
[twentytwenty]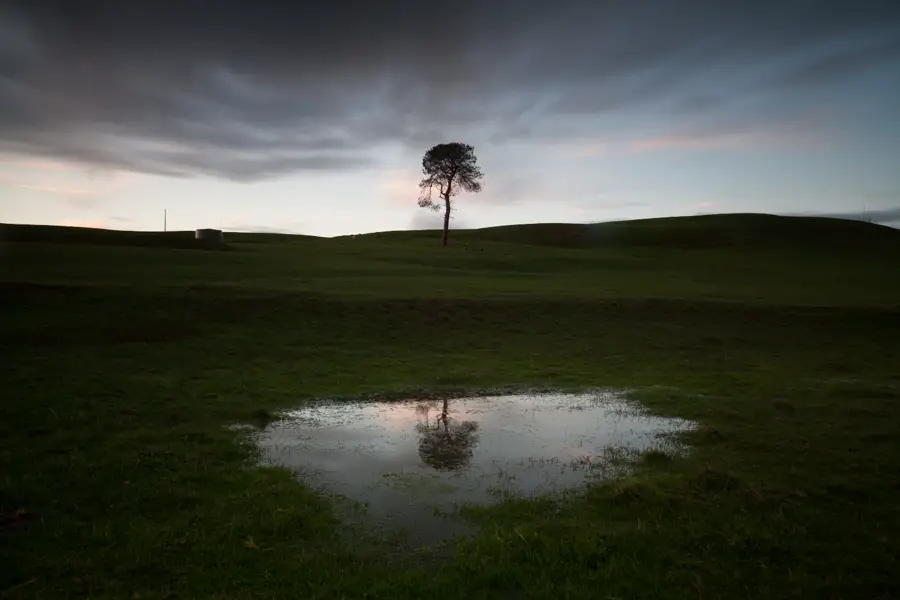
 [/twentytwenty]
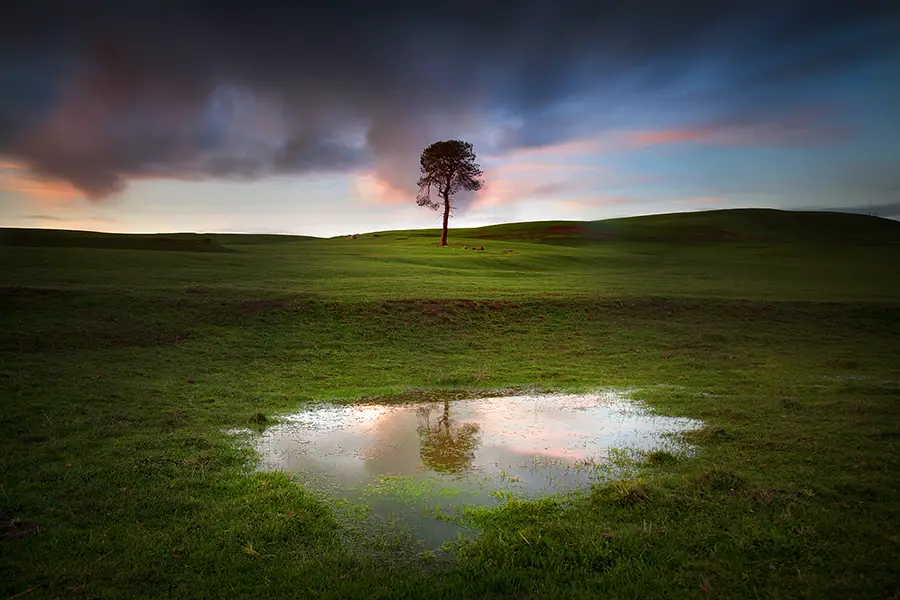
Recently I posted this image on [ilink url=”http://www.reddit.com/r/EarthPorn/comments/2epv5r/lone_tree_on_sunset_in_mansfield_victoria_by_alex/”]Reddit[/ilink] and received some great exposure. Amidst the exposure, some people were calling that the sub-reddit had degenerated into nothing more than heavily Photoshopped images that didn’t depict how the scene accurately looked. As part of my [ilink url=”http://www.alexwisephotography.net/blog/category/technique/before-and-after-technique/”]Before and After Series[/ilink] I’d like to look at how this image from [ilink url=”http://www.alexwisephotography.net/blog/2014/06/24/exploring-country-victoria-mansfield-and-abroad/”]Mansfield, Victoria[/ilink] was captured and processed.
The Evolution of the Dark Room
When reading comments comments about photographs that don’t resemble a scene whether it’s directed at me or others, I question whether there is a level of ignorance surrounding post processing. Let’s not forget that Ansel Adams was a pioneer in the use of dodge and burning and other darkroom techniques as discussed in interesting detail with comparative pictures by [ilink url=”http://whitherthebook.wordpress.com/2013/02/27/ansel-adams-and-photography-before-photoshop/”]Jack Dziamba[/ilink]. I would argue that if Ansel Adams was alive today, he would be using Photoshop as his digital dark room and pushing the envelope by using its features to process his images. Not only was Adams a pioneer in developing darkroom techniques but his involvement in the now famous, f/64 group, were also pioneers in exploring darkroom techniques which are now imitated in the digital equivalent – Photoshop. Regardless of time, photographers will always be looking to explore and push the envelope with photography and to me, that is the joy in Photography. We’re always constantly learning and developing. It’s definitely what keeps me hooked.
My Shooting Process
Before I even press the trigger on a my camera shutter, I am not only correcting the camera as much as I can (i.e. setting it to the settings that I desire, straightening the horizon, etc) but also considering how I will process the image whether this be adding a duo tone or using the dodge/burn tool to highlight particular parts of the image. I don’t simply take a photo, look at my LCD and think “ah well, I’ll fix it up in Photoshop”. Instead I capture an image on the camera that forms part of ‘my vision’ for the whole photograph. For this reason, you may find notice my before photographs in this [ilink url=”http://www.alexwisephotography.net/blog/category/technique/before-and-after-technique/”]Before and After Series[/ilink] are often captured quite flat. Shooting in RAW mode, your images will appear somewhat flat regardless however often I will aim to shoot my image without any harsh highlights which often means shooting slightly under exposed. Modern digital camera’s have come a long way however pulling detail from highlights is a lot more difficult than pulling detail from blown highlights. For this reason, I will often expose just before I start to lose my highlights. For example, if the highlights are starting to blow at 5″ seconds, I will reduce to a shorter exposure of 2.5″ seconds. But enough ramble… Let’s look at how this photo from Mansfield was captured and post processed.
Capturing the Photo
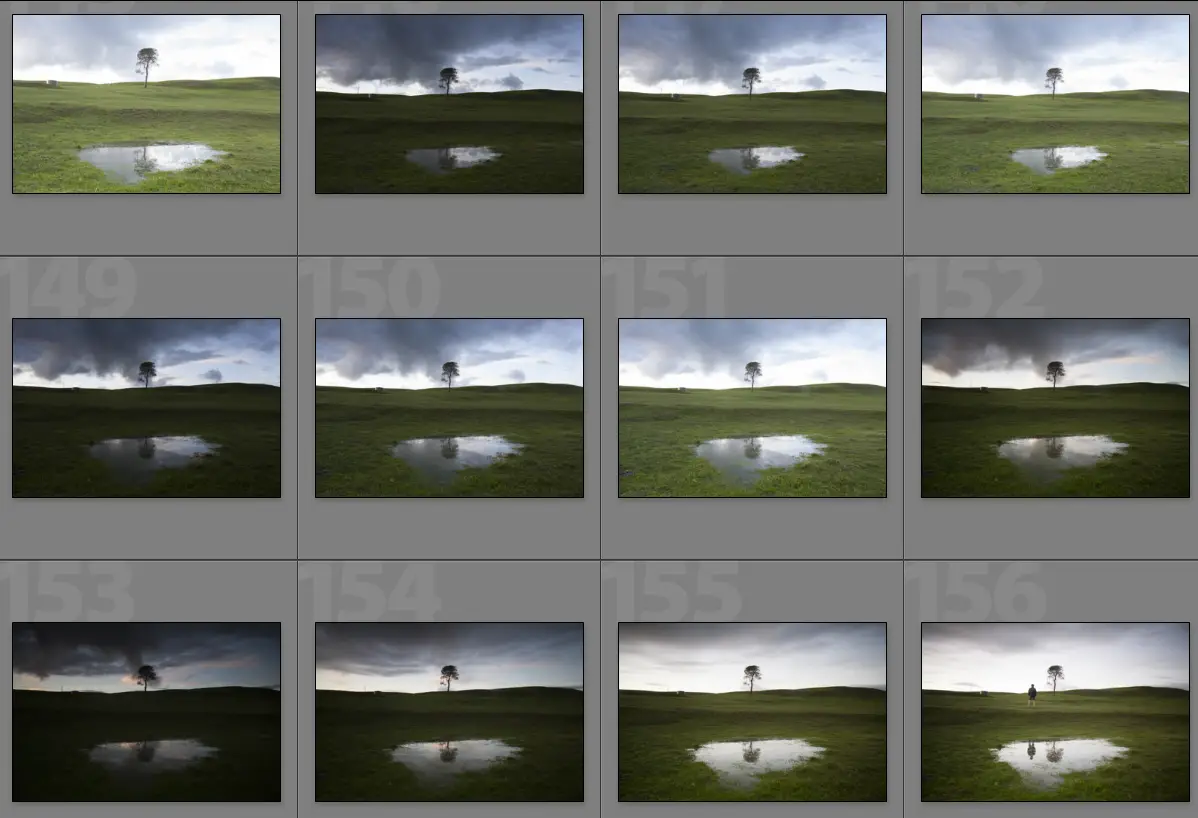
This photograph was taken while staying on a remote rural property in June 2014. We stayed in a farm house on an actual farm filled with livestock. It was an amazing experience and something I’ll never forget. Upon arriving home from photographing the [ilink url=”http://www.alexwisephotography.net/blog/2014/06/24/exploring-country-victoria-mansfield-and-abroad/”]Howqua Valley[/ilink] the sun was just starting to set and without much time to drive far, I decided to take a walk around the farm in the hope of finding a composition to capture the sunset. Luckily I came across this tree and decided to setup my tripod and camera gear while having a walk around to try find a good angle. As I was setting up cows were walking across the crest of the hill, I worried for a second that they may take a seat and call it home for the night but fortunately they kept moving. On this evening, there was quite a bit of breeze about which in turn was bringing through clouds at a rapid pace which I wanted to capture through a long exposure. The clouds weren’t moving as quite as much as I would have liked so I captured multiple long exposures with the intention of layer blending them in Photoshop. However through taking a long exposure, this ran the risk of also blurring the grass and puddle reflections. For this reason I also took some shorter length exposures in case the long exposures left the scene unsharp.
Processing the Images
The location was lacking for stand out compositions so I decided to take a chance and just take this one composition of the sunset of the tree reflecting in the background. Once I setup my camera, I took a few photos over the sunset which included:
- Long exposures – The idea was to capture the moving clouds but unfortunately they weren’t moving as fast as I would have liked so to capture them properly before the sun went down, I captured multiple exposures with the intention of combinging them through using layer masks in Photoshop;
- Short exposure – Shooting 3-5 minute long exposures with a slight breeze ran the risk of blurring the grass and puddles. I captured a shorter exposure in case I got home and these elements were blurry from the long exposure. By having this image I could easily layer mask the short exposure into the image and retain the sharpness of the image and;
- Self portrait – Can I just say, putting the camera into a one minute self timer and sprinting (and perhaps awkwardly tripping) makes you look like a complete fool to anyone nearby watching? Fortunately no one was around nor do I really care but I’m sure if someone saw they would have been slightly bemused. This image never eventuated but was just an idea for something different in case the tree didn’t work on its own.
[box type=”info” size=”large” style=”rounded”]Layer what? Check out a previous blog post that discusses how to use layer masks[/box]
Generally I’ll tend to make most of my adjustments in Lightroom but obviously when you are doing some layer masking Photoshop is required. Once I identified what images I would be using (a mix of long exposures and a short exposure), I exported the images from Lightroom without much change and began editing them with the following process:
- Opened my short exposure in Photoshop to use as the base layer
- Imported the longer exposures and added them as layers to this image
- Slowly introduced the clouds one shot at a time by using layer masks
- Once the clouds were introduced to the shot and I was happy, I wanted to go a bit experimental with the vignette and colour grading for the image. This resulted in a lot of selective curves and saturation masks making minor changes to the different channels of the image. For the most part, this was just playing around until I was happy with the end result but the intention was to focus on the tree and reflections and slowly fade off to a vignette using dodge and burning
- Added a ProContrast layer from the [ilink url=”https://www.google.com/nikcollection/”]Nik Collection[/ilink] and juggled the opacity until it was at an acceptable level
- Save image (this will form my master copy for printing)
- Resize image for web (900px at the longest edge)
- Added a unsharp (USM) layer to sharpen only the tree and grass of the shot. The idea here was to keep the sky looking as soft as possible while trying to boost the sharpness of the rest of the image. I do this quite often for my images however be mindful not to do over do this as having one part of your image with strong sharpness and the rest looking unsharp can look quite odd if you’re not careful
- Save web image
Apologies if the process sounds a bit vague but for the most part, dropping and the different clouds exposures was the easy part. It was experimenting with different colour styles and dodge/burning where I dabbled and experimented with different looks until I ended up with something I was happy with.

Thanks for reading. If you have any questions about the processing of this image be sure to leave a comment or drop me an email as I’d be happy to help!
– Alex

Nice work Alex. And thanks for the PP workflow info. Very informative and good of you to share. Cheers – JK
Thanks John! Appreciate the comment and for stopping by, We really need to organise a shoot soon. I’m pretty free over the next few Sunday’s so did you want to try tee something up? Would be very keen! 🙂
Very nice, but the reflected area is substantially brighter than the original patch of sky, which isn’t possible, especially with the bright tree foliage which should be in complete silhouette. Consequently the brighter reflection becomes the focal point instead of the intended focal point; the tree. As a result the image is unbalanced and looks manipulated.
Reflections are tricky to get right but the first rule is that they should never be brighter, contrastier, or sharper than the original area. Try reducing the brightness of the reflection to slightly less than the original area for a more realistic look.
Cheers,
AM
Hi there,
Really appreciate your constructive criticism regarding this photo. I must admit, the processing on the photo was quite experimental for me so it’s good to hear where the processing might be a bit off and could be improved. Will definitely take your comments into account when I go to play with it.
Thanks again,
– Alex