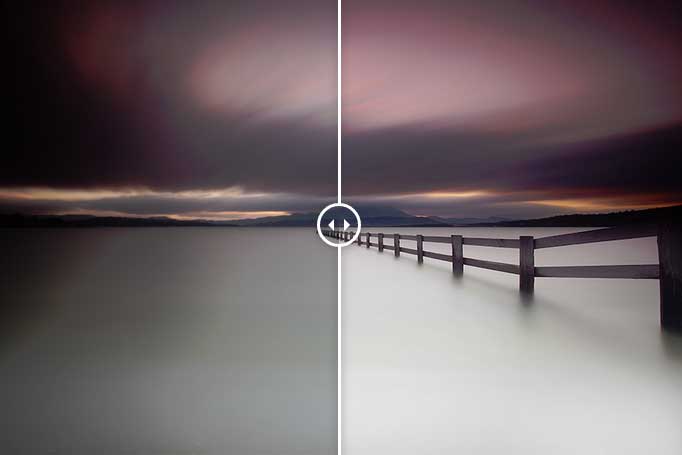
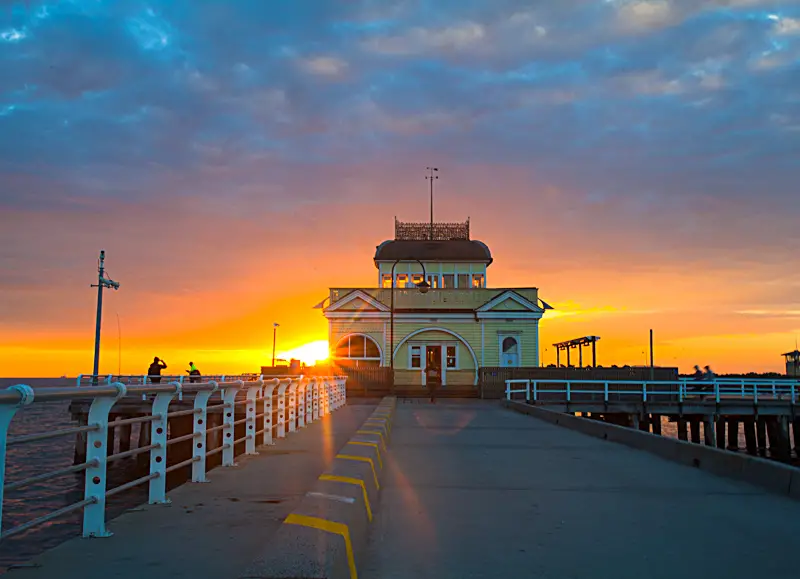
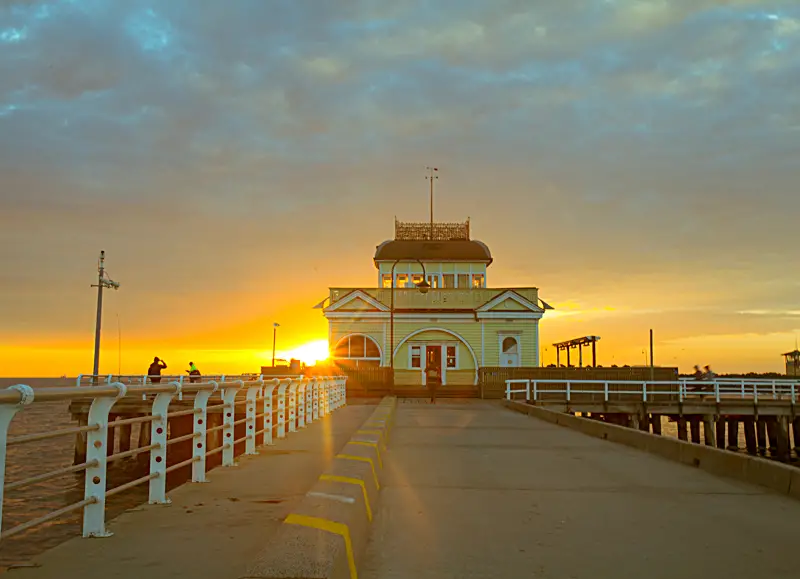
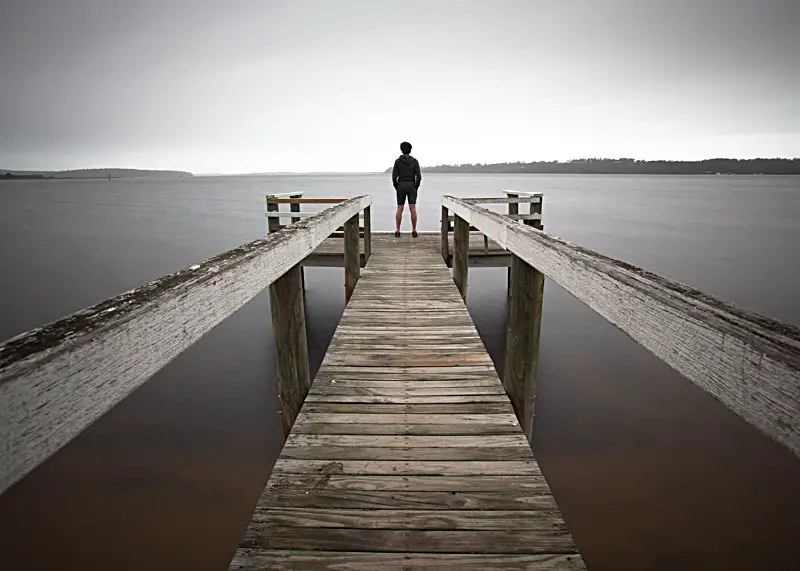
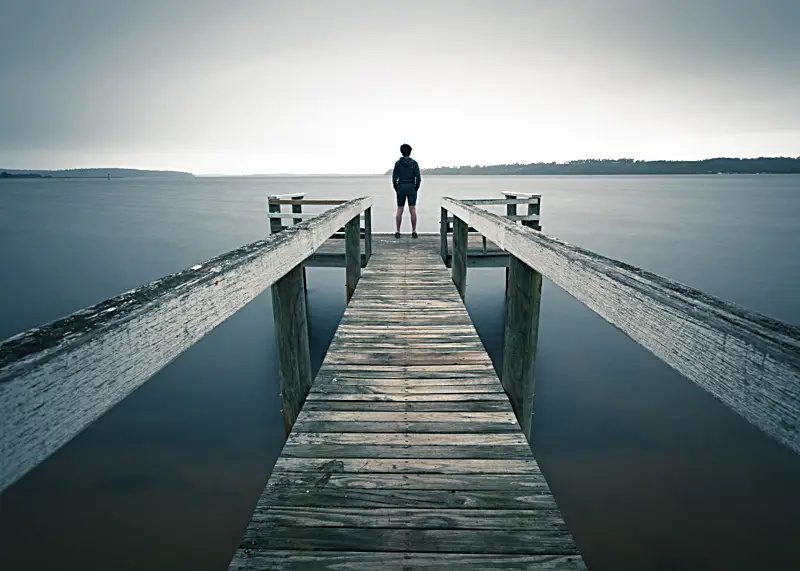
Posted on 4 Comments

Before and After – Warburton Cement Creek

[twentytwenty]

[/twentytwenty]

Last Thursday I spent the morning watching the weather forecast as a heavy pattern of rain made its way over Victoria and tried to find somewhere new to take photos. I can’t say I’ve ever gone and chased waterfalls during summer on a 35 degree day but I am so glad I did! I eventually decided to take a drive to Warburton and explore the area around East Warburton which is home to Warburton Creek and the beautiful redwood forest which I’ll look to share in a future post. 

Walking around Warburton Creek was stunning even if I did take the wrong turn and walk the wrong way for 30 minutes or so in the scorching heat. Boy was it hot! But with that said, I eventually found some stunning little streams in Warburton to photograph and I was suddenly like a kid on Christmas day. It was the most refreshing feeling standing knee deep in water on a boiling Melbourne day. I just regret not taking some swimmers! 

Without realising I was suddenly caught in the heavy showers I’d been watching in the weather forecasts in the days leading up. The rain was almost torrential at times which led to flash flooding in the area and difficult photography conditions. Unfortunately I didn’t get much of a chance to fire off many photos as the lens would quickly be saturated whenever I aimed in any direction.

Water droplets blurring parts of my image

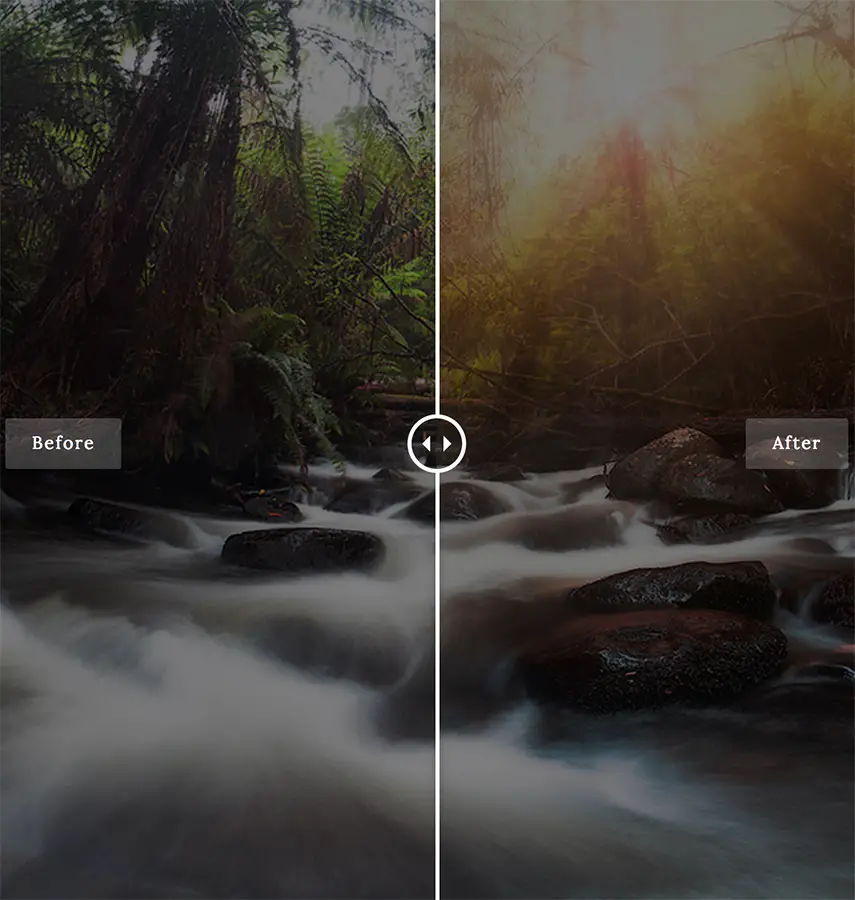
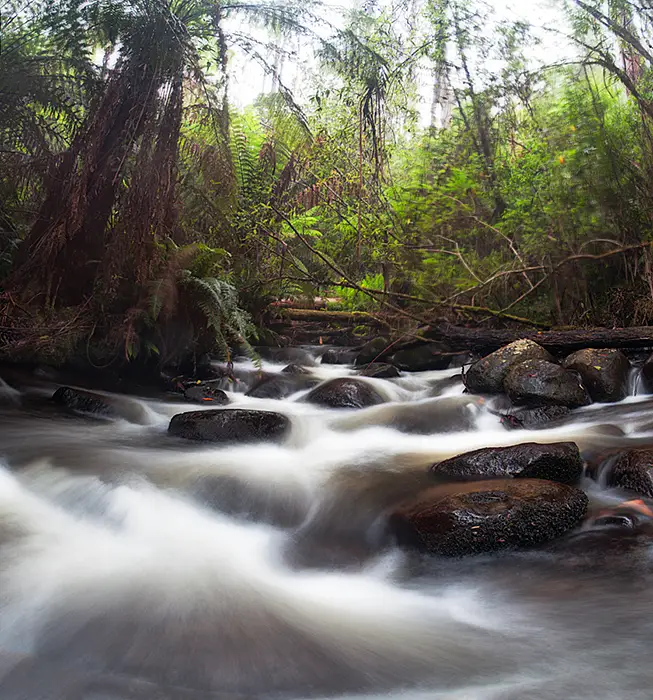
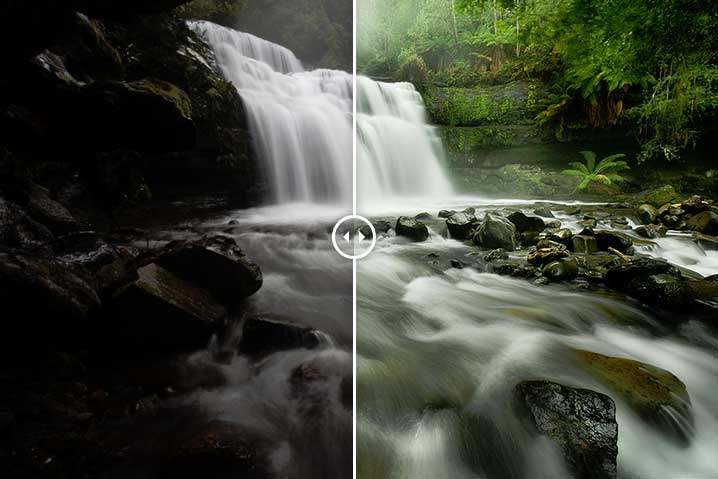
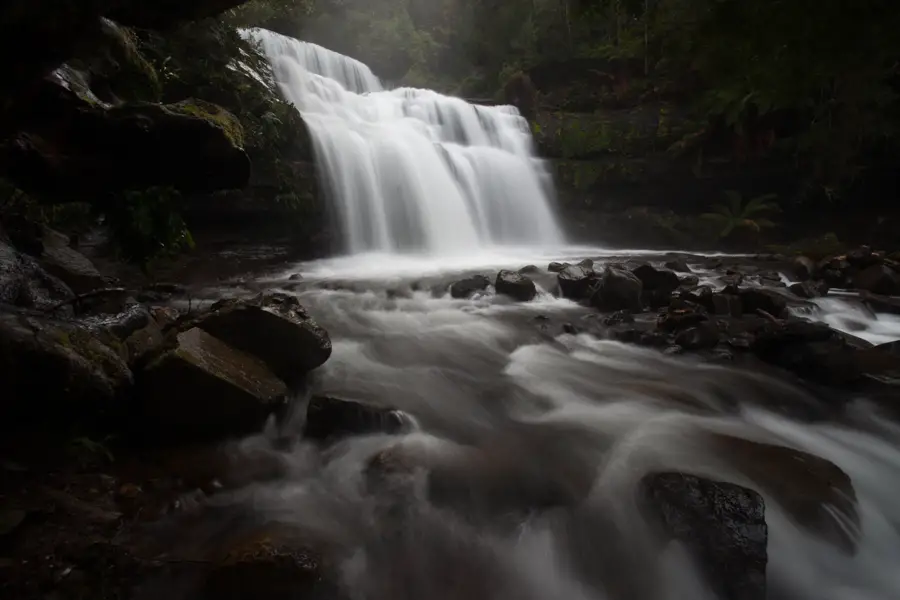
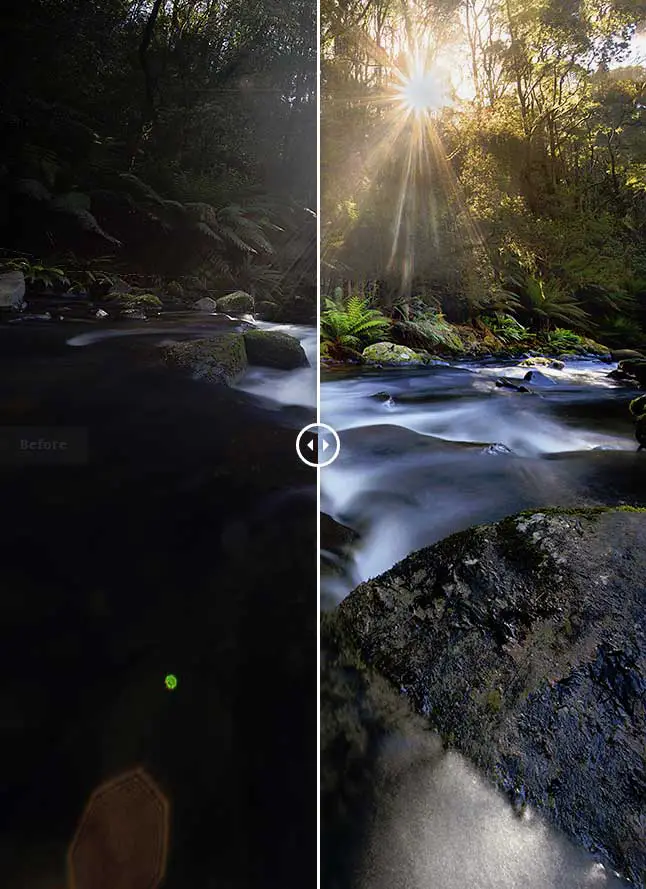
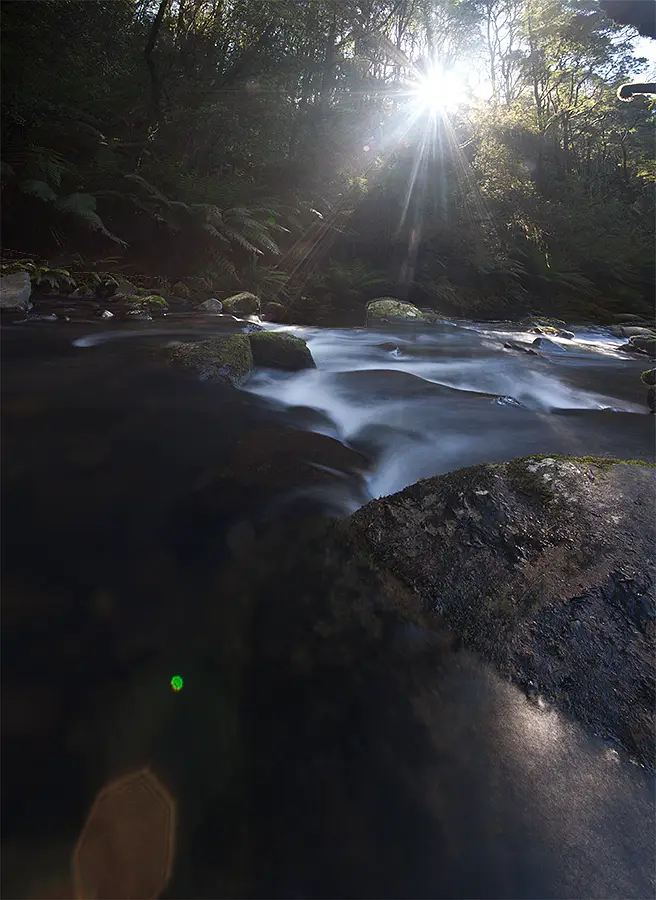
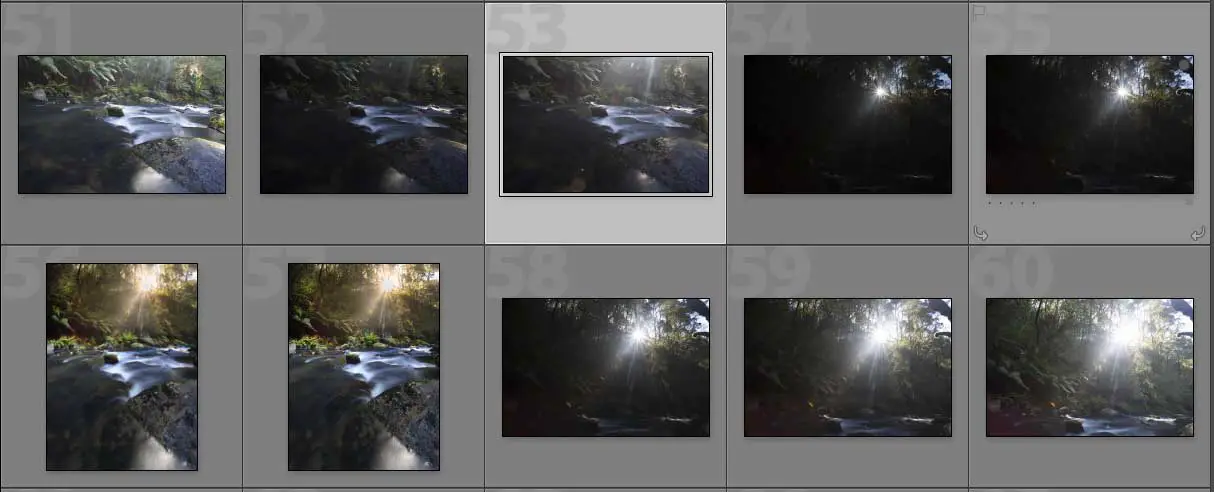
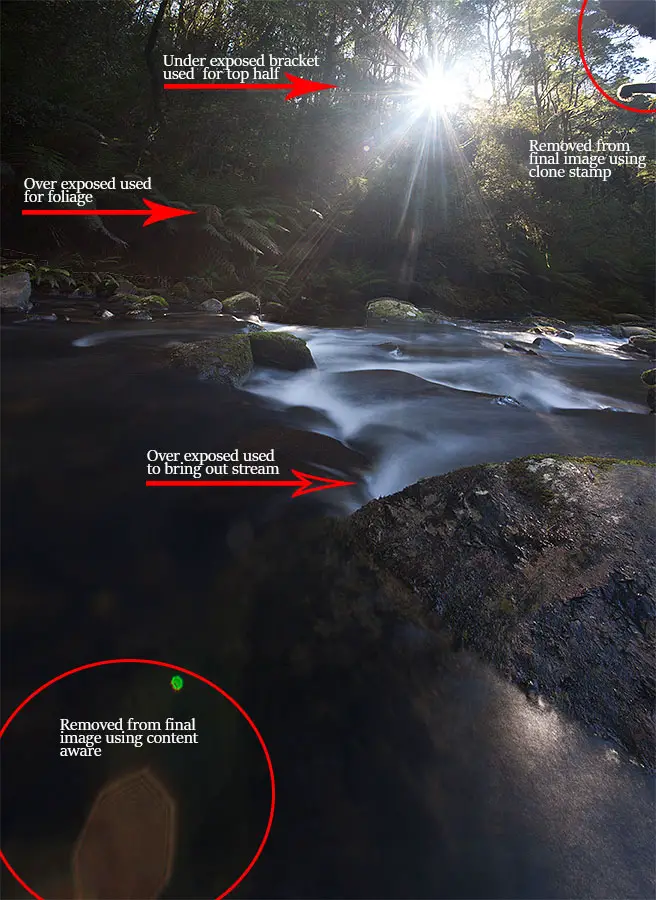
With the severe weather conditions, this is what led me to photograph and process the image how I have. The plan was to take 3 images to create a vertical panorama which sort of worked. I luckily managed to get a photo off of the bottom half of the scene without any water droplets on the lens but as I slowly moved my camera upwards, a few water droplets made their way onto the camera lens. Easily avoidable if you actually stop to check your lens between shots. Oops!

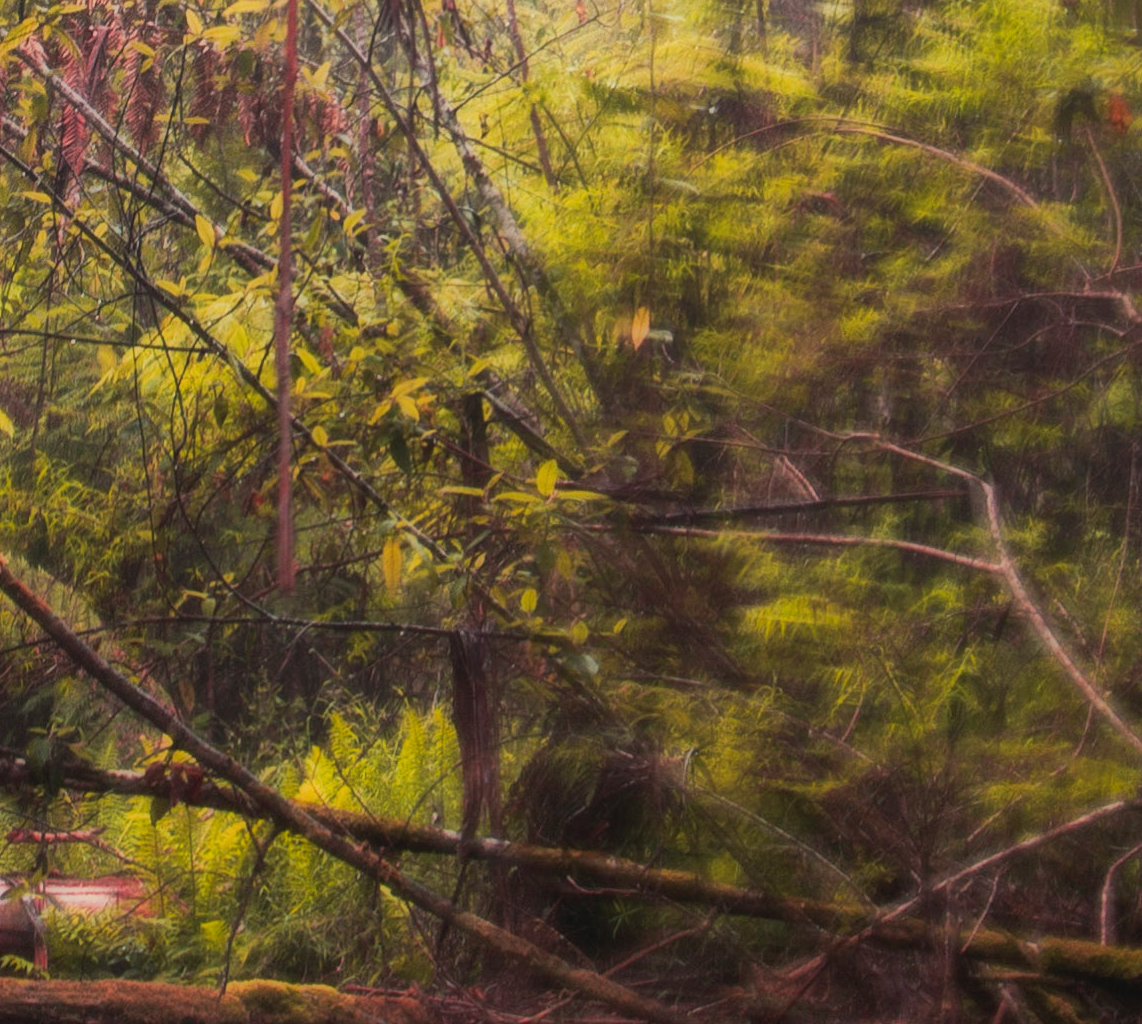
Getting water drops on your lens isn’t the end of the world and just leads to some blur to parts of your image. In trying to hide the water drops, I looked to create a light burst effect through the trees. It was very much an experiment of a new technique that I’d picked up off a Phlearn video and I’d love to hear your feedback. Is it too much? Doesn’t float your boat? Let me know!


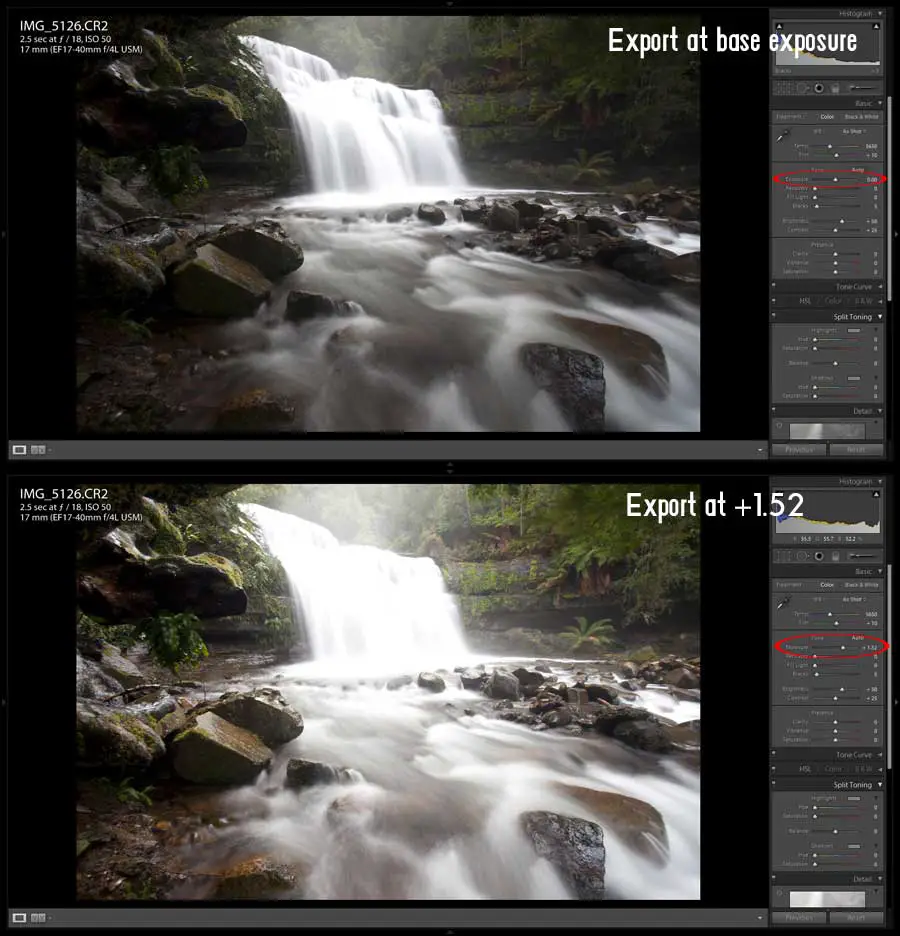
To give you more understanding to how this image was post processed I’ve put together this small clip. Hopefully it doesn’t bore you senseless but gives you more of an understanding to how the radial blur and layer masks were applied to the image.  The key post processing made to the image include:

  • Stitching the three images in Photoshop – Quite self explanatory and more comes down to personal preference. I feel that once upon a time 3rd party tools like Ptgui owned the panorama space but now days Lightroom and Photoshop provide great offerings. I used Photoshop to stitch the three images.
  • Removal of distortion and levelling – Shooting with a Canon 17-40 at 17mm on a full frame body leads to some distortion being introduced to the image. I pulled this back by using the lens correction tool.
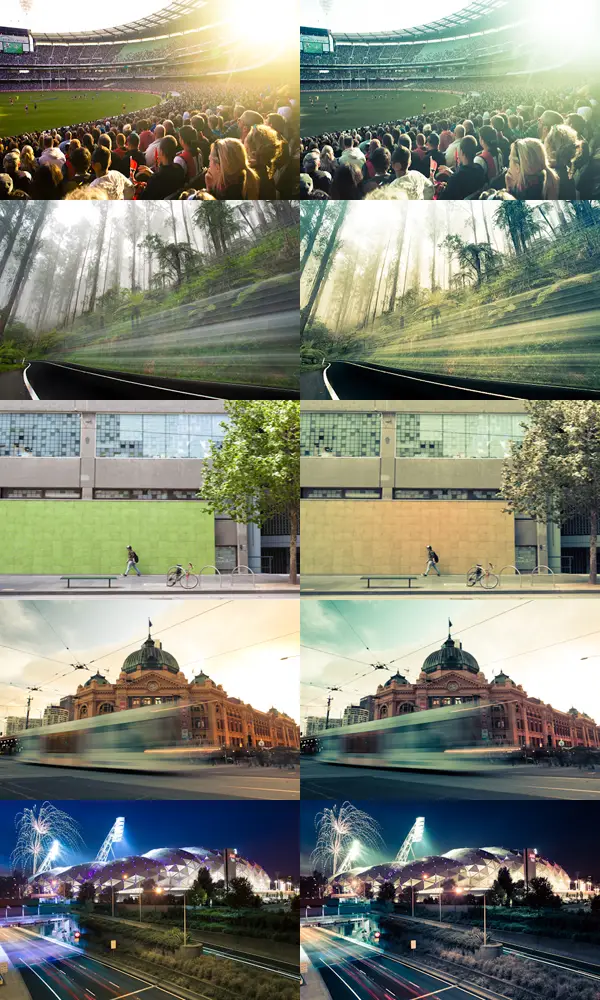
  • Creating light bursts – This is a mix of using the radial blur tool set to Zoom, quality set to Best and the amount set to 100. By using layer masks, I create a black layer masks (effectively disabling the radial blur) and then started to slowly re-introduce the radial blur (or light bursts) into the frame by painting over the image with the white brush. The key here was to try make the bursts look natural and coming through the trees. Once this was applied, I then looked to apply a light burst technique by Phlearn which added a nice finishing touch.
  • Lens flare – Wow, I haven’t touched this since I picked up Photoshop CS2 many, many years ago and was making crappy logos for my Geocities website. The intent of using the lens flare tool was to create a sense that a warm light was coming through the trees. I applied a warm photo filter over the lens flare to give a golden hour light feel to the image.
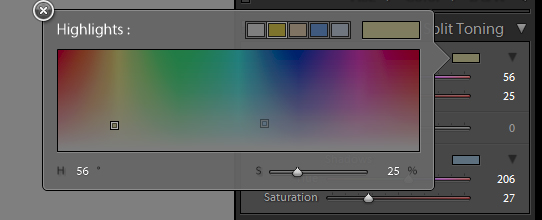
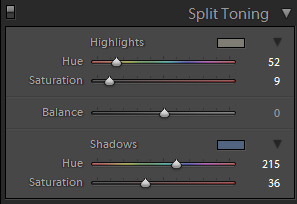
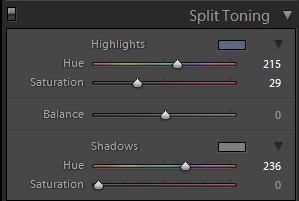
  • Luminosity masks – I used to be a sceptic about luminosity masks thinking they would slow my walk flow down and were people who didn’t know how to post process their images (oh how wrong I was on both fronts). Luminosity masks have been around for years and there are some great tutorials by Sean Bagshaw who explains the technique in more detail. In short though, luminosity masks allow you to make very selective changes to your darks, mids and highlights of an image. For this image, I used luminosity masks to make curves, photo filter saturation changes to small parts of the image. I love the granular control that luminosity masks give you over an image. I’m so glad I spent the time to watch Sean’s video’s and would recommend for anyone looking to further grow their post processing skills.

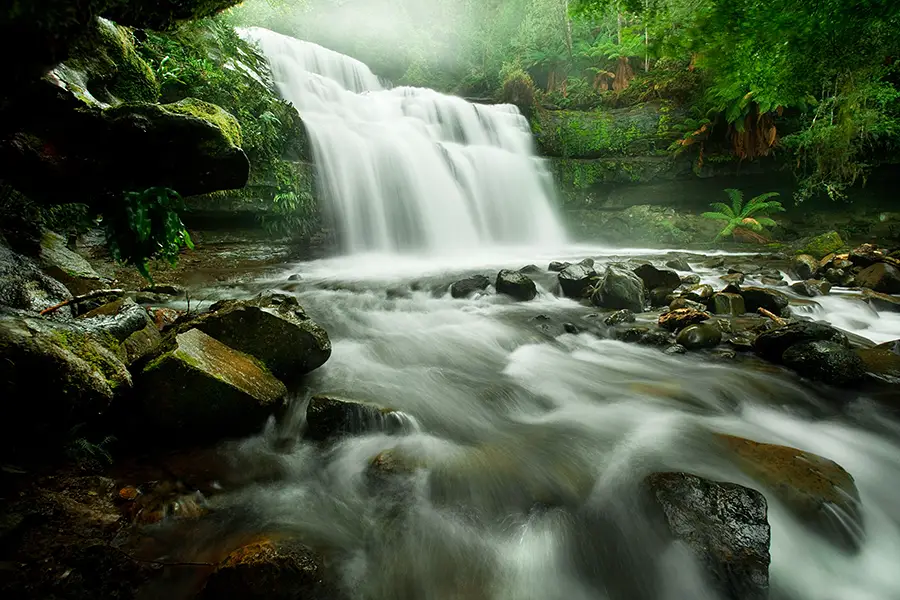
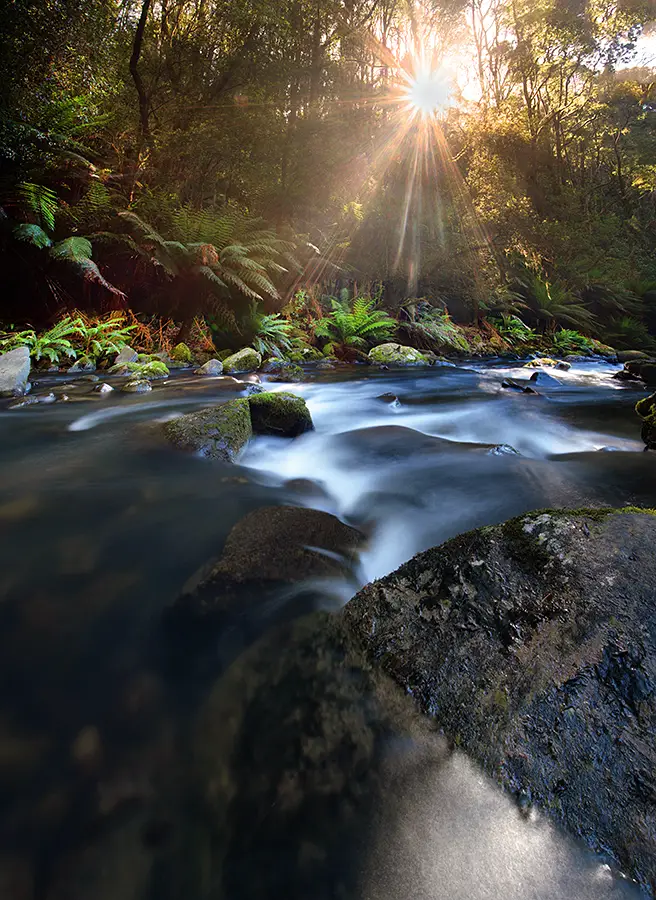
With fiddling back and forward I eventually ended up with the below image – 

Warburton Cement Creek

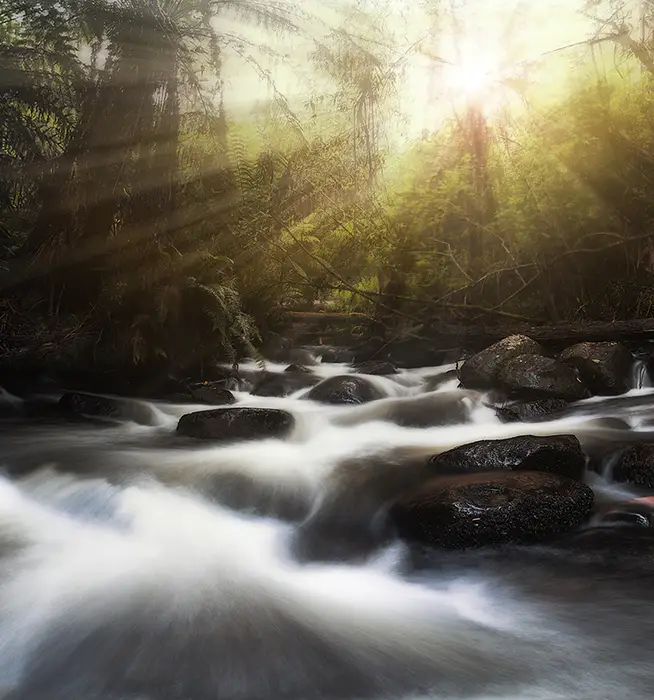
Should you have any feedback on how the image was processed or questions feel free to reach out as I’d love to hear from you. The post processing for this image might not be for everyone’s tastes and was more an experimental edit for me so I’d love to hear your feedback.

Thanks for reading (and hopefully watching),

Alex


Posted on 4 Comments

Before and After – Liffey Falls

[twentytwenty]

Liffey Falls Before

Liffey Falls After[/twentytwenty]

As a photographer, we all have one or two images that are personal favourites. For me, this is mine. It’s a photo captured at Liffey Falls, Tasmania on a wet and wintery day.

Generally personal favourites for me are images that have back stories that make them what they are.  Before taking this photograph I had spent 4 days driving around the Tasmanian West Coast in constant torrential rain without much opportunity to get the photos I’d hoped for. Sure it was beautiful walking along those empty beaches in the pouring rain and exploring the quiet towns of the West Coast but at the same time disappointing not to be able to photograph it in all its glory. Feeling a bit tired and over it all, I decided to make a last ditch attempt for some photos at Liffey Falls even if it was pouring with rain.

Taking the Photograph

The rain over the trip seemed relentless and upon arriving it was still constant even through the towering trees. Luckily for this photo I managed to find a nice little spot underneath a large rock slightly covered from the downpour. Being close to the waterfall created its own challenges with water from the waterfall creating a constant spray over my lens. I couldn’t escape the rain! But eventually after taking a photo, wiping the lens and repeating, I eventually got something without water spray all over the image. It was nice walking away from driving around 1200km over 4 days to walk away with one image I was happy with. Regardless thoughI would have probably been happy with nothing. Exploring the Tasmanian West Coast is a joy in itself. Such a beautiful part of the world. In case you’re interested, photos from this trip to the Tasmanian West Coast can be found in a previous post.

The image was captured with a Canon 5D Mark II, Canon 17-40, manfrotto tripod and Hoya Circular Polariser with a 1 second exposure at f/18. Generally I’ll try to shoot a waterfall for a little longer but due to the constant spray from the waterfall I had to settle with a shorter exposure to get a photo without spray all over the lens.

[box]Interested to learn more about photographing waterfalls? Read my how to on photographing waterfalls here[/box]

Post Processing the Photograph

With the amount of spray coming off the waterfall it made the shoot quite the shoot and dash affair. With this in mind, I deliberately shot the image a little under exposed with the intention of pulling back detail in post. Generally shooting slightly under exposed is a good rule of thumb as it offers you a lot of flexibility in post as you are able to recover detail. Shooting over exposed and trying to recover detail is another story and not generally recommended.

Blending two exposures

With the image shot under exposed, I went about loading the image into Lightroom and exporting two images from the RAW. One at the normal exposure that the photo was shot at and another over exposed at +1.52.

The two images used for blending in Photoshop. One at a neutral exposure and another 1.52 stops over exposed
The two images used for blending in Photoshop. One at a neutral exposure and another +1.52 stops over exposed

The intention here was to use the over exposed image (+1.52) to bring out detail in areas that were quite dark in the original exposure in particular the foliage areas around the waterfall. Combining parts of the over exposed/second image was through the use of layer masks. I’ve written about the layer mask technique previously and funnily enough, the example image in the post is this photo from Liffey Falls so I’ll let that post do the talking.

Colour Correcting

The end result of blending the two images was recovering detail around the waterfall that was otherwise lost in the normal exposure. With the foliage recovered, I then went about making shifts to the red, green and blue colour channels via the curves tool.

In case you’re not familiar with the Curves tool, this gives you the ability to make adjustments to the shadows, midtones and highlights of an image. But for those seeking more control, you can select either the Red, Green or Blue channels and specifically just adjust the shadows of that channel of an image. It’s generally my go to when editing an image in terms of colour correction and changes to the dynamic range of an image.  For a quick look into the clip be sure to give this little clip about Photoshop Curves I put together. Not too sure what I was thinking in terms of song choice that day…

I wanted to give the foliage a boost to appear more green and vibrant. Using the curves tool, I made some aggressive changes to the green channel and used layer masks to restrict the changes to the foliage area of the image. This was to avoid introducing a strong green colour cast over the water in the image. With the change to the foliage done, I then went about making some subtle changes to the hue and saturation of the water.

Faking a bit of fog…

So this is where I’m potentially going to lose you… I thought when editing the image “Wow, how great would some fog look at the top of the waterfall? There was a little bit of fog from the rain and low hanging cloud but I must be honest – nothing to the effect as seen in the photograph.Ok so hopefully you’re still with me and I haven’t lost you after coming clean about the fog 😉 But in faking the fog it was actually super easy. Using the dodge brush, I used a mixture of dodging the highlights and midtones around the top of the waterfall gradually introducing it to give this effect.

Final Touches

With the image in a state that I was happy with I went about adding the final touches of selectively sharpening parts of the image using layer masks and some dodge/burning to parts of the image. This was the finished product.

Liffey Falls After

As always, feel free to send an email or leave a comment if you have any questions or feedback.

Don’t forget to give my Facebook Page a like to keep up to date with future posts from my blog or even give this post a like if you’re feeling generous 😉

[fblike style=”standard” showfaces=”false” width=”450″ verb=”like” font=”arial”]

Thanks for reading,

– Alex

Posted on 2 Comments

Before and After – Sunlight at Hopetoun Falls

This is an entry for my [ilink url=”http://www.alexwisephotography.net/blog/category/technique/before-and-after-technique/” style=”note”]Before and After series of photographs[/ilink] where I share how I captured and post processed an image. This particular image is from Hopetoun Falls looking back down river of the water that runs off from the main fall. Hopetoun Falls forms part of the Otways Ranges and is a beautiful part of the world. If you’d like to see more photos from this trip be sure to check out my [ilink url=”http://www.alexwisephotography.net/blog/2013/12/08/weekend-trip-down-the-great-ocean-road/” style=”note”]post from the Great Ocean Road[/ilink] which includes this among many.

[twentytwenty]
Sunlight at Hopetoun Falls Before
Sunlight at Hopetoun Falls After
[/twentytwenty]

Capturing and Editing Sunlight at Hopetoun Falls

This is one of those photographs that as a photographer, we view it through our eyes and then when we try to capture it in camera it’s incredibly difficult to replicate what our eye is seeing. On this particular day we had shot the waterfall most of the day under overcast conditions (perfect for photographing waterfalls). Later during our time at Hopetoun Falls, the cloud started to clear and the sun began to shine stunningly through the trees. Rather than pack up my gear like I normally would when the sun starts shining harshly at a waterfall I wanted to try pull off a shot of the sun bursting through the trees.

Taking the Photo

Bracketed images that would be later stitched and combined in Photoshop

Framing the photo straight away I knew if I wanted to get both the stream and sun bursting through the trees in shot I would have to take two photos and stitch them together. Even though I was shooting with a Canon 17-40 it still wasn’t wide enough to fit in the one shot so a two image stitch would be the go. Shooting the images I’m using my Canon 5D Mark II, Canon 17-40, Hoya Circular Polariser and Manfrotto tripod.

I also knew that trying to capture the dynamic range properly in one shot for each stitch was going to be very difficult. Not one to normally use the auto bracketing exposure (AEB) feature on my camera, I opted to take 3 exposures of the top half of the stitch and another 3 for the bottom part of the stitch which resulted in a slight mess of images in my Lightroom catalogue.

In case you’re not familiar with the AEB feature I wrote [ilink url=”http://www.alexwisephotography.net/blog/2013/01/12/automatic-exposure-bracketing-aeb-explained/”]article about Auto Exposure Bracketing[/ilink] a while ago now which explains the feature a little more. I took the multiple exposures as it provided me with some insurance that if I didn’t get it right with the neutral exposure I would also have the under and over exposed images to play with.

Combining and Editing the Photos

When it comes to exposure blending my level of competency is around average so the idea of combining this with a two image stitch was a recipe for disaster. I processed the images from the trip and let the images for this one sit for a while. Normally when I shoot, I like to process my images within 24 hours of taking them. I hate the feeling of sitting on unedited images and like to get them processed, not necessarily to post online but just to have them processed according to how I remembered the scene. For this one, I was actually too intimidated by the prospect ahead and knew I was in for some fun in Photoshop.

It wasn’t until a weekend a few weeks later that I finally decided to give combining and editing the images a crack.

Combining The Photos

Having used auto exposure bracketing to capture an under, neutral and over exposed image for both the top and bottom parts of the frame, I went about creating two image stitches for each bracket.

By this I mean, I created a two image stitch of the two over exposed images, again for the neutrally exposed images and another for the under exposed images. This resulted in 3 separate stitched images consisting of 1 over exposed stitch, 1 neutral exposed stitch and 1 under exposed stitch.

When stitching images, most people tend to recommend various different pieces of software like PTGui but I’ve had quite good luck with the Photoshop stitch tool. This can be found under File > Automate > Photomerge.

Editing the Photos

[box type=”info”]Haven’t blended images in Photoshop before? Read my Photoshop image blending tutorial to get started[/box]

Edits made to the stitched image

Now that I had these 3 separate image stitches of each exposure, I went about opening the neutral image in Photoshop and layering the over and under exposed images as layers on top. The over exposed image would be used to bring out the dynamic range in the foliage surrounding the waterfall and the waterfall itself while the under exposed layer would be used to capture the sun bursting through the trees. Luckily, it wasn’t as hard as I originally thought but just required a lot of low opacity layer masking to subtly bring out areas of a layer. The hardest part was blending the sun into the shot which required me to use a combination of the brush tool and gradient masks to ever subtly drop it back in without it looking uneven to the rest of the scene.

I’ve attached a screenshot to the right which highlights the different parts of the image where layer masks from the 3 images were used. Call me lazy but I’ve become a fan of the [ilink url=”http://tv.adobe.com/watch/learn-photoshop-cc/using-contentaware-fill-to-remove-distractions/”]Adobe Photoshop Content Aware Tool[/ilink]  which for the most part works perfectly. Generally if this doesn’t work I’ll revert back to the [ilink url=”https://www.youtube.com/watch?v=MY023ZQJy0M”]Adobe Clone Stamp Tool[/ilink] to remove unwanted distractions like the branch in the corner and lens flare at the bottom of the stream.

Once all the images were blended in, I then went about making selective adjustments to the saturation and individual colour channels to colour grade parts of the image. I’m fond of using layer masks for saturation changes as it allows you to increase or decrease the saturation or change the hue of a particular area in the image without affecting the overall photo.  For this image, I used selective saturation and hue adjustments to both the water and foliage areas.

Finally some cropping was applied to the image and a warming filter was applied to add some warmth to the sunburst coming through the trees. With this I used a layer mask to ensure changes with the warming filter were only limited to the sunburst and not the rest of the image.

And that’s that. Something I learnt from this photo was that sometimes it’s okay to sit on an image and procrastinate about it rather than process it immediately. Sometimes I should probably do a bit more often.

Thanks for reading and I hope this was helpful,

– Alex

Posted on

Before and After – Mortimer Bay

Over the coming months I’d like to share with you some before and after images of shots I’ve taken over the years. I’m a firm believer that there needs to be transparency in photography and the days of photographers hiding away secrets is done. Sorry to the old guard and old rules (oh yeah I just quoted Jay-Z in a post).  Sure, there’s some aspects of photography that can’t be taught but I for one enjoy a behind the scenes look of how other photographers work. It’s both beneficial to people starting out and people who have been shooting for sometime. I shoot quite a bit with various people and find even though we’re shooting the same thing and processing quite similarly, there’s always subtle differences and it’s that what I hope to capture in my posts.

Through these before and after images, you will sometimes find that there is a dramatic change between the straight out of camera image and the final image you see on my website.  While in others there may be minimal difference. For me, this is highlighting that we aren’t always fortunate to get great light while in other cases we are fortunate for the get great light and walk away with great photos in camera.

I’d like to use this as an opportunity to demonstrate how the image looked prior to my processing and briefly explain the processing techniques I used to achieve the final image. In some cases, the final image won’t be to everyone’s tastes and I fully accept and welcome that so feel free to chime in if you have any criticism of how you may have gone about things differently.

Continue reading Before and After – Mortimer Bay

Posted on 2 Comments

Exploring the Lightroom Split Toning Feature

IMG_2986

Split toning has become quite popular thanks to Adobe Lightroom making it easy for photographers to experiment and add duo-tone  sepia and film effects to their photographs. But split toning isn’t anything new and actually dates back to the late 1800’s. The technique was used by photographers including Ansel Adams to add a colour to either the highlights or shadows to a black and white photograph (as they were at the time). Ansel would occasionally add a very subtle purple to the shadows of his stunning photographs.

Since the days of Ansel Adams using split toning  the technique has evolved and we now use it slightly different to in the past. That’s not to say it can’t still be used like it traditionally was but as photography has evolved as have the way techniques are used. Photographers are now using split toning on the shadows and highlights of their images to recreate film effects like cross processing or adding a duo-tone like effect to their image. It’s a feature of Lightroom that I love to tinker with when editing my photographs and I’d been meaning to write a blog post about it for sometime now after making a YouTube tutorial on split toning last year.

What is split toning and how does it work?

Basically split toning involves adding a colour to either the shadows or highlights part of an image. One favourite of mine is adding a yellow to the highlights to give the image a warm feel. While other times I like to add a blue to the shadows to give the image a cold feel.  If you’re going for a warm or cold look to your image this can sometimes be achieved by adjusting the temperature of the image. Personally, I prefer the control which split toning provides but you can also adjust the temperature for a similar effect

For photographers using Lightroom the split toning feature can be accessed by opening the Develop tab and located fifth menu down from the right.  Once open you will be presented with two different options: Highlights and Shadows. Start by selecting the little box that appears next to Highlights and select the blue box (see below). Now do the same for the Shadows but this time select the yellow looking box.

Selecting a colour to split tone the highlights


From this point I start to gradually change the hues of both the Highlights and Shadows, adjust the saturation of both and slightly play with the balance until at a level I’m happy with. There’s no perfect formula that will work all the time for images so I find the best thing to do is to play until you get the results you desire. If this isn’t making much sense then give my video split toning tutorial I uploaded to YouTube last year a look which explains the process better.

Let’s start to look at some images and the split toning settings that were used to give you an idea of how I’ve used split toning in the past –

IMG_6231-2
St Kilda Pier with natural colours
IMG_6231
St Kilda Pier with split toning applied


stkildasplit
Split toning settings for the above St Kilda Pier photograph


IMG_2444-2
A wet miserable day with natural colours
IMG_2444
A wet miserable day with split toning applied


melbourne1split
Split toning for the above photograph ‘A wet miserable day’


IMG_2192-2
Car park entrance with natural colours
IMG_2192
Car park entrance with split toning applied


melbourne2split
Split toning settings for the above car park entrance photograph


IMG_2986-2
Self portrait with natural colours
IMG_2986
Self portrait with split toning applied


sthelenssplit
Split toning settings for the above self portrait


Adding Split Toning to Black and White Photographs

Another reason I love split toning is the subtle tones you can add to a black and white image. My favourite is adding either a very subtle blue into the highlights to almost give a duo tone feel to the image. For this image I processed as normal and then dropped the saturation completely to make the image black and white then opened the split toning and added a slight blue to the highlights. It’s a neat little trick and something I’ve got into a habit of adding when going for a black and white feel to my images but adding something a little different on top.

IMG_7972-2
Girl smoking in natural colours
IMG_7972
Girl smoking with split toning and decreased saturation applied


smokingsplit
Split toning settings for the above photograph of a girl smoking


Split Toning Lightroom Presets

Or if you’re feeling slightly lazy and would rather all of this to happen at the click of the button then my Lightroom presets might suit you best.  The presets (not to be confused with an Australian band…) are heavily split toning based and at this stage offer a duotone/cold effect and a coffee/warm effect for your images. Below gives you an idea of what the two presets offer.

Feel free to click either image to download the preset.

duo
coffee

I hope this tutorial on split toning has been useful for you. If it has I’d appreciate you share the love by using one of the share buttons to the side menu on the right.

Feel free to drop an email if you have any questions. Always happy to help 🙂

– Alex