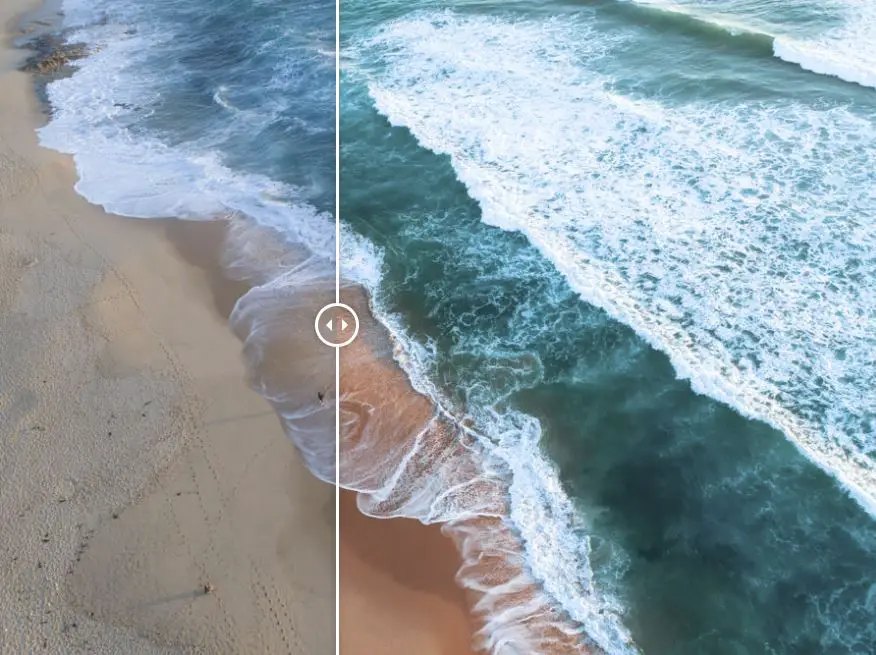
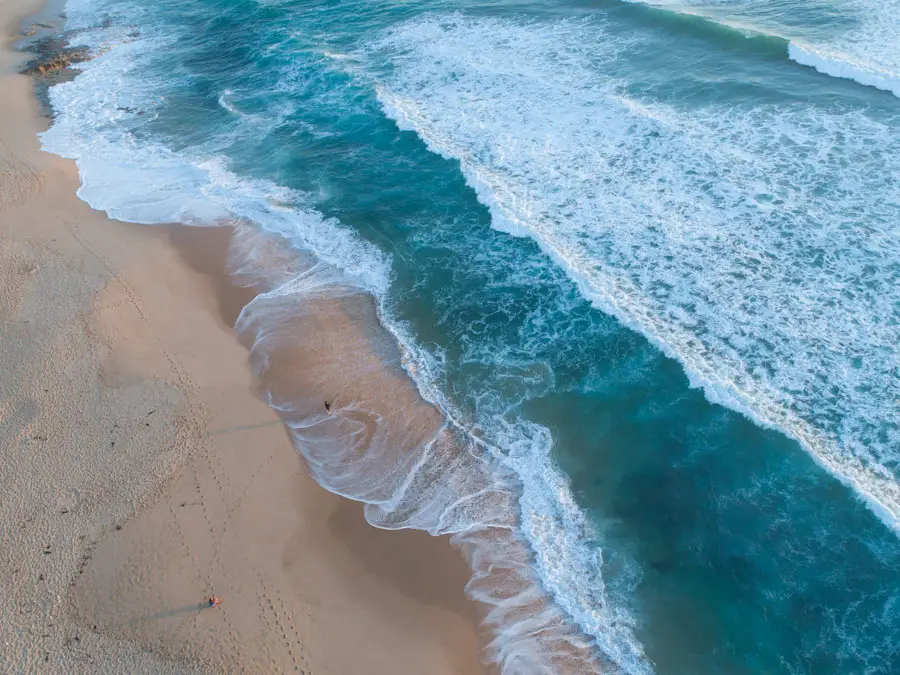
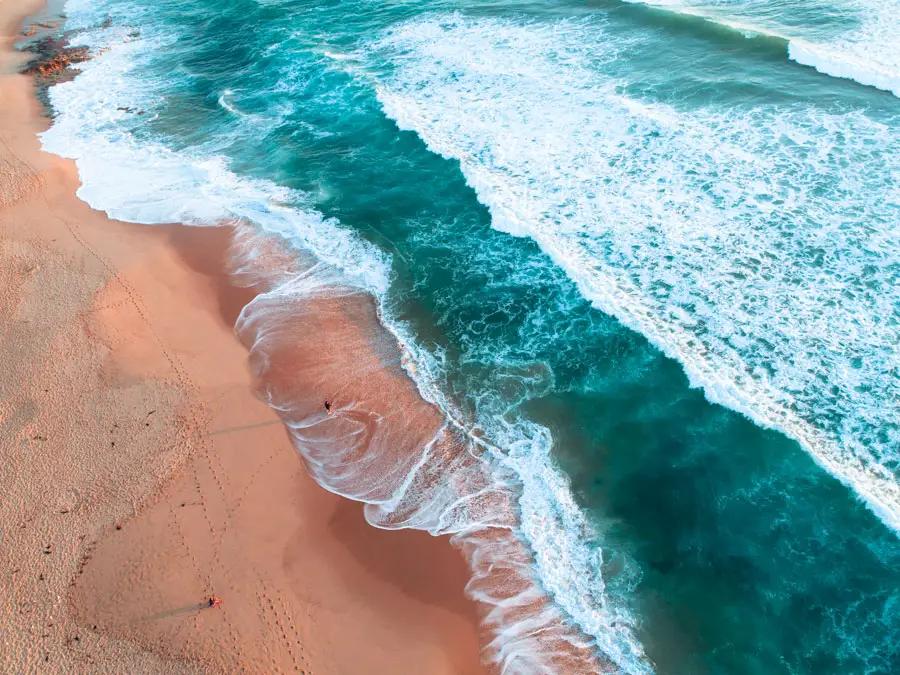
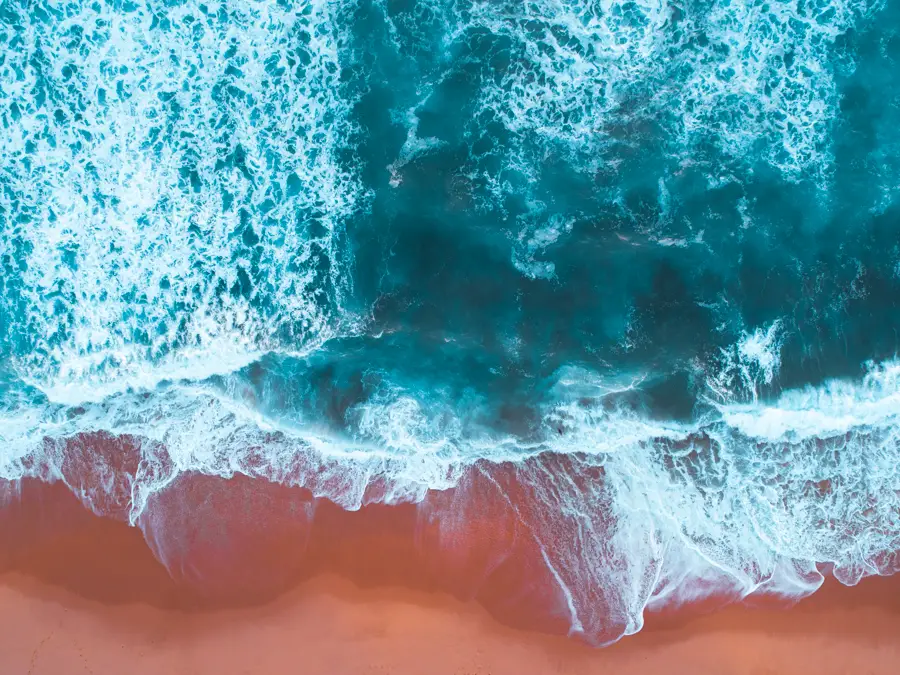
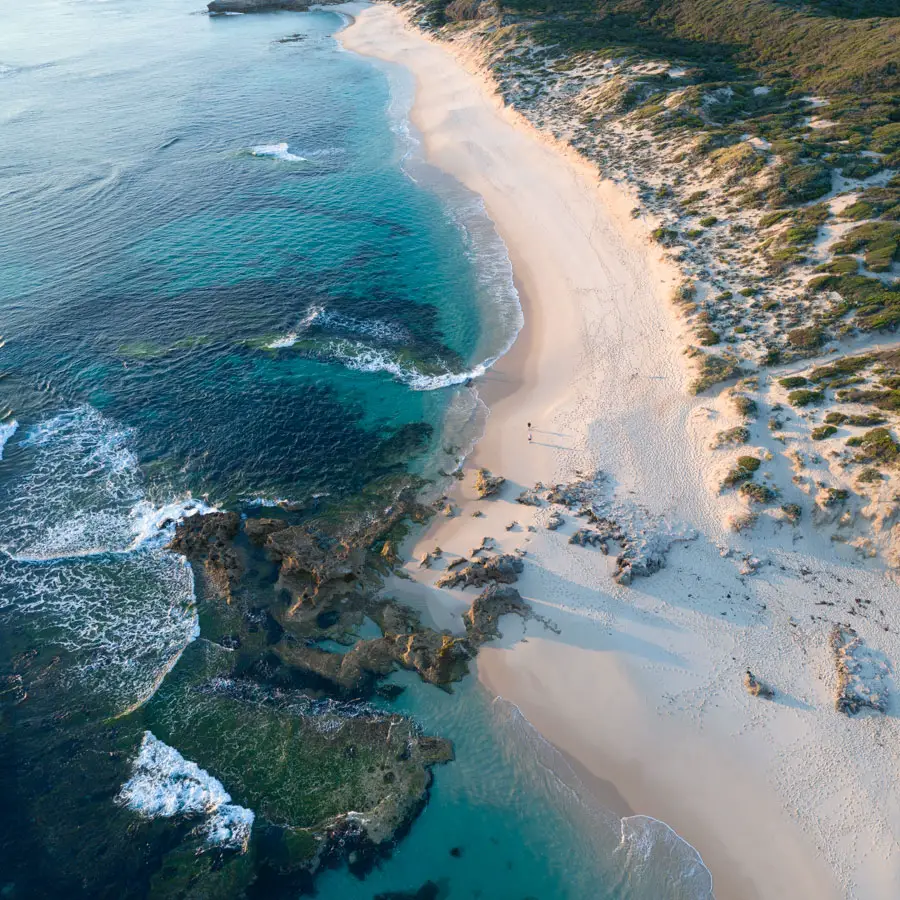
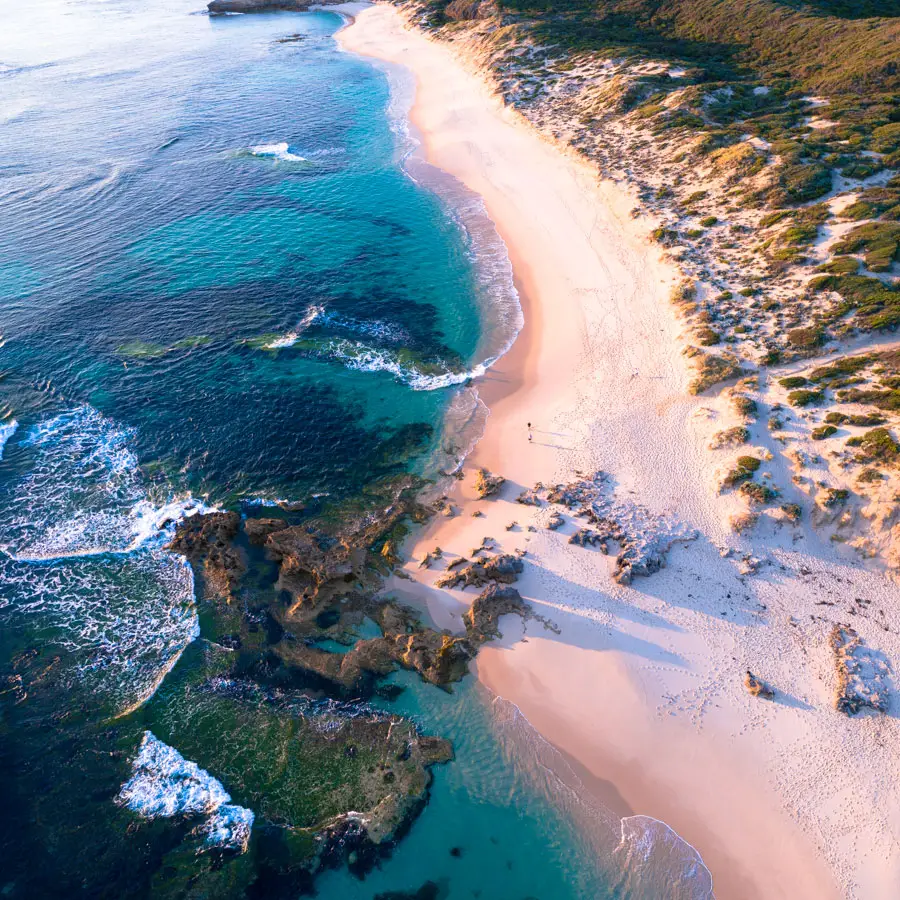
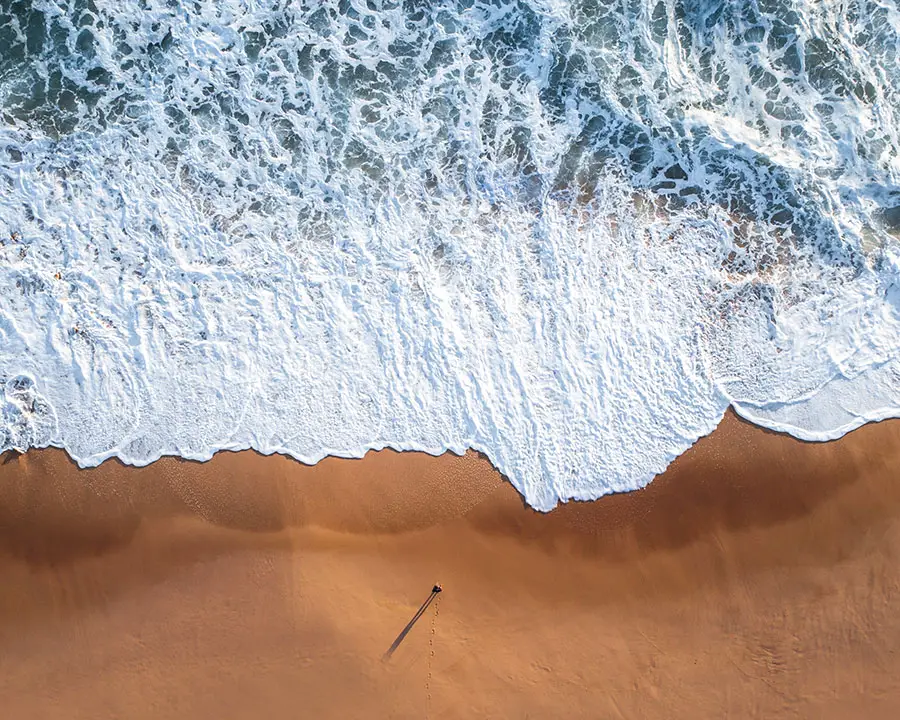
Picked up a drone and still learning your way around Adobe Lightroom? Here are 6 of my Lightroom presets for drone photography to help get you started. These presets are best for drone seascape photography but can also be used for other types of drone photography. This quick guide includes tips on how to work the presets to suit your image, before and after images of the presets in action, download link for the Lightroom drone photography presetsand finally, instructions on how to install these on your Windows or Mac.
Generally I find Lightroom presets best used as a base and then fine tuned to suit your image. For some images, my presets may make your image look over-done with the highlights or colours pushed too much. Don’t be alarmed! For this reason, I’d recommend setting a preset that you like and then adjusting:
Tonal Curve – I generally use an ‘S Curve’ when editing my images which gives a strong shadow to your image while giving the highlights a pop. This may or may not work with your image so look to use the Tonal Curve section to adjust the Highlights, Lights, Darks and Shadows of your image.
Hue Saturation and Luminance (HSL) – If the colours are too overpowering for your image, look to open the HSL section in Lightroom to decrease the strength of the Hue, Saturation and Luminance of the preset.
Split Toning – This is where the real magic happens. Use the Split Toning section to either decrease or increase the strength of the split toning to the Highlights or Shadows of your image. It’s also worth playing around with the balance of the split toning where you may want the shadow split toning to be more overpowering than the highlight split toning.
Now I’m more of a visual person so now for some before and after shots of these Lightroom drone presets:
Picked up a drone and not sure where to start? Here are my 12 tips for improving your drone photography.
Love them or hate them, there is no denying that drones have made an impact on photography around the world in the recent years introducing a whole new genre of photography in capturing angles that previously would have required a helicopter/plane to capture.
Use Google Maps to plan your shoots
The hardest thing for me when buying a drone was finding locations to shoot which would look good from above. I didn’t really know what I was looking for or how to find them. It’s pretty easy these days when planning a shoot with your regular camera to open up Instagram and quickly find some locations to photograph. The best way to find locations to photograph with a drone is by using Google Maps Satellite view.
But what are you looking for when you have Google Maps open? Here are some things which I’ll look for when scouring my local areas:
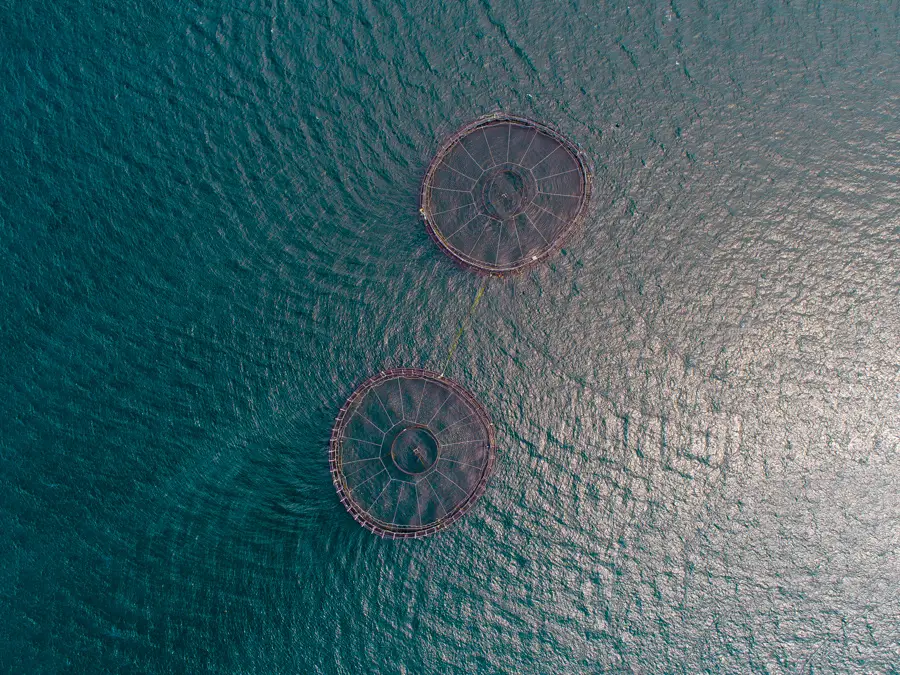
Finding unique angles through fish farms in Southern Tasmania
Unique patterns – Try to find things which wouldn’t normally be interesting if captured using a regular camera. Take the image to the right as an example of the unique patterns of a fish farm in Tasmania.
Contrasting colours – Try not to let one colour dominate your shot. Instead look for other colours which allow you to create a colour harmony (i.e. one colour being the opposite of another colour to provide a greater visual experience). This guide on TigerColor has an introduction to the different colour harmonies to get you started.
Objects which can look interesting from above – Basketball, tennis courts and garden mazes are just some to get you started. Bonus points if you manage to find one in a pretty location such as by the ocean or in a nice forest area.
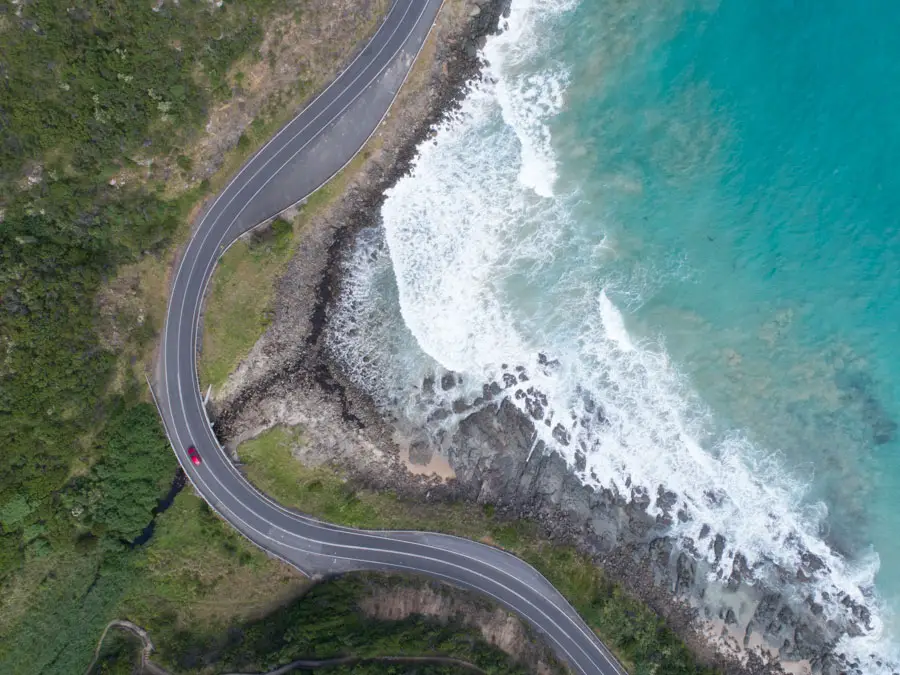
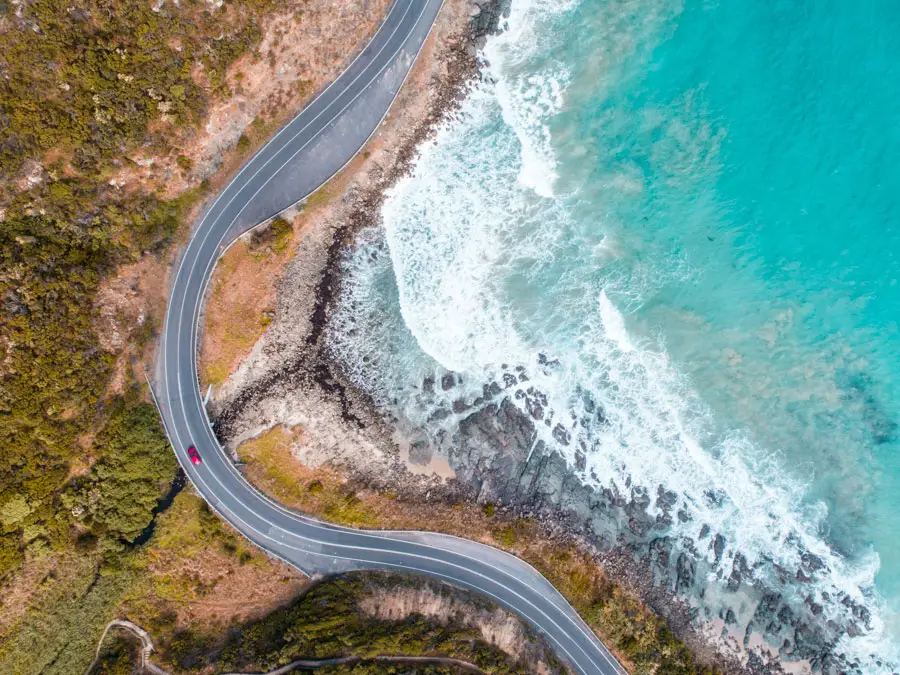
Using the stunning road of the Great Ocean Road, Victoria to separate the shot
Use shadows to your advantage – Found a lone tree? Why not fire up the Photographers Ephemeris and plan for when the light will be falling behind the tree to create some harsh shadows.
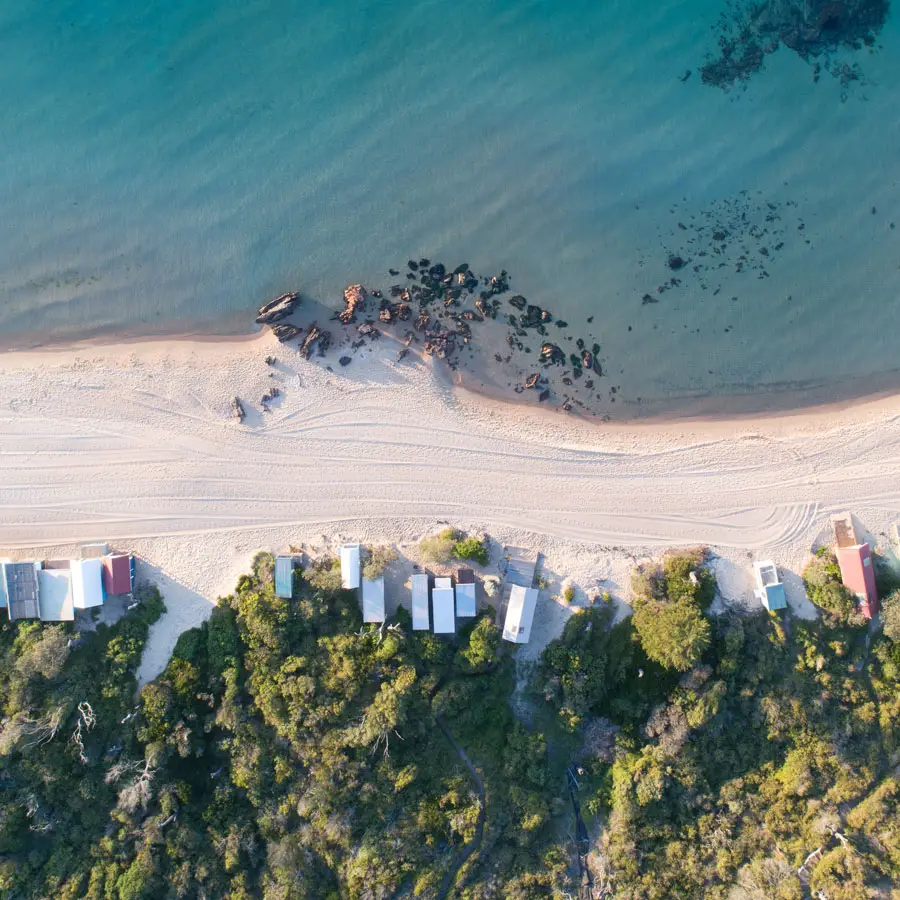
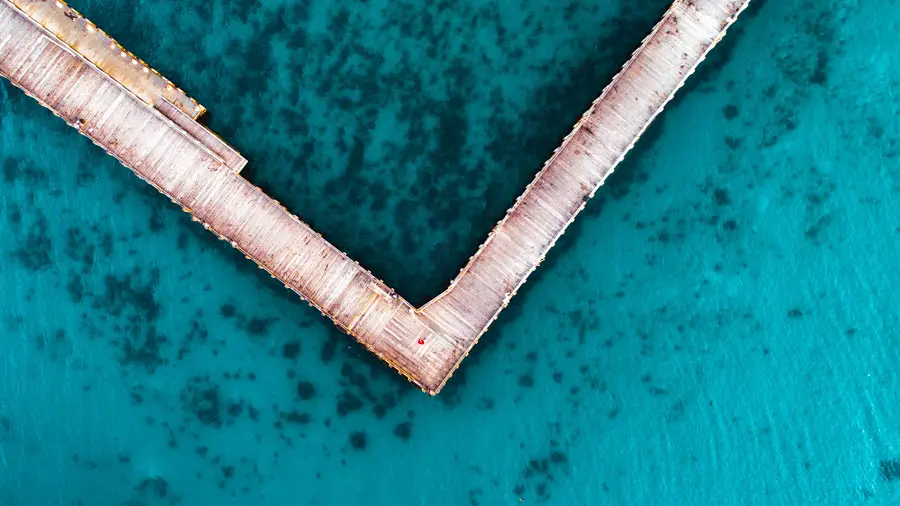
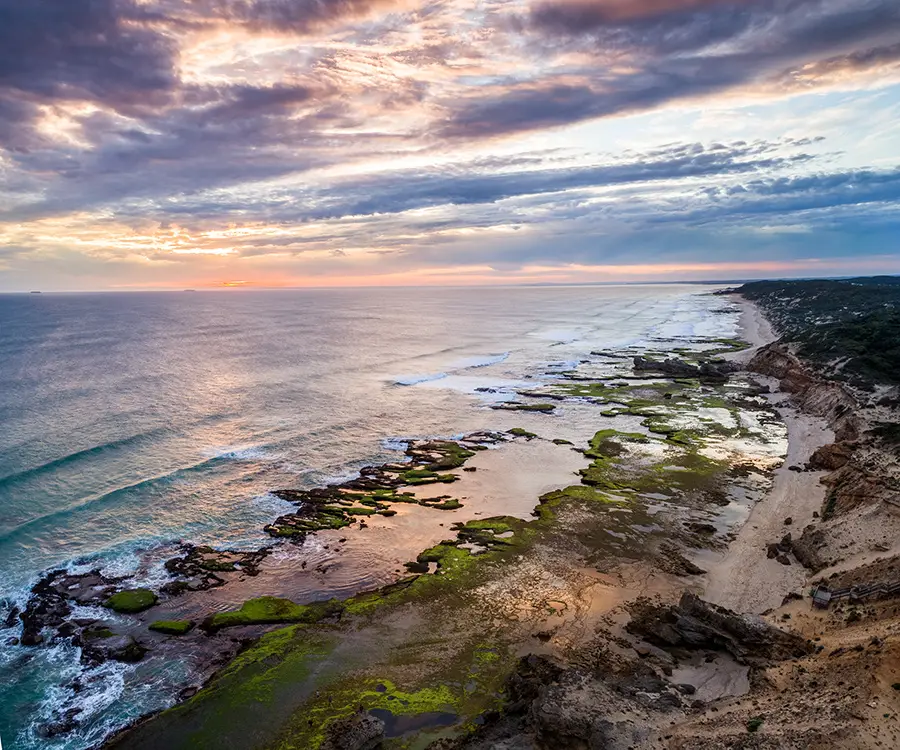
Dividing lines which separate your shot – Look for elements which help frame and seperate your shot. Often when shooting a seascape location, I will use the road to separate the sea and foliage area.
Keep it simple – And finally, like regular photography, it pays to keep things simple by looking for a strong composition element in your shot and reducing clutter.
Fly where there’s no point
One thing I love about drone photography is that you can arrive at a location, feel a bit uninspired on what you are seeing as you set the drone up and then manage to find something when you get it up in the air and are viewing the area from the above.
For this reason, I recommend buying a second battery for your drone with one to be used for scouting and the other for photography.
Panoramic stitching
With most drones now coming with a panoramic mode built in, the panoramic mode on your drone is a great way to expand your image size when one image won’t quite cut it.
I’ll occasionally use both the panoramic and AEB modes of my camera to both maximise the size and dynamic range of my shot. It’s a bit of mucking around but the results are great when used for the right image.
Shoot at a low ISO
As drone technology continues to evolve, we have seen image quality drastically improve over the last few years. While there is no denying the image quality in the latest Mavic and Phantom drones are superb, there is still room for improvement particularly around the low light capabilities of current generation drones. When shooting at the lowest ISO possible (generally ISO 100), image quality is fantastic. It is when you start dialling the ISO up which is when you see degredation to your image quality through unwanted noise in your image.
Shoot in RAW mode to maximise the highlight and shadow recovery when post processing
For this reason, always shoot with the lowest ISO possible with your done to maximise the image quality output. At times especially in low light conditions, it will be unavoidable that you will need to shoot with a higher ISO in low light conditions. But when you can… Try keep the iso down to the lowest level possible to retain image quality.
Shoot in raw
Like shooting with your regular camera, it’s recommended to always shoot in RAW mode on your drone. By doing so, this maximises the shadow and highlight recovery when you post process your images.
Bracket images
Finding the camera on your drone isn’t quite getting the dynamic range you’re used to on your DSLR camera? Often I’ll shoot in AEB mode (a technique I’ve written about previously) which allows you to capture different exposures of a scene to maximise the dynamic range.
Depending which AEB mode you choose, the camera will generally capture an under exposed, neutral exposed and over exposed image of the scene. Bracketing your images is especially useful when shooting in sunrise or sunset where the light is often uneven and harsher in parts. By bracketing your images this allows you to retain the detail in your highlights and shadows which would have otherwise been lost due to the constraints of the drone sensor.
Don’t limit yourself to a certain type of angle
Experiment with different angles. This image shows two angles of the same location.
Aspect ratio
Most drones now will come with the ability to shoot in 16:9, 4:3 and 3:2 formats. The first two more favour video shooting with the later being more commonly seen in digital cameras. It’s worth noting that on the DJI Phantom 4, the 3:2 aspect ratio provides the highest resolution/megapixel:
3:2 Aspect Ratio: 5472 × 3648 = 20 MP
4:3 Aspect Ratio: 4864 × 3648 = 17.7 MP
16:9 Aspect Ratio: 5472 × 3078 = 16.8 MP?
I personally use the 3:2 aspect ratio as I prefer to crop the image in post processing however my best advice would be to have a play and see which works best for your shooting style.
Shoot with tripod mode
Tripod mode is best applied when shooting video as it slows the speed of your drone down for those silky smooth shots. For those shooting with a DJI Mavic, tripod mode will slow the movement of your Mavic down to 3.5 kph (or 2.2 mph) or for people like me with the DJI Phantom, tripod mode will slow the movement of your drone down to 9 kph (or 5.6 mph).
Tripod mode is also helpful for when shooting photography to minimise any sharp movements if you were to accidentally touch the controls in between shots. Often I will use tripod mode when shooting multiple images to stitch later as a panoramic image.
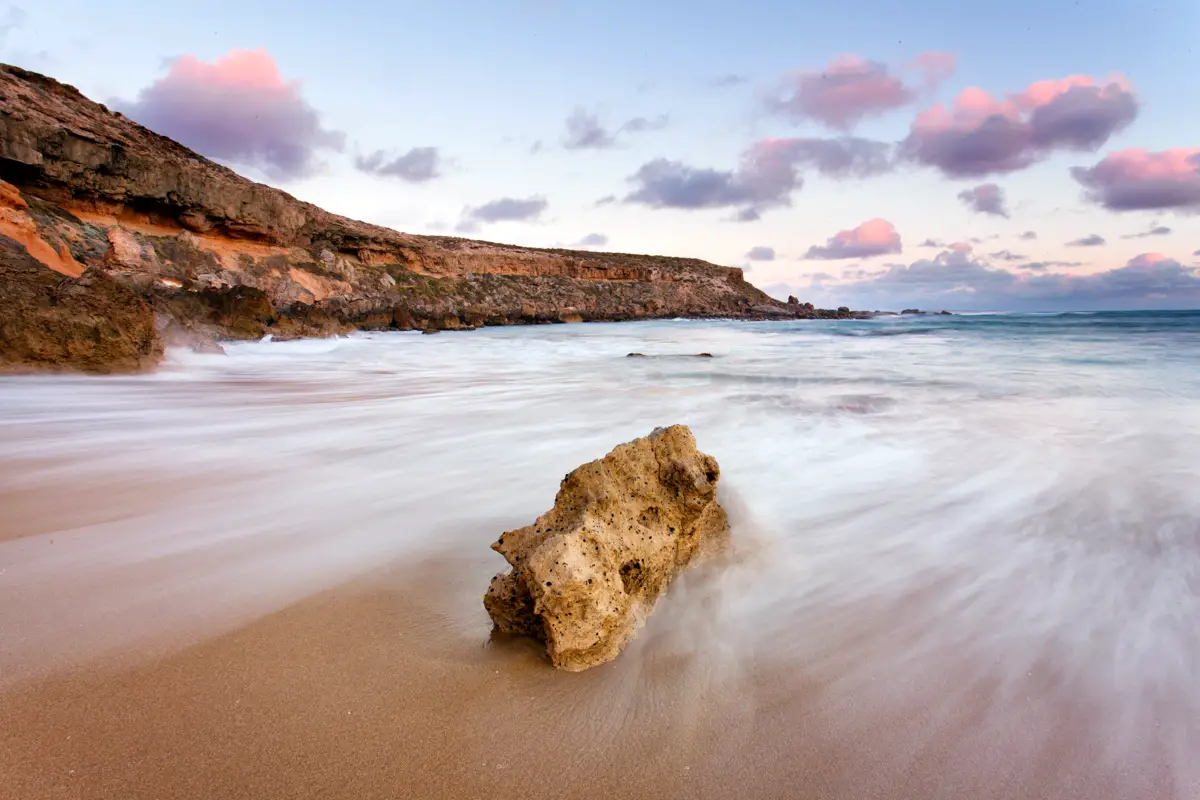
Use neutral density filters (at the right time) for long exposure shots
If you’ve read my blog before, you will know that I’m a sucker for neutral density filters and playing around with long exposures.
The benefits of using a neutral density filters on a drone are similar to when used on a normal camera where it allows you to reduce the amount of light hitting the camera sensor. By doing so, this allows you to capture long exposures with the camera during the day (see photo below) or shoot video at different frame rates which provides smoother footage.
Using a neutral density filter allowed me to capture this 0.6″ second exposure. Blurring the water nicely.
One of the tricky things about using neutral density filters on a drone is the lack of tripod support to stabilise your camera for getting those sharp images. For this reason, I generally shoot my drone long exposures around the 1-2 second mark in calm conditions. Longer exposure times are still possible in calm conditions but you may notice a loss of sharpness when viewed zoomed in.
When planning a long exposure photo with your drone, don’t forget that the higher the altitude you fly your drone the stronger the wind conditions will be. For this reason, you may need to photograph at a faster shutter speed to counter the wind. Often, I will shoot at a lower altitude for long exposure shots as this allows me to shoot at a longer shutter speed due to the reduced wind conditions.
Rule of thirds overlay
While you’re getting started with drone photography, a good way to help with the framing of your shots is by using the rule of thirds overlay. Through having this enabled, this will ensure that your shots will be framed accurately which reduces the need to crop your images during post processing.
Shoot in the right light
The mistake most photographers make when starting out is that they rarely photograph in the right light and will often go out and hope to get nice images in harsh daylight sun. Drone photography is no different and is best in low light and golden hour settings.
Enjoying that golden hour light
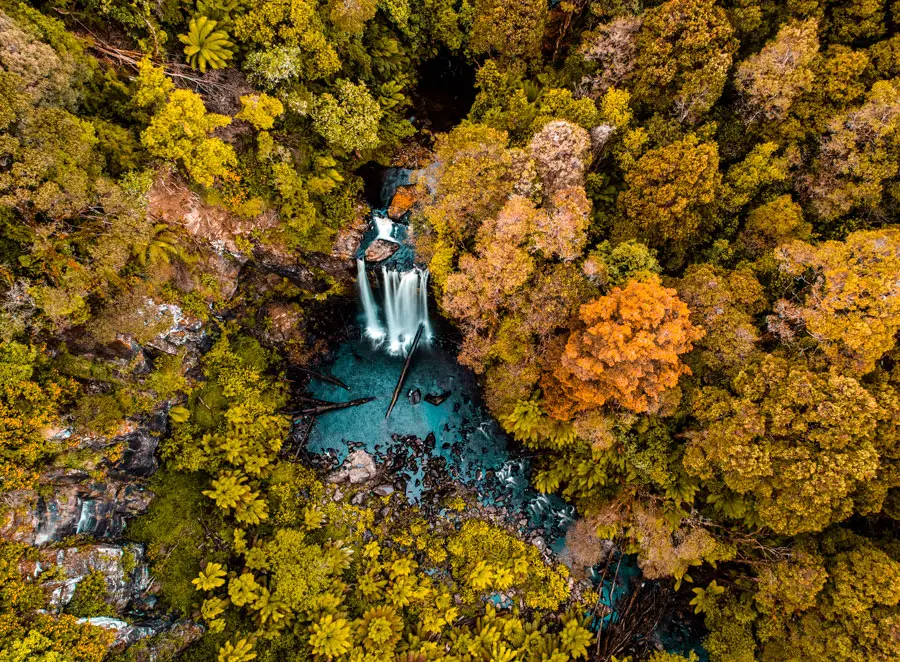
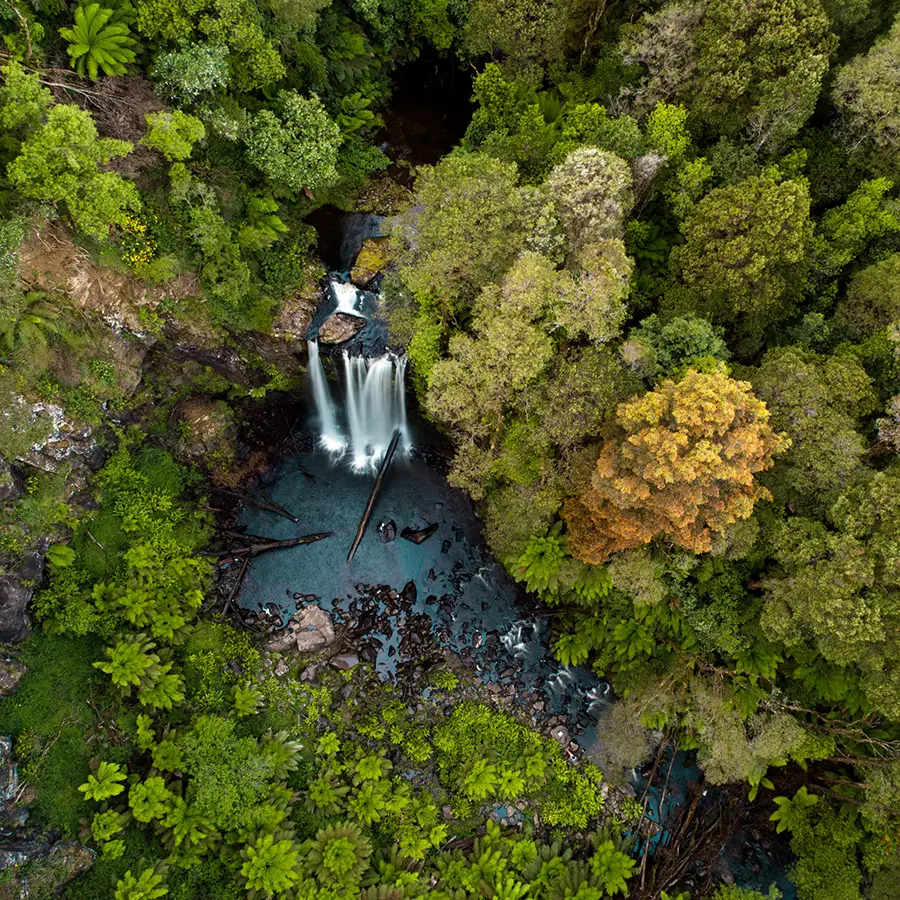
My favourite times to shoot with my drone is either sunrise or sunset and the golden hour periods around this time. By shooting during this time, you will get a nice soft and warm light on your images. Alternatively, I also enjoy shooting on overcast days as the light will often be diffused with no harsh light hitting your object. Generally overcast conditions work best for when photographing waterfalls.
End
The above list is far from complete but forms some of my essential drone photography tips. If I’m missing anything, free free to let me know in the comments and I’ll include in a future revision. Thanks for reading!
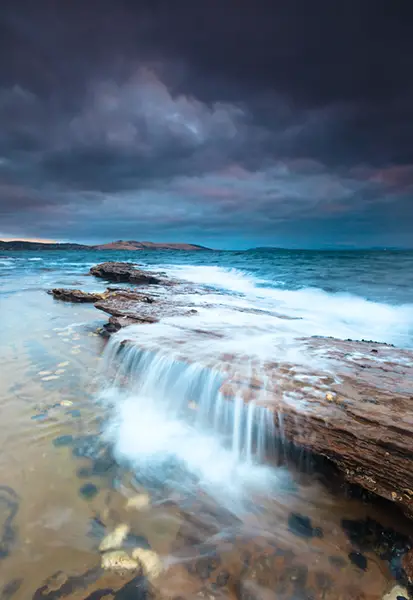
Using shutter stacking is a great technique to use in changing light conditions
One thing I love about landscape photography is the challenge that comes with trying to capture a particular moment in quickly changing conditions. An example that I’m sure some people reading this post can relate to is when photographing the sea, you see a rock ledge and think to yourself, some water falling over that rock ledge would create a nice waterfall effect over the rocks (similar to the image to the right). But as we’re all too familiar, that wave creating that nice effect seems to never come and if it does, it’s all too late and the nice sunset colour has disappeared. This is where shutter stacking different exposure times comes in as a useful trick to have in your workflow when you’re out shooting in variable conditions and know you’re about to miss the timing on what you’ve envisaged in your head.
For the purpose of this article I’ll be looking at how you can stack multiple frames in changing light conditions but the effect can also be used to reduce noise in long exposure images by capturing multiple long exposures (i.e. 10 x 30 second exposures rather than a 5 minute exposure) to reduce noise in your image.
This image from Heart Bay, South Australia used shutter stacking to combine the nice sunset sky and the timing of a wave rushing around the rock
Generally when using this technique it really slows down my shooting process as I’m setting my camera up for one photo rather than running around like a mad man trying to get as many angles of the sunset as possible. So there’s a few things I’ll do as I’m taking my one photo which I’ll look to break down. If we consider the image to the right with the water rushing over the rock ledge as an example, let’s look at my process for this shot:
Focus on composition – Find an interesting composition. In this case, I’ve noticed the water flowing over the rocks could come up nice with a long exposure. Oh what? The swell has dropped out and I’m about to miss the nice colour in the sky. That’s ok, I’ll capture multiple images and combine in Photoshop later using shutter stacking.
Double check everything – Take some test photos to make sure everything is lined up. At this point I’ll double check what the swell is doing in case my gear is exposed (I’m hardcore but not swimming in the ocean and losing my gear hardcore)
Capture your base image – With my camera firmly in position and I’m feeling confident that I’m not going to get swept out to sea, I take a photo of the scene. This image is to capture the sunset in all its glory which will form my base image.
Capture the moment you’ve been waiting for – Now I wait for that wave to come through to create the waterfall effect over the rocks and complete the shot. It goes without saying but keep your camera as steady as you can to avoid any misalignment when you got to mask the image later in Photoshop. Generally for this style of shot I’ll aim for a long exposure of around o.5″ of a second all the way to 2 seconds.
Stack the images – Open the two images in Photoshop and use the layer mask tool to introduce the wave motion to my base sunset image (as roughly shown in the video below)
Let’s take a look at how the images are combined in Photoshop with this quick video I put together. The technique relies heavily on layer masking the second exposure. If layer masking isn’t something you’re familiar with then give a previous post on layer masking exposures a read or watch one of the many YouTube videos available which will quickly bring you up to speed.
For this video I tried to keep things short (as you can probably tell by my quick and dirty layer masking) but occasionally if there’s not much movement in the water I’ll shutter stack 3-4 images to exaggerate the movement of the water. The purists reading this are no doubt rolling their eyes but if the tools are available then why not make the most of them.
Thanks for reading and watching. If you have any questions about this technique feel free to contact me directly as I’d be happy to help!
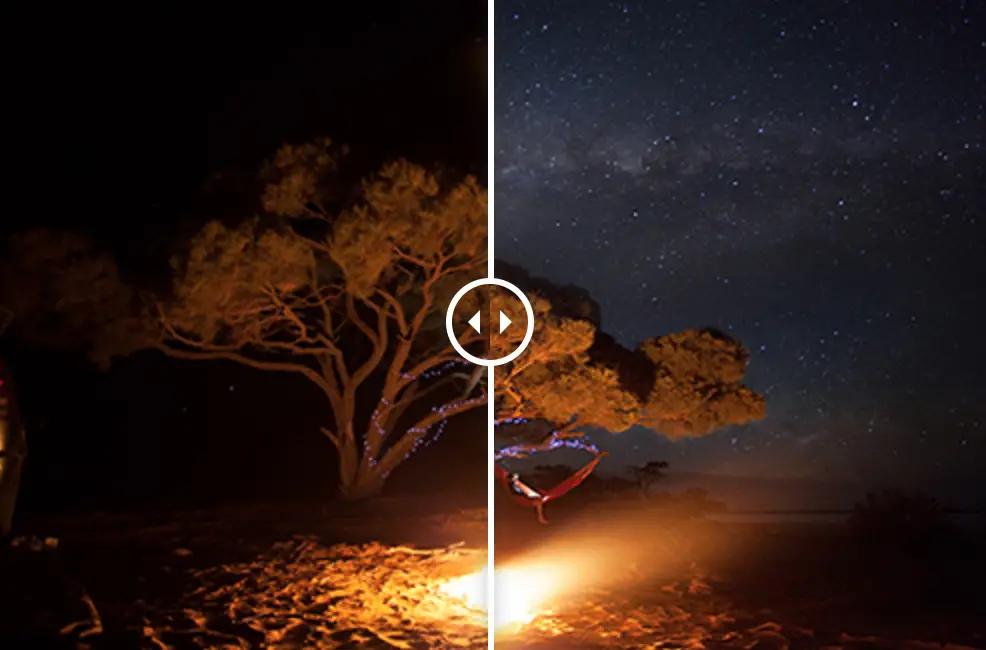
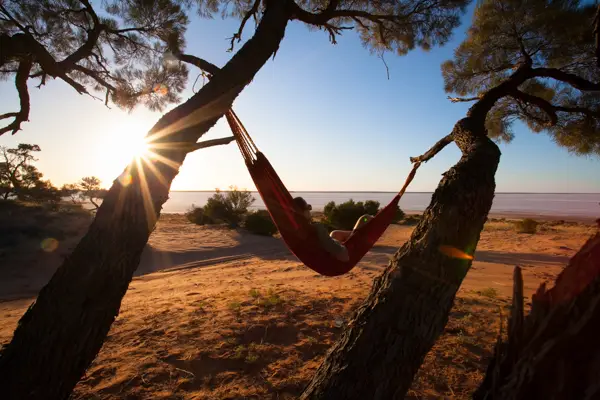
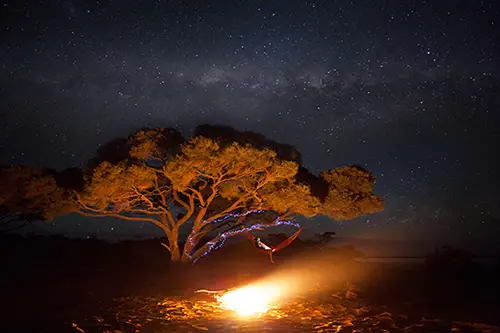
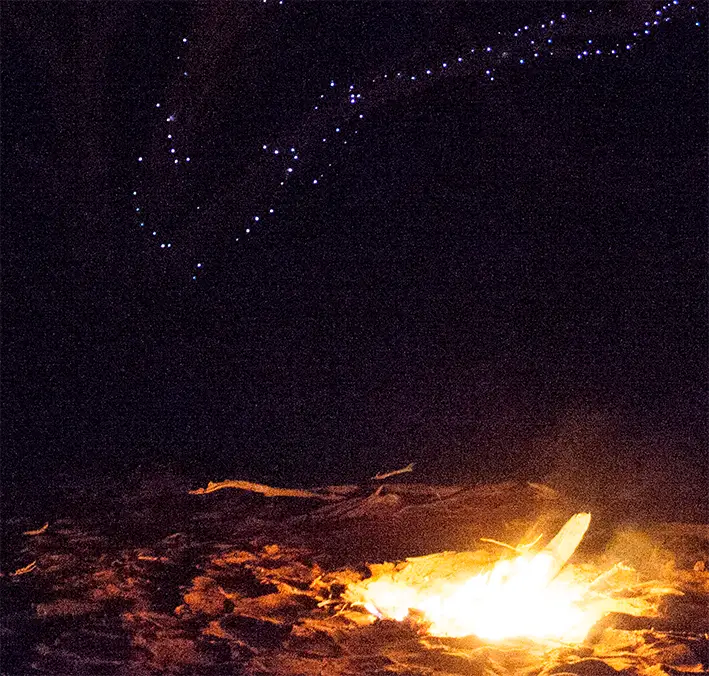
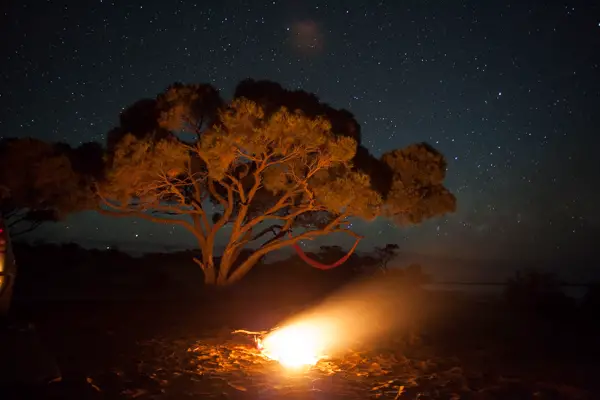
In the last few years I’ve been in awe of the work by Michael Shainblum who is just one of the many people upping the game when it comes to silky clean milky way and star photographs. I have to admit, milky way photography has never been one of my strongest points and I’ll often blame the age of my Canon 5D Mark II being limited in lowlight as an excuse to not get out and shoot milky ways. With a recent trip I was keen to challenge myself with this photograph titled Under the Stars which features me, sitting on a hammock attached to a tree wrapped in fairy lights under the milky way with a fully stoked fire keeping us warm. The end photo required a few shots at varying exposures to bring it all together which I’ll look to walk you through in this post.
Challenging your in camera and post processing techniques
On a drive from Melbourne to Perth (50 hours of driving) I was keen to explore some of the night skies in the middle of nowhere and add a couple of milky way shots to my gallery. Yes, the Canon 5D Mark II struggled at ISO 3200 but unless you’re looking close, it’s not too noticeable (well I think so anyway..!)
[box type=”info” style=”rounded”]My Melbourne to Perth roadtrip post has more photos from this trip where I explored some of the best parts of Australia[/box]
This is one of my favourite photos of the trip and is something that was just a concept I was keen to try. To be honest, I didn’t think I’d be able to pull it off in getting the right exposures and post processing it correctly but I’m pretty happy with the end result.
The hammock wasn’t just for decoration and was the perfect way to kick back before the sunset
Coming up with a concept that’s outside your comfort zone and giving it a go is the only way to really push your development in hands on photography and post processing. There were other concepts that I toyed with while we were away and you know what? They didn’t come off. But it was fun taking them and giving them a try. Next time you’re planning a photography outing, why not set yourself a lofty goal and see how you go executing it? If you fail, you’ll learn so much on how to do it different next time. If you succeed, you’ll no doubt pick up on things you can do better next time while learning little techniques that you may not normally use in your normal post processing workflow.
[box type=”info” style=”rounded”]I recently bought a new travel tripod and compared the 5 most popular tripods on the market. Give my travel tripod guide a read if you’re looking for a lightweight tripod for your next trip![/box]
About the photograph
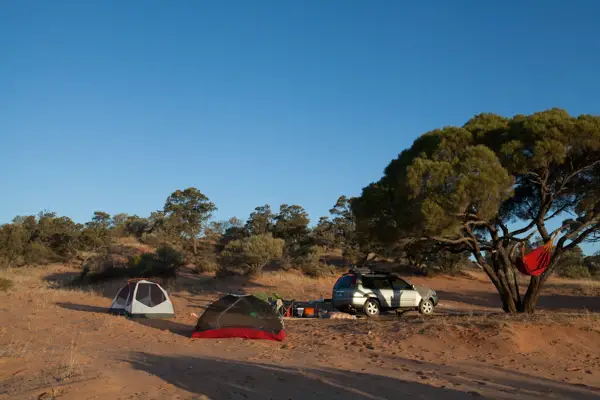
Unglamorous camp photo. I couldn’t resist and camped without my tent cover. Sleeping under the stars was something amazing
For this photograph, Under the Stars, we were camping in Pimba, South Australia which is basically in the middle of no where. As we were driving around the area looking for somewhere to set up our tents for the night, we found this secluded part located just off the salt lake and surrounded by this tree you see in the photo. Straight away we knew where we were camping for the night. It was perfect, silence that was almost eerie and skies that were darker than some of my brother’s music tastes in high school (really dark! Sorry Rich 😉 )
After shooting the sunset and then shooting the milky way down at the salt lake for a few more hours, we eventually headed back to our tents but were still keen to shoot for a while longer to make the most of the dark skies.
With a hammock already in the tree from some lazy beers in the sun earlier and the fire lit to warm up, we decided to pull the solar powered fairy lights out of the car which we had bought on the first day of our trip and neglected ever since. I knew they would eventually come in handy..!
[box type=”info” style=”rounded”]Interested in landscape photography? My guide to landscape photography shows you how to get started in this fun part of photography[/box]
Taking the photograph
The final photo was a mix of 4 images with the other 6 very loosely used where required (i.e. detail in the tree or fire)
When experimenting with an image concept I have a habit of going overboard with my image brackets. Throw in the poor performance of the Canon 5D Mark II and you have 10 bracketed images. Ok ok. I probably could have got by with less but better safe than sorry right?
There is some reasoning to my madness with the need for having 10 different images coming from:
Tree and fairy lights –With a light wind around this meant a shorter exposure of the tree and fairy lights was needed to avoid any shake. This had to be a high ISO shot to get a shorter exposure (5 sec)
Me sitting in the hammock – Trying to sit still in a hammock with no subtle movements should be an Olympic sport. Either that or I have ants in my pants. With this said, I needed a shorter exposure (2.5 sec) of me sitting in the hammock to minimise the risk of any subtle movements
Exposing for the stars behind the tree – With the plan to make this a two image panoramic (one for the scene you see in most of the frame and another for the milky way sky) it was important to bracket a shot of the stars behind the tree which would allow for a seamless alignment of the two images
Positioning the camera further up to capture the milky way – I won’t lie the milky way wasn’t directly above the tree like the photo suggests but it was close! Unfortunately it was hovering just to the right of the tree however by angling the camera up I was able to capture a frame which would later be used above three
Short burst for the fire – The plan was to capture the fire looking more natural rather than a blur of orange light. Even at ISO 25600 I wasn’t able to get an exposure short enough to get the fire how I wanted it. At ISO 25600, the Canon 5D Mark II really comes into its own with its amazing handling of noise (sarcasm intended).
Couple of extra frames for good measure – I’ve got nothing. Press the button and hope for the best for a few frames?
Bringing it all together
[twentytwenty]
[/twentytwenty]
I’d love to tell you that I processed this with the same level of precision like Marc Adamus in the space of 10 minutes. But in reality of me being sleep deprived after driving 12 hours the day before and not really knowing what I was doing, the edit for this photo took a couple of hours or so of extreme procrastination and trial and error.
The key elements to processing this image (after we get past the trial and error):
Bringing all the concepts together with layer masks – As mentioned earlier in the post, I shot a series of frames at different ISO levels and shutter speeds to minimise noise where possible and capture specific detail (i.e. me in the hammock or the detail of the fairy lights).
Cloning out the car – Not sure when composing that I didn’t notice a small part of the car in the frame. Whoops. A quick touch over with the clone stamp tool had it removed.
Colour grading – Sorry, that sounds wanky but it also sounds like I know what I’m talking about so let’s run with it. Colour grading was selectively applied to the image using layer masks. The intent here is to control the colour to parts of the scene which may have been affected by noise. Parts of the image where these minor tweaks were applied include adjusting the blue hues in the sky and dialling back the orange glow on the sand.
Overlaying the milky way – Dropping the milky way into the shot was either going to make or break the photo. In an effort to make it look as natural as possible, I used the bracketed image with the stars as the base image of the sky. I then used the image which had the milky way with a very subtle transition through the tree using an inverse selection.
Noise reduction – Shooting at ISO 3200 and higher does leave you with some ugly noise in parts (i.e. around the dark parts of the sand where I’ve tried to pull back some detail). Fortunately Nik Collection’s free Dfine tool works wonders for the removal of noise. I don’t apply noise reduction across my whole image and prefer to just apply it selectively to parts of the image most affected. When you are applying noise reduction, you are reducing the sharpness of the image so it’s important to ensure you are only applying it where needed to minimise any loss of sharpness.
Dodging of the scene – As I was using exposures of various dynamic ranges, there wasn’t much needed in the way of dodge and burning of the scene. With only some minor dodging applied to the fairy lights to make them appear brighter and further dodging around the fire to create the flare effect you see in the final image.
To help give you a sense of how the different adjustments were made and effected the image, I’ve put together this short clip which gradually introduces the various layers to reach the final image.
[box type=”info” style=”rounded”]If you enjoyed this post, be sure to give my Before and After series a look for similar posts[/box]
Feel free to use the contact page if you have any comments or questions about this post.
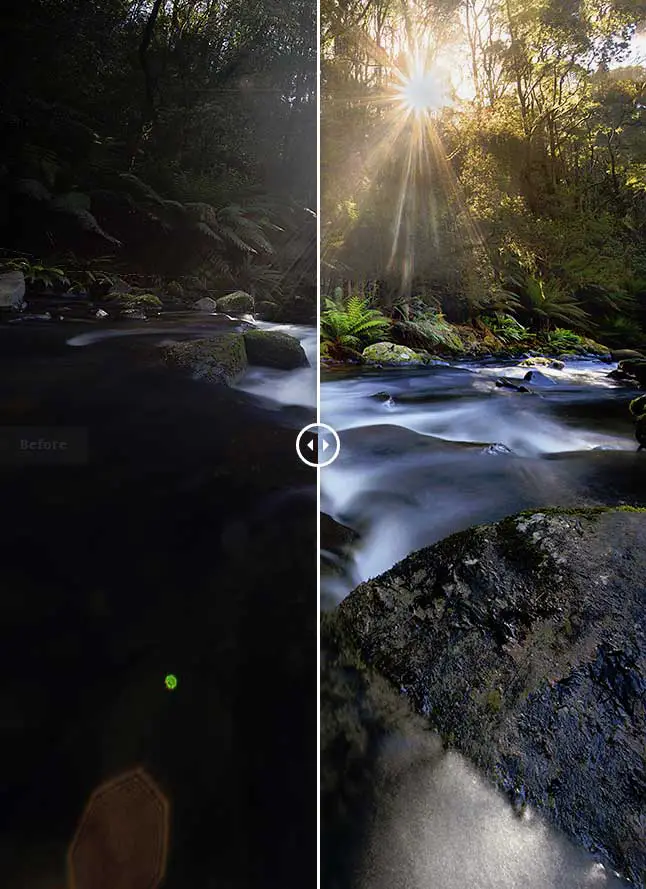
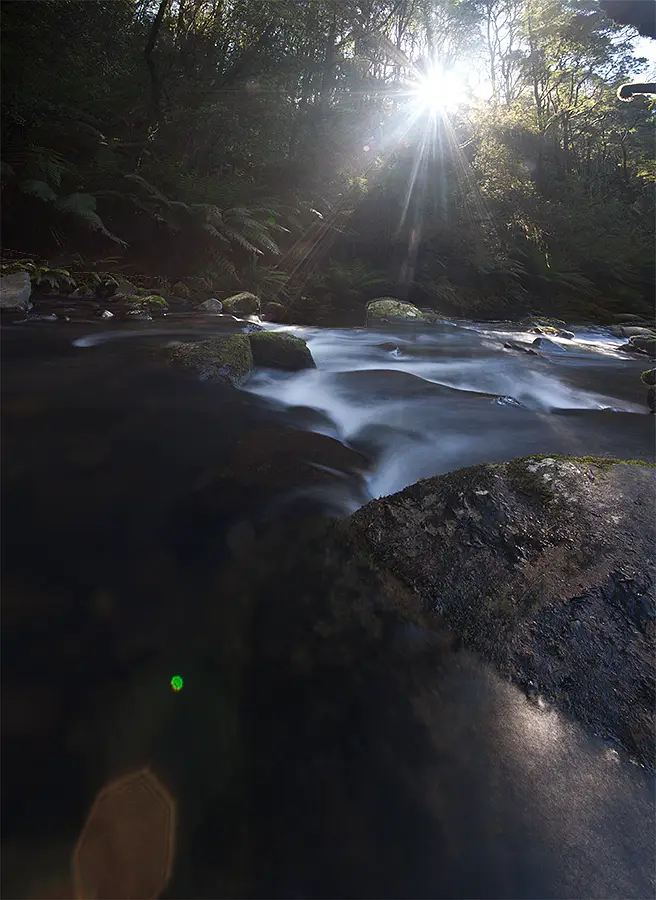
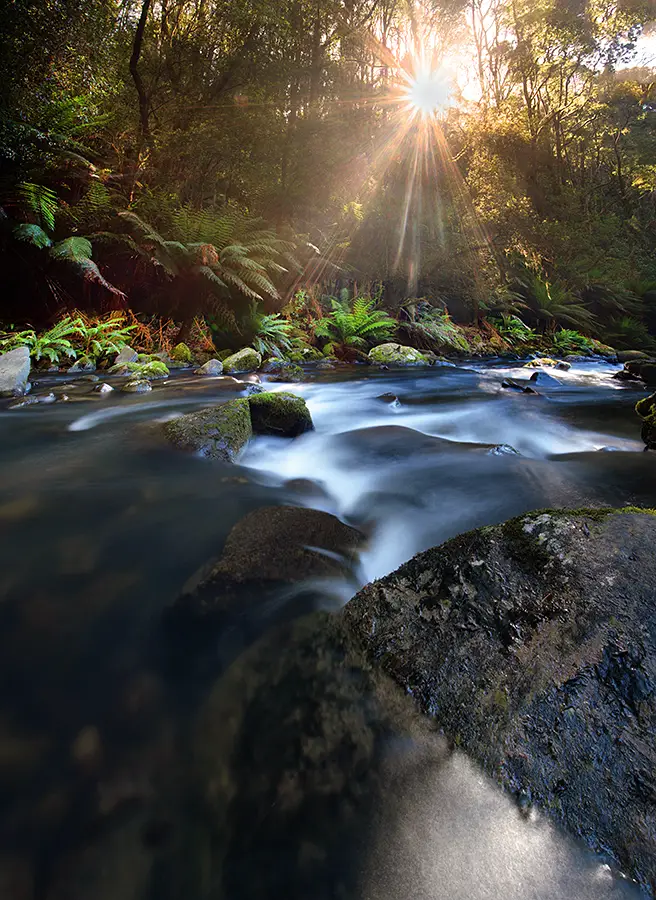
This is an entry for my [ilink url=”http://www.alexwisephotography.net/blog/category/technique/before-and-after-technique/” style=”note”]Before and After series of photographs[/ilink] where I share how I captured and post processed an image. This particular image is from Hopetoun Falls looking back down river of the water that runs off from the main fall. Hopetoun Falls forms part of the Otways Ranges and is a beautiful part of the world. If you’d like to see more photos from this trip be sure to check out my [ilink url=”http://www.alexwisephotography.net/blog/2013/12/08/weekend-trip-down-the-great-ocean-road/” style=”note”]post from the Great Ocean Road[/ilink] which includes this among many.
[twentytwenty] [/twentytwenty]
Capturing and Editing Sunlight at Hopetoun Falls
This is one of those photographs that as a photographer, we view it through our eyes and then when we try to capture it in camera it’s incredibly difficult to replicate what our eye is seeing. On this particular day we had shot the waterfall most of the day under overcast conditions (perfect for photographing waterfalls). Later during our time at Hopetoun Falls, the cloud started to clear and the sun began to shine stunningly through the trees. Rather than pack up my gear like I normally would when the sun starts shining harshly at a waterfall I wanted to try pull off a shot of the sun bursting through the trees.
Taking the Photo
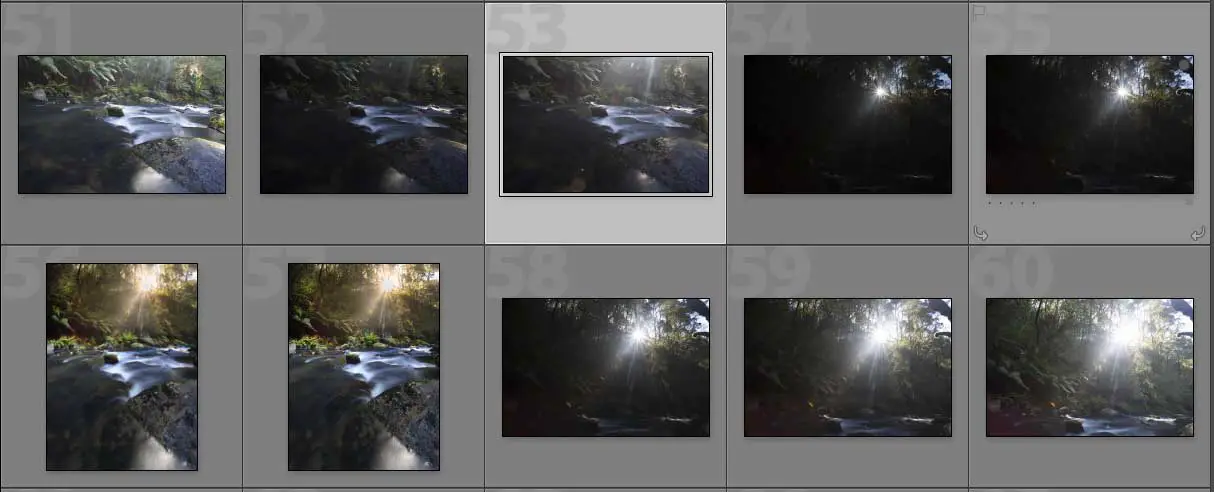
Bracketed images that would be later stitched and combined in Photoshop
Framing the photo straight away I knew if I wanted to get both the stream and sun bursting through the trees in shot I would have to take two photos and stitch them together. Even though I was shooting with a Canon 17-40 it still wasn’t wide enough to fit in the one shot so a two image stitch would be the go. Shooting the images I’m using my Canon 5D Mark II, Canon 17-40, Hoya Circular Polariser and Manfrotto tripod.
I also knew that trying to capture the dynamic range properly in one shot for each stitch was going to be very difficult. Not one to normally use the auto bracketing exposure (AEB) feature on my camera, I opted to take 3 exposures of the top half of the stitch and another 3 for the bottom part of the stitch which resulted in a slight mess of images in my Lightroom catalogue.
In case you’re not familiar with the AEB feature I wrote [ilink url=”http://www.alexwisephotography.net/blog/2013/01/12/automatic-exposure-bracketing-aeb-explained/”]article about Auto Exposure Bracketing[/ilink] a while ago now which explains the feature a little more. I took the multiple exposures as it provided me with some insurance that if I didn’t get it right with the neutral exposure I would also have the under and over exposed images to play with.
Combining and Editing the Photos
When it comes to exposure blending my level of competency is around average so the idea of combining this with a two image stitch was a recipe for disaster. I processed the images from the trip and let the images for this one sit for a while. Normally when I shoot, I like to process my images within 24 hours of taking them. I hate the feeling of sitting on unedited images and like to get them processed, not necessarily to post online but just to have them processed according to how I remembered the scene. For this one, I was actually too intimidated by the prospect ahead and knew I was in for some fun in Photoshop.
It wasn’t until a weekend a few weeks later that I finally decided to give combining and editing the images a crack.
Combining The Photos
Having used auto exposure bracketing to capture an under, neutral and over exposed image for both the top and bottom parts of the frame, I went about creating two image stitches for each bracket.
By this I mean, I created a two image stitch of the two over exposed images, again for the neutrally exposed images and another for the under exposed images. This resulted in 3 separate stitched images consisting of 1 over exposed stitch, 1 neutral exposed stitch and 1 under exposed stitch.
When stitching images, most people tend to recommend various different pieces of software like PTGui but I’ve had quite good luck with the Photoshop stitch tool. This can be found under File > Automate > Photomerge.
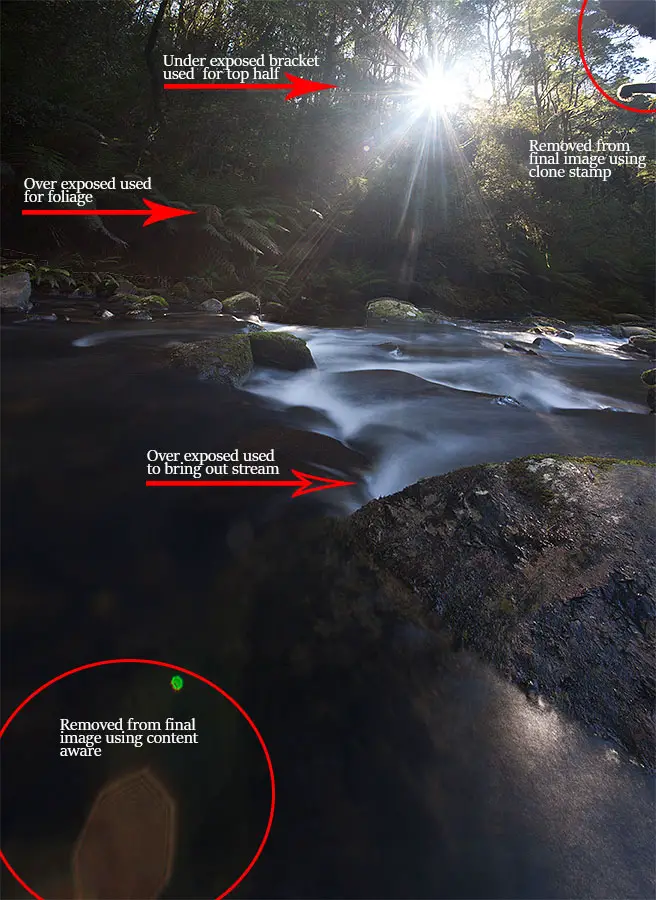
Now that I had these 3 separate image stitches of each exposure, I went about opening the neutral image in Photoshop and layering the over and under exposed images as layers on top. The over exposed image would be used to bring out the dynamic range in the foliage surrounding the waterfall and the waterfall itself while the under exposed layer would be used to capture the sun bursting through the trees. Luckily, it wasn’t as hard as I originally thought but just required a lot of low opacity layer masking to subtly bring out areas of a layer. The hardest part was blending the sun into the shot which required me to use a combination of the brush tool and gradient masks to ever subtly drop it back in without it looking uneven to the rest of the scene.
I’ve attached a screenshot to the right which highlights the different parts of the image where layer masks from the 3 images were used. Call me lazy but I’ve become a fan of the [ilink url=”http://tv.adobe.com/watch/learn-photoshop-cc/using-contentaware-fill-to-remove-distractions/”]Adobe Photoshop Content Aware Tool[/ilink] which for the most part works perfectly. Generally if this doesn’t work I’ll revert back to the [ilink url=”https://www.youtube.com/watch?v=MY023ZQJy0M”]Adobe Clone Stamp Tool[/ilink] to remove unwanted distractions like the branch in the corner and lens flare at the bottom of the stream.
Once all the images were blended in, I then went about making selective adjustments to the saturation and individual colour channels to colour grade parts of the image. I’m fond of using layer masks for saturation changes as it allows you to increase or decrease the saturation or change the hue of a particular area in the image without affecting the overall photo. For this image, I used selective saturation and hue adjustments to both the water and foliage areas.
Finally some cropping was applied to the image and a warming filter was applied to add some warmth to the sunburst coming through the trees. With this I used a layer mask to ensure changes with the warming filter were only limited to the sunburst and not the rest of the image.
And that’s that. Something I learnt from this photo was that sometimes it’s okay to sit on an image and procrastinate about it rather than process it immediately. Sometimes I should probably do a bit more often.

 [/twentytwenty]
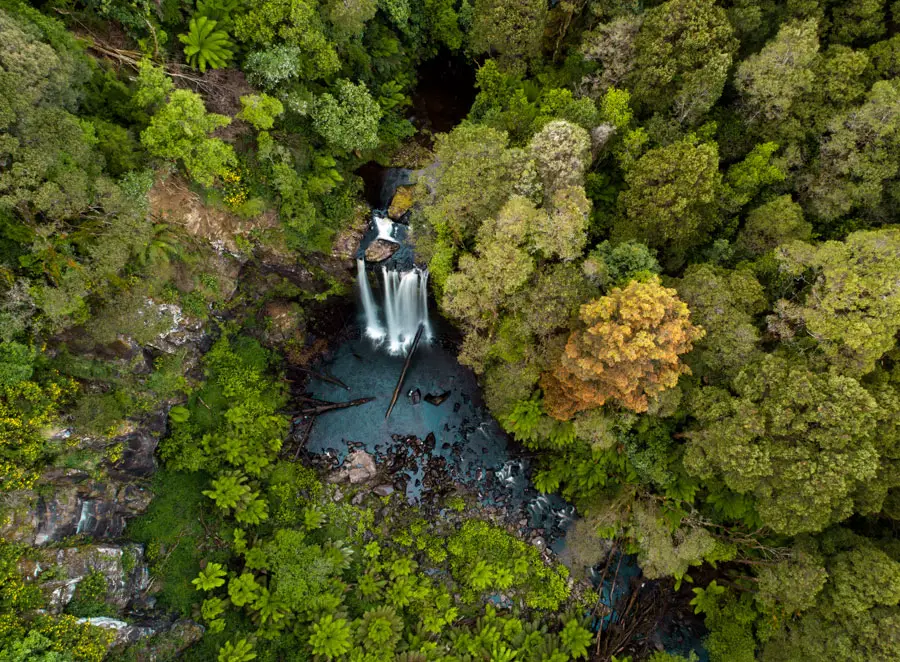

 [/twentytwenty]
 [/twentytwenty]

