
Recently a friend purchased his first DSLR camera and we’ve been getting out doing some shooting around Melbourne and Tasmania (where he’s based). Helping someone starting out with photography has been rewarding as I’ve been able to show him the things that I wish I knew when I was starting out with photography which has forced me to go back and read up on things. The little things like explaining the various camera filters and learning about features on your camera that you didn’t know were there. One of these features is the Automatic Exposure Bracketing (AEB) feature. As cameras have advanced, the AEB feature comes standard with most cameras now days. This guide is more so written for Canon cameras but the logic can easily be applied to other brands.
What is the Automatic Exposure Bracketing Tool?
The AEB tool allows you to automate the process of taking multiple exposures of a scene. Rather than take a photo, adjust the exposure and then press the shutter again, AEB allows you to automatically expose the scene once you press the shutter button. Some describe this as in camera HDR as the shots can then be stacked and converted into a High Dynamic Range (HDR) image or manually blended. Using this feature will give you one over exposed image (+1 EV), one under exposed (-1 EV) and a normal exposed image (0 EV). How much the camera over or under exposes can be changed within the camera so it is possible to over expose by 2 stops (+2 EV) and under expose by 2 stops (-2 EV) if you wish.
Why is automatic exposures useful? Manually adjusting the exposure between each individual shot can misalign your images from constantly changing the exposure and pressing the button each time. Sure this can be fixed in Photoshop by aligning your images but why not get it right and avoid this issue?
I must be honest and tell you that I don’t really use the automatic exposure bracketing feature on my camera much. Instead if bracketing for a scene I’ll manually take exposures for different parts of the scene (i.e. an exposure for the sky, land and any specific parts of the scene which the camera is having difficulty capturing in one exposure). But for my friend learning about photography and his new camera, it’s a useful feature to know about especially when you’re still having difficulty exposing your images and getting it right in camera.
How to use the Automatic Exposure Bracketing on your Camera?
The AEB feature can vary between camera brands and models but fortunately the feature is available in most modern DSLR and high-end point and shoot cameras. For the purpose of this tutorial I’m using a Canon 5D Mark II to demonstrate how to enable and use the automatic exposure bracketing tool but if you own a Nikon D90 or Canon 60D, it shouldn’t vary much between the models. The principle it still the same and it might just require different steps along the way. I’ve tried to compile a few different step by step processes if you’re using a different make or model to what I’m using.
Before taking your shot using automatic exposure bracketing, there’s a few steps you have to go through first.
- Set the camera up on a tripod as it’s important the camera doesn’t move during the exposures. Any movement can create misalignment issues if you plan to merge the images later into a HDR image
- Know which camera mode you intend on using. I have the camera set to aperture priority mode but you might want to use shutter priority depending on what you’re shooting. Basically setting the camera to aperture priority will mean the camera will stay on the defined aperture value (in this case f13) and change the shutter speed as it brackets the exposures. If shooting in shutter priority the camera will instead stay on the defined shutter speed (i.e. 2 seconds) and change the aperture as it brackets the exposures. Makes sense? Not really? Don’t worry, once you’ve taken the bracketed exposures and look back over the exif settings for the shots it will make a little more sense
- Disable auto focus once you’ve composed your shot and are happy with the focus for the scene. Leaving auto focus on during the bracketing could result in shifts in focus throughout the 3 shots which we don’t want
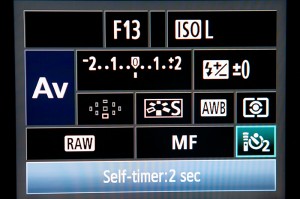
- Turn on the shutter delay. This may or may not be limited to the Canon 5D Mark II but AEB requires either the 10 or 2 second shutter delay to be enabled
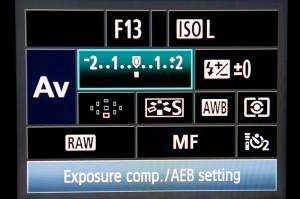
- Select the Exposure Comp/AEB setting and dial this up with the wheel on your camera. Lines like in the third screenshot should appear which shows that three images will be taken, one under exposed (-1 EV), one neutral exposed and another over exposed (+1 EV)
- Press the shutter and hope for the best
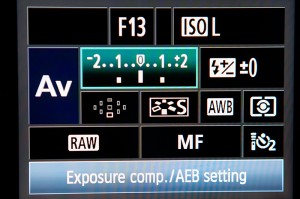
Using the dial on your camera, dial to this to the right and lines like above will appear. This indicates that an under exposed, normal exposed and over exposed image will be captured
Examples of Exposure Bracketing and the Results
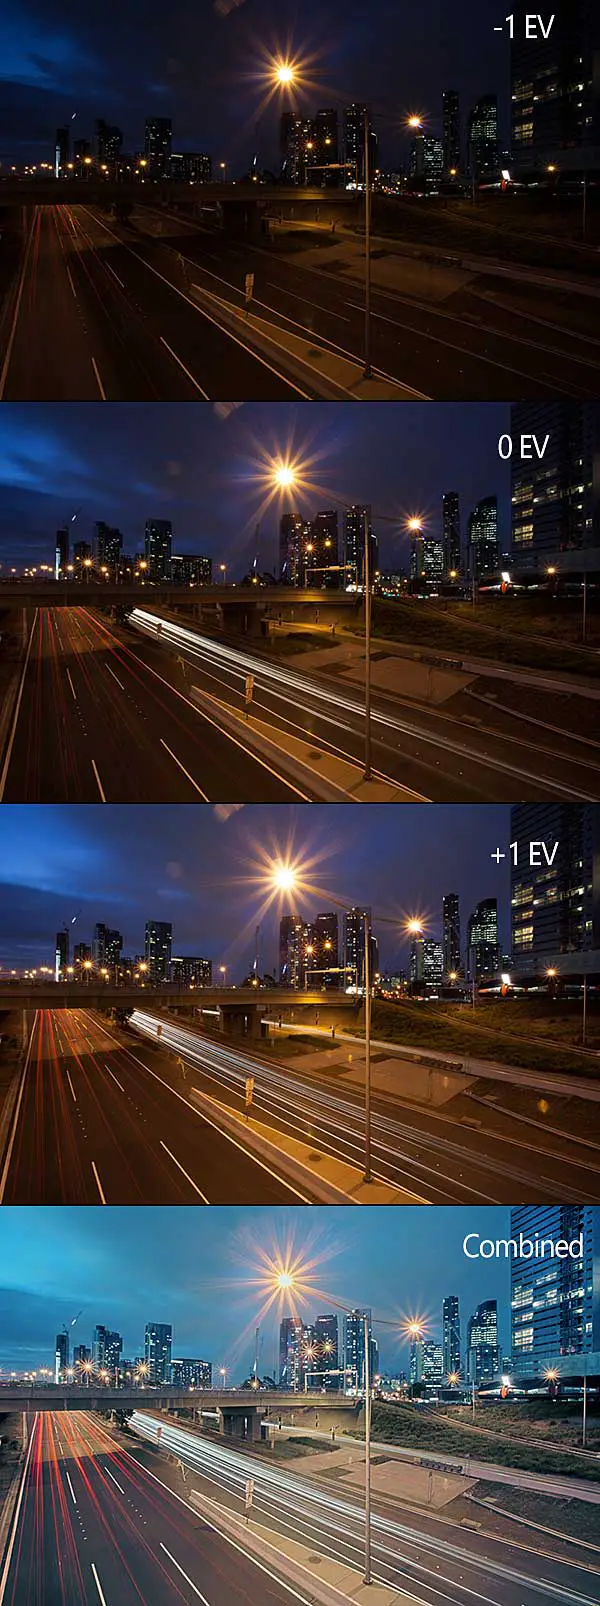
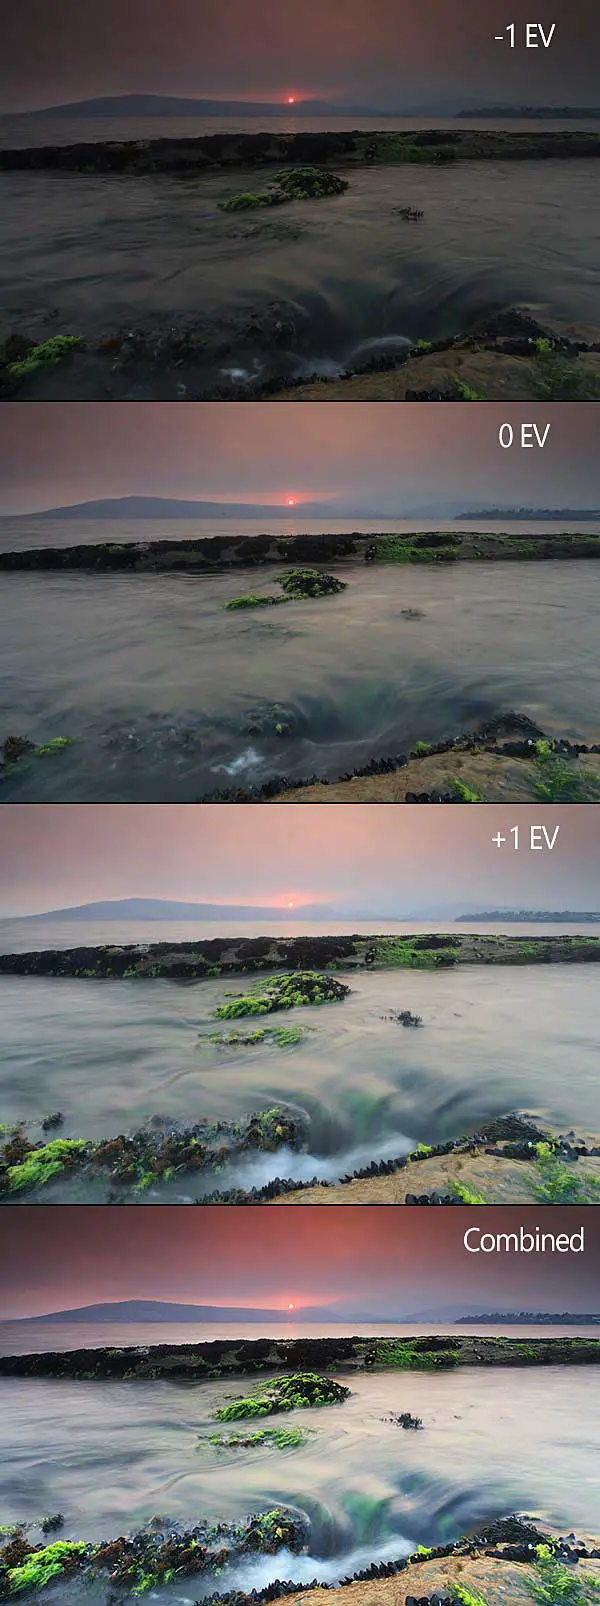
You will now have 3 bracketed exposures on your memory card. Using the settings described in this tutorial I now have one under exposed image (-1 EV), a neutral exposed image (0 EV) and an over exposed image (+1 EV). Let’s look at the results of two recent trips out where I’ve used auto exposure bracketing and what results it gave me.
Melbourne Overpass
In this first photograph taken on an overpass in Melbourne you might be wondering why I’ve bothered using the dark under exposed image. The idea here was to use and combine the traffic in the three images to give the impression there was more traffic than there actually was. It worked quite well.
Processing this image I wanted to try something different by loading it into Photoshop and trying the HDR tool (Note – Trey Ratclliff has created a great guide that goes into detail on using the Photoshop HDR tool that might be of interest). I’d never used it before and didn’t intend on using it but the result was quite good so I decided to stick with the image and not manually blend it. Just one piece of advice though. Go easy on using HDR whether it be Photomatix or Photoshop. I’m not staunchly against HDR like some others in the photography community and believe it can occasionally look good when applied correctly.
Not happy with the warm temperature from the nearby street lights I decided to use various curves layers to play with the individual colour channels. The idea was to make the image seem cold while still retaining some of the warmth created from the street lights. In the end it was processed a lot more than I normally would but I’m quite happy with the result.
Hobart Bush Fire Haze
Similar to the previous image I’ve taken three exposures for this photograph of a smoke-filled sky on sunset captured on the Hobart Eastern Shore. One under exposed image (-1 EV), one neutral exposed image (0 EV) and one over exposed image (+1 EV).
Normally I’ll capture one exposure of a scene and try to avoid capturing multiple exposures. The nearby bush fires created a smoke haze on sunset which made it difficult to get the exposure I was after so I opted to bracket the exposures.
Processing the photo was much quicker and simpler than the previous photo and probably took around 2-3 minutes. Using the 0 EV image as the base image I made some quick adjustments:
- Placed the -1 EV image over the base image, created a layer mask and used a gradient to use around 30% of the sky from the under exposed image.
- Placed the +1 EV image over the base image, created a layer mask and gradually brought back detail from the over exposed (+1 EV) image
- Created a curves layer and made minor adjustments to each colour channel
- Dodge and burning around the scene. This was mostly burning around the sky and a mixture of dodge and burning around the foreground elements
- Image sharpened
If all this talk of layer masks and exposure blending is confusing then don’t stress! I’ve developed an article that walks you through manually blending exposures.
Hopefully this article has been useful for you. If you have any questions on anything mentioned in this article please feel free to get in touch and I’d be happy to help.
– Alex

Great job!! I rarely use exposure bracketing and don’t have Photoshop, but if I do get Photoshop one day I sure would like to turn out great pictures like you have. In saying that I have other photo editing programs (basic ones compared to PS), and one thing I can never get the hang of is layers. I find them very complicated and can’t even touch first base with them 🙁
Hi Ronald,
Thanks for the warm words and stopping by. Did you know that Adobe has released Photoshop CS2 for free? Admittedly it’s an old version but some of the core functionality is there and it’s still quite usable. Don’t worry though I found layers a little intimidating too when I first came across them. My only advice would be to experiment with them (i.e. create multiple image layers and place layers over other layers to see what effect this has). Try not to be too intimidated by them as you will get the hang of it soon enough!
– Alex
Thanks for the link and the encouragement Alex. I had a look and it appears that it’s for Windows 2000 and XP though. I have Windows 7. btw, I forgot to mention how well the article is written and how informative it is, as are all your articles.
Ron.
No worries Ron! Sorry to hear it was for older versions 🙁
Thanks for the kind words. I’m hoping to try do one article a month this year. It’s a little ambitious but we’ll see how we go! Would love to hear if you had any article topic suggestions.
Thanks again for the kind words,
– Alex
Great writeup on AEB – something I probably should use more often myself!
Thanks Martin! I hope Tassie was good and treated you well. Have to touch base with you soon as I’ve got a couple of questions for you.
Take care,
– Alex