Posted on 2 Comments

Before and After – AAMI Park

[twentytwenty]

Aami Park 1 Aaami Park 2
[/twentytwenty]

Capturing the Photo

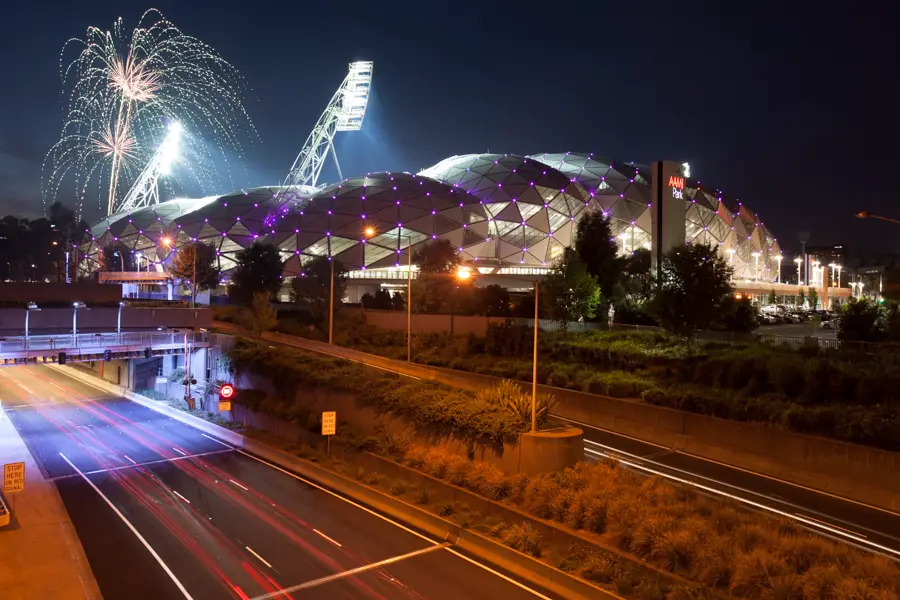
Fireworks at AAMI Park as captured in 2011 during a sports game at one of Melbourne’s iconic sports venues.

After passing by it on my commute every day to work, I’d always wanted to capture a long exposure of the traffic going beneath the bridge with the stadium all lit up with a game being on. Timing for this photo was key where I wanted it to be a clear forecast so I could get a nice blue sky around blue hour.  I waited a few weekends where an event would be on but the forecast wasn’t really on my side. Eventually I got lucky with the forecast and luckily there was a time playing so decided to pounce. The plan was to arrive just on sunset to setup and capture an image around blue hour which would provide a nice even light over the scene and allow me to capture the lines from the constant flowing traffic beneath.

Various photos taken over the night.

It was by luck that AAMI Park uses fireworks for when a team scores a goal. Even more lucky was that many a goals were being scored. I have to be honest – photographing fireworks isn’t my strong point and I really wanted to capture it in one image rather than blending the fireworks into the shot. Thanks to the fireworks going off every 5-10 minutes it let me get the right photo eventually in a 20 second exposure at F/13. For this photo I used the Canon 5D Mark II, Canon 17-40 and a tripod.

Processing the Image

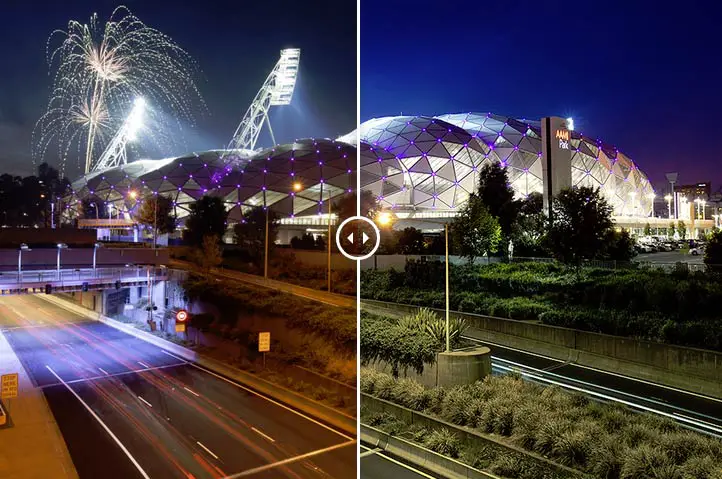
The challenge for this photo (and something I find a lot when shooting night time) is battling the warm temperatures of the street lights. For this image, I could of edited it entirely in Lightroom by using the adjustment brush and saturation but I wanted a greater level of control over the image where I could make small-scale changes to a small selection without affecting the overall image.This is where I encourage the use of layer masks in Photoshop due to their ability to allow you to make selective changes to an image. Want to increase the saturation of just the reds of the traffic flowing past without increasing the saturation to other reds in your image? Layer masks is your answer.

[box type=”info” style=”rounded”]More information about layer masks and blending can be found in an earlier post about layer masks on my blog[/box]

Using layer masks on the bottom half of the image, I used a mixture of selective saturation changes, curves channel changes (adjusting the Red channel shadows and mid tones to reduce the red) and introducing a cold photo filter . I’m probably not 100% with the bottom half of the image but much prefer it over the original image where the lights create a high temperature over the scene.

With the high temperature traffic lights cooled down I then went about editing the sky and stadium. The changes here were quite simple and included:

  • Saturation boost and brightening the sky – With the intention of capturing the image on blue hour I really wanted to bring out the sky to emphasize the blue hour feel. The sky in the raw was quite flat (notice how the light drops off near the stadium lights) so I used the dodge feature in Photoshop to brighten the sky and to also bring out the fireworks more. With this done I then set about boosting the blues of the sky with a saturation mask
  • Colour correcting and brightening the stadium – As  I had the camera set to auto white balance, this left a warm and inconsistent colour temperature across the whole scene. To correct this, I set about creating a curves layer, opening the red channel and reducing the reds in the shadows and mid tones. The key here was to remove the reds from the stadium to make it appear its natural white colour. In addition to this, a saturation layer was created to lower the saturation of the stadium. Once again, a layer mask was used here for both layers to ensure the reduction to the red channel and saturation was only made to the stadium and not other parts to the scene. Once this was completed, I then went about dodging the stadium to brighten it
  • Straighten and perspective correction – I must admit, it’s rare that I’ll get my horizons 100% straight. Luckily it’s easy to quickly fix in Adobe Photoshop by selecting the ruler tool, running it along the horizon of the image and then selecting Image > Image Rotation > Arbitrary. With this complete I also used the lens correction tool in Photoshop which corrects distortion based on your lens profile. This can be found in Filter > Lens Correction

And that’s it really. For this image the most important thing was getting as much correct in camera as possible. Sure the colour balance could have been set to manual to avoid having to re-correct in post but through getting the fireworks and everything in one shot made post processing a lot easier.

Hope this post was useful for you and as usual if you have any questions or feedback I’d always love to hear from you.

Thanks for reading,

– Alex

Posted on

Before and After – Southbank Overpass

This photograph was captured from a busy overpass in Southbank, Melbourne. Coming from Hobart where traffic is let’s be honest – quiet, I’m forever looking for city overpasses that provide a good vantage point that overlooks the busy and constant flow of traffic entering and exiting Melbourne. I’d like to share the before and after for this image as there’s quite the difference between the two.

[box size=”large” style=”rounded”]This photo forms part of my Before and After Series. Be sure to check out previous posts of this series[/box]

Southbank, Melbourne on Blue Hour

[twentytwenty]

Southbank 1

Southbank 2

[/twentytwenty]

Capturing the Photograph

Southbank-Overpass-BracketGenerally when shooting traffic from an overpass that doesn’t have a constant flow of traffic, I will slightly cheat and set my camera to manual mode and fire exposures as each big burst of traffic goes through my scene. The reason for doing this is it allows me to combine the larger flows of traffic into one photo to give a sense that the road was busier than it actually was.  It’s probably not ethical but coming from Hobart where the highways aren’t high flowing like huge cities, sometimes we have to use any trick up our sleeves to get the photo we’re striving for.

Luckily though this wasn’t needed on this occasion as I was overlooking one of the busier highways in Melbourne where there is an abundance of trucks and cars constantly flowing under the overpass.

The photograph was taken after sunset on blue hour. I find blue hour is perfect for shooting long exposure cityscape photos as there is still a lot of natural light which the camera picks up through long exposures that may not be visible to the naked eye. Although there was a lot of light still about, I wanted to ease on the side of caution and capture multiple exposures at different exposure values. By this I mean, I wanted to capture an under exposed, neutral exposed and over exposed image.  No no, before you ask, not to create a HDR image but to err on the side of caution. Although shooting at this hour provides a lot of available light that may not be visible to the natural eye, it still doesn’t overcome the issue that there was some dynamic range drop off around the buildings and dark points of the overpass where the over exposed image would be useful.

Using Automatic Exposure Bracketing

For this reason I set the camera into automatic exposure bracketing mode (AEB) and set the camera to fire at various exposures. This is quite a useful tool for when you are shooting and don’t want to risk missing the right dynamic range.

[box size=”large” style=”rounded”]Further information about Automatic Exposure Bracketing (AEB) can be found on a previous post of my blog which explains how to use it on your camera and when it can be useful[/box]

With the images captured at varying levels of exposure, I was quite content that I had the image I was after and set off home to process the images.

Editing the Images

Opening the images in Lightroom, I was glad to have taken multiple exposures and decided to use the +1 over exposed image as my neutrally exposed image was slightly too dark. Instead, the over exposed image provided a good level of dynamic range without blowing out any highlights while bringing out detail in the shadows.

Upon editing the image, it was quickly apparent that the surrounding lights had warmed the RAW temperature of the image to a level that didn’t accurately reflect the scene. Normally I would drop the colour temperature within Lightroom but opted to go straight to Photoshop for colour grading.

I’m quite fond of using Photoshop for colour grading of my images through using Curves to make this change. Curves is super powerful as it allows you to isolate your changes to the shadows, midtones and highlights of the red, green and blue channels of the image.  Through using this tool, it provides you with the ability to have great control over the tones and contrast of an image. For example, in this image I used Curves, selected the red channel and made changes to the shadows to correct the colour temperature. For more example about Curves, Adobe’s website has some [ilink url=”http://helpx.adobe.com/photoshop/using/curves-adjustment.html”]great information[/ilink] about using the tool.

For the most part, the final image involved a lot of back and forth edits in curves with layer masks to subtly introduce different parts of the curves to parts of the image. This generally meant bumping the shadows then layer masking it to a particular part of the image (i.e. boosting the shadows for the under pass of the image).

If you enjoyed this post be sure to check out my other posts in this [ilink url=”http://www.alexwisephotography.net/blog/category/technique/before-and-after-technique/”]Before and After Series[/ilink] or if you’re feeling brave, give me a follow on Twitter or Facebook 😉

Thanks for reading.

– Alex