
Photography Tips: Waterfall Photography
Waterfall photography is one of my favourite styles of photography as it combines my love of nature and long exposures. I’m a sucker for standing waist deep in a freezing stream capturing a photo. It’s strangely relaxing especially when you have a scene all to yourself. But enough jibber, these photography tips should help you with:
- What camera settings to use for waterfall photography
- Explain and show how shutter speed can affect your photo through visual examples of different long exposures
- What equipment to use
- My personal step by step process of setting up a photograph and the things I consider in terms of composing the photograph and how I decide on what camera settings to use
- Working out ideal weather conditions for waterfall photography
Equipment
Most photography tips place too much emphasis on equipment and the need to have an expensive camera or lens. You can spend as much money as you want for waterfall photography but purchases I find essential are a tripod, circular polariser and a camera (No way really?). I’ve provided some equipment suggestions for each part but please don’t take this as the only equipment you can use. Be creative and use whatever you have available to you financially. I’ve seen people take some amazing photos just with an iPhone. But feel free to email me if you need any advice on what equipment I’d recommend as I’m always happy to lend a hand.
Camera

An obvious one but you will need a camera that is cable of capturing shutter speeds longer than one second and preferably upwards of 15-30 seconds. All digital SLR cameras come with this functionality and most point and shoots also now provides some longer shutter speed functionality.
I must admit I’m slightly biased here as I’m a Canon shooter myself but the Canon 5D Mark III coupled with the Canon 17-40 is a fantastic combination. Why you might ask? The weather sealing of the duo make them perfect for waterfall conditions where your camera may be exposed to spray from the waterfall. I’m by no means dismissing other brands or cameras however this is just my preference.
Circular Polariser
The circular polariser (not to be confused with the linear polariser) is a screw on filter that reduces glare and provides deeper and appealing colour tones
This isn’t crucial for waterfall photography but I personally like the effect which the filter provides and wouldn’t leave the house without it when shooting waterfalls. Whilst using a circular polariser also means you lose 2 stops (or 1-1/2 stops with some brands) which is beneficial as it allows for a longer exposure. You can pick yourself up one and use it for other things too such as minimising reflections from the windows on cars or buildings. If you’re shooting with an ultra wide lens then be careful not to purchase the cheapest filter out there as you will run into vignetting issues. Instead something like this Hoya HD2 filter is a great purchase (pity about the price though…!)
Below are examples of images captured with and without the circular polariser. It’s not the best example but the big difference where the glare is reduced around the key rock to the right of the frame.

Circular Polariser – No Filter
Neutral Density Filter
Using a neutral density filter is a useful tool for obtaining a longer exposure time. This is possible by placing a dark element filter over the front of the camera lens which allows you to capture an exposure time longer than if shooting without a filter.

To put this into perspective, if you were shooting without a filter and the camera gave you a base reading of 1/15 of a second, attaching a 4 stop neutral density filter would change this reading to 1 second. Again if you had a base reading of 1 second without a filter applied, attaching the 4 stop neutral density filter would result in a reading of 15 seconds. Make sense? Not really? This neutral density calculation cheat sheet might help give you an understanding of how different strength neutral density filters can affect shutter speed.
Neutral density filters aren’t crucial for waterfall photography because you will be shooting in diffused light which means you are able to easily achieve desirable exposure times without the need of filters. Without going overboard this Hoya 4x (0.6) ND filter is ideal for waterfall photography and will allow you to capture shutter speeds slow enough without over doing it. By this I mean, you don’t necessarily want a super strong neutral density filter as there’s no need for super long exposures (5 minutes~) when it comes to capturing waterfalls.
Tripod

Using a tripod is essential for waterfall photography as it allows you to capture water movement whilst retaining a sharp image. Attempting to take waterfall photographs without a tripod results in blurred images. This is easily avoided by using a tripod to steady your camera and provide a sharp image.
Most tripods on the market extend to around 140-150cm which provides you with the opportunity to get a little wet (and possibly cold)
I’d suggest positioning yourself ankle to waist deep in the water to get a different angle. Most photographers are quite content on shooting from the water’s edge so this is an easy way to get something different from the norm. A word of warning – take it slow. A recent trip photographing waterfalls I was ankle-deep in water and took one step and was suddenly waist deep in water. Sometimes your tripod is a handy tool to test the depth before making an unfortunate step.
You can’t go wrong with a Manfrotto tripod. They’re a market leader and I personally recommend the cheaper more affordable range as opposed to dropping some considerable money on a carbon tripod. Why? You’re going to get your tripod legs exposed to some pretty harsh elements and sure you can clean your tripod as much as you want post trip but these conditions aren’t the best for the longevity of a tripod especially if you see yourself branching out into seascape photography.
[box type=”info” size=”large”]For more advice regarding equipment for landscape photography be sure to view my ‘Useful Equipment for Landscape Photography‘ post[/box]
The Importance of Shutter Speed
Shutter speed is the time which the shutter within the camera remains open to capture an image.
Effectively this is the amount of light that hits the camera sensor or film which is anywhere from 1/16000 of a second or as some have demonstrated, years. Longer shutter speeds can be achieved by using a low ISO setting, shooting at a relatively high f-stop (f.16-32) or by introducing filters such as neutral density filters or circular polarisers (as soon discussed).
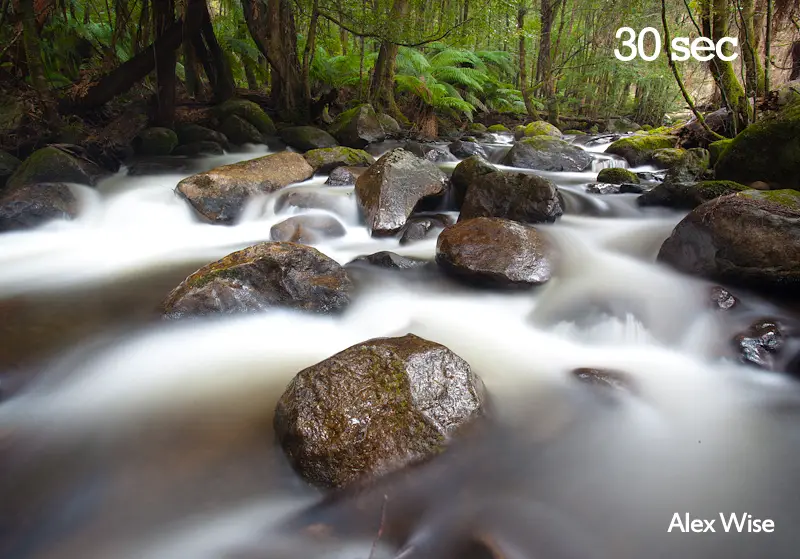
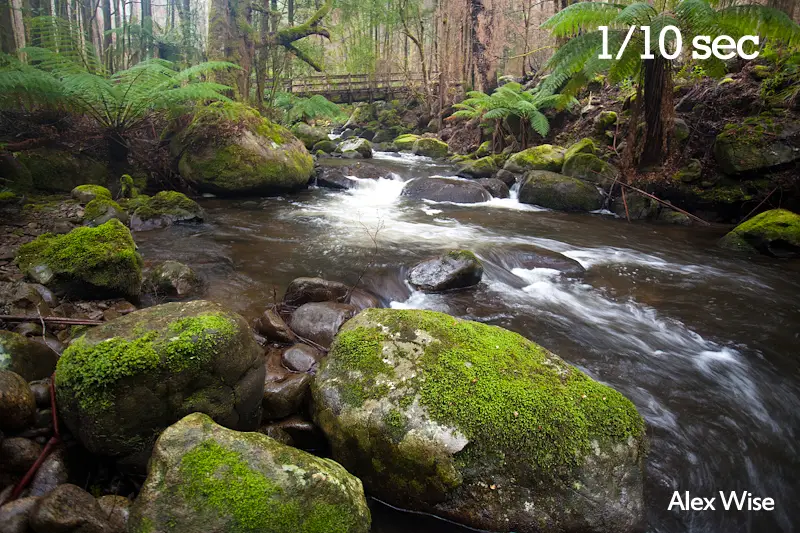
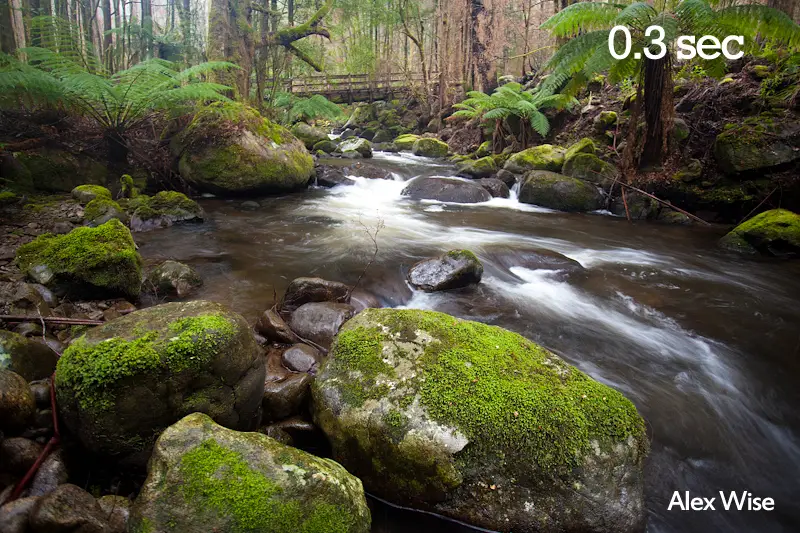
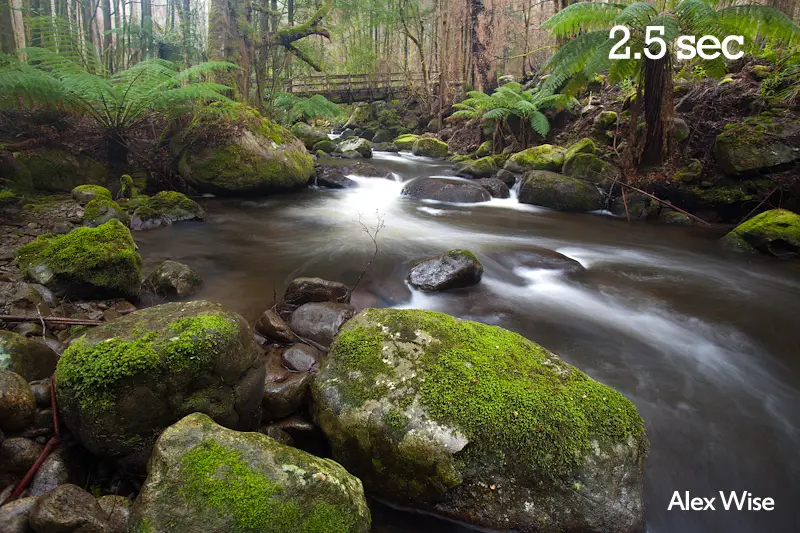
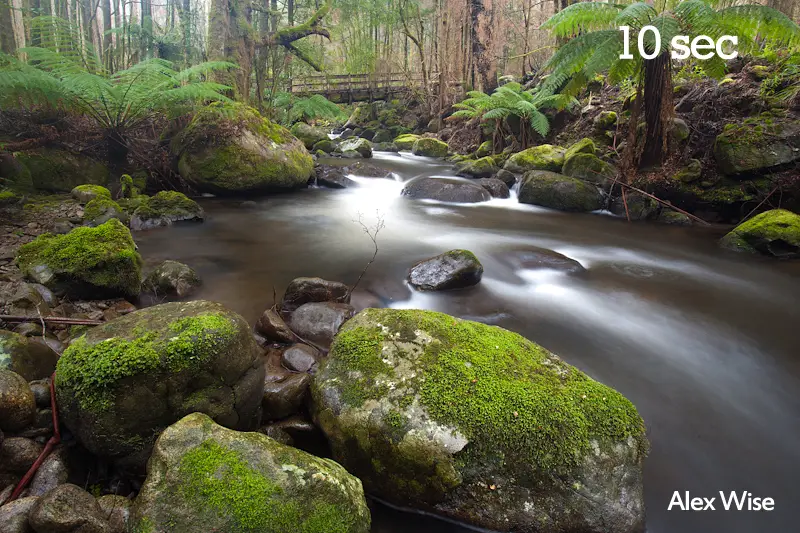
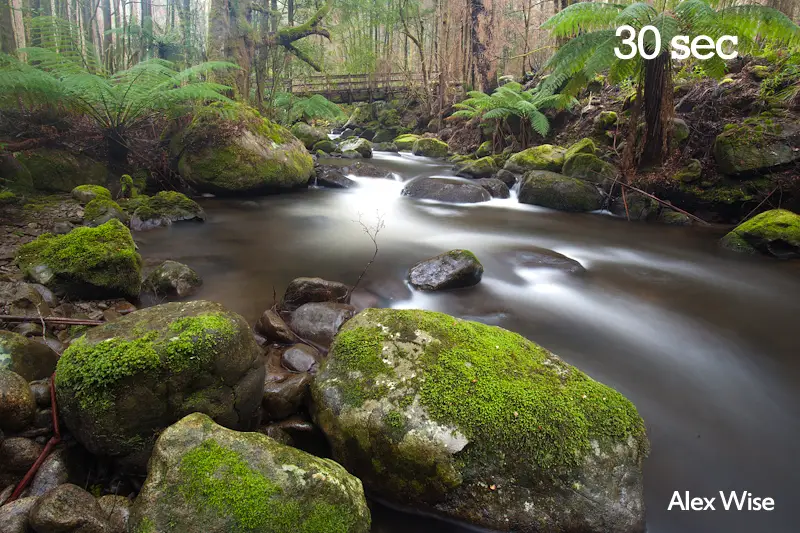
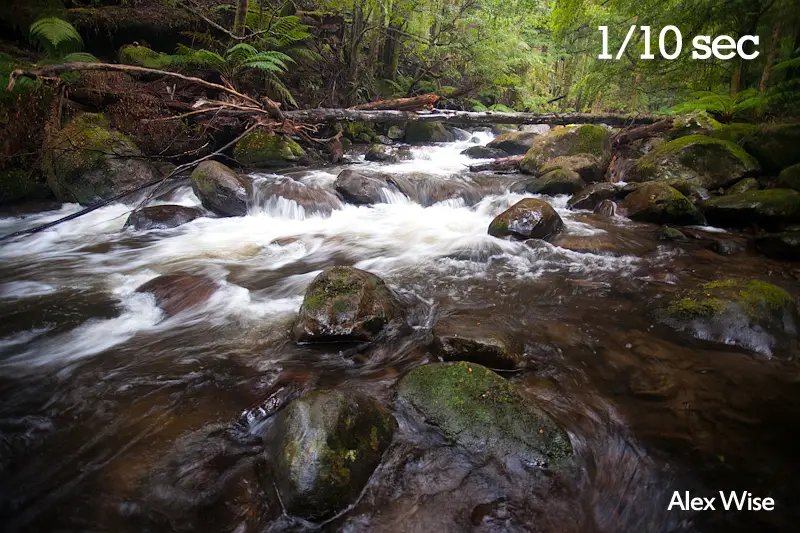
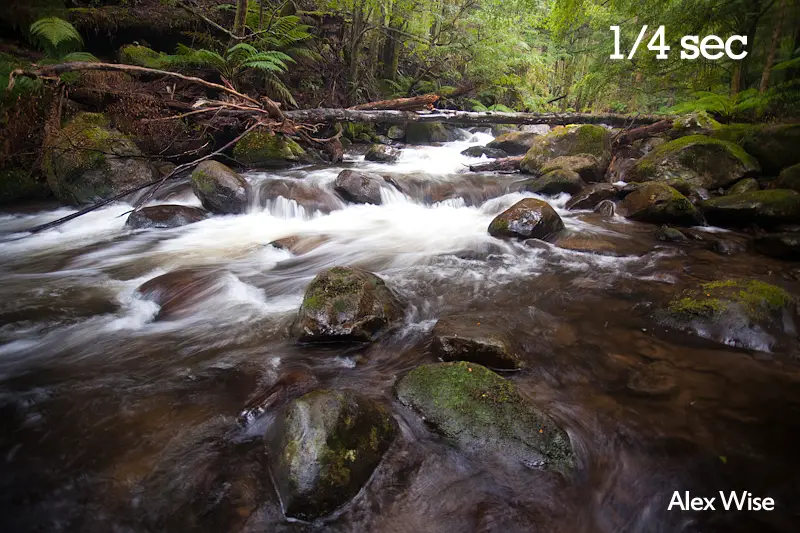
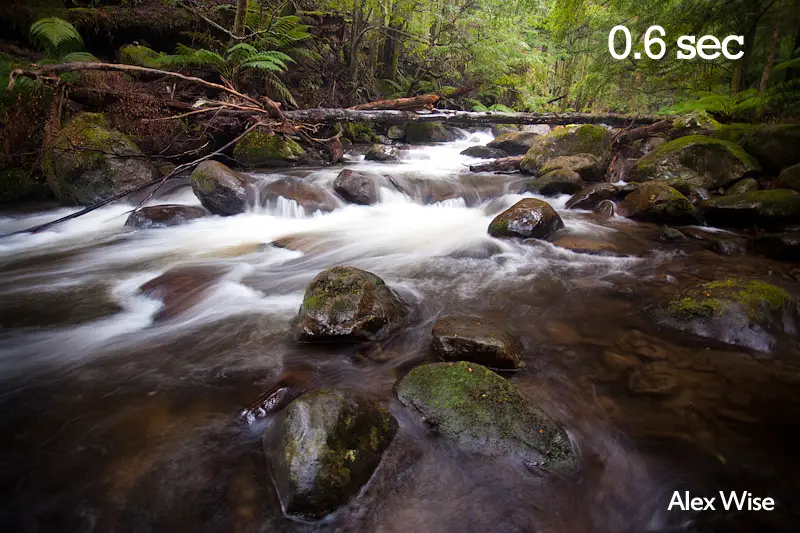
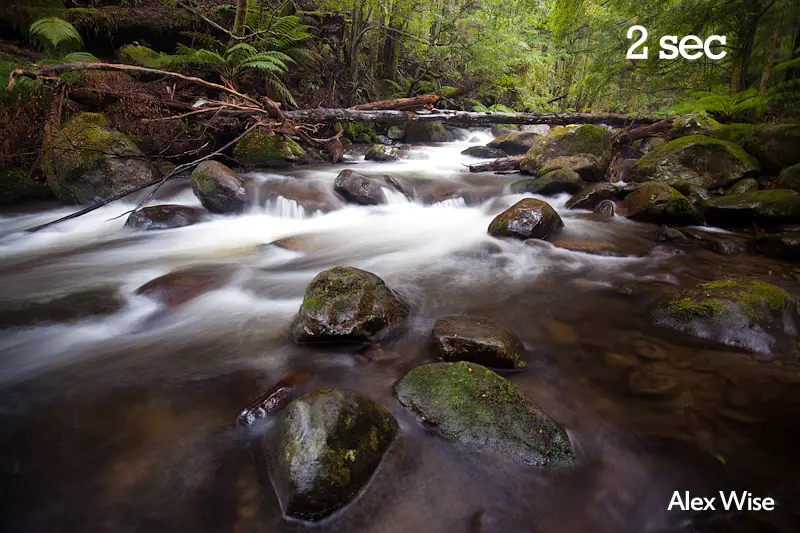
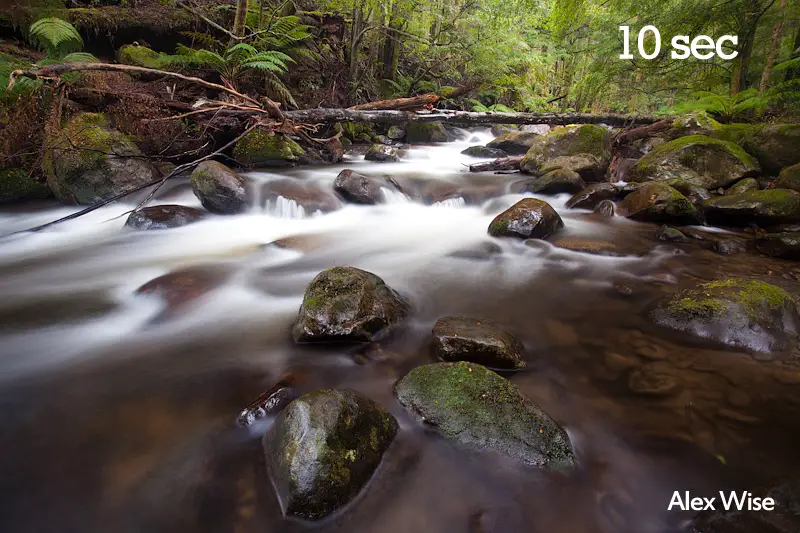
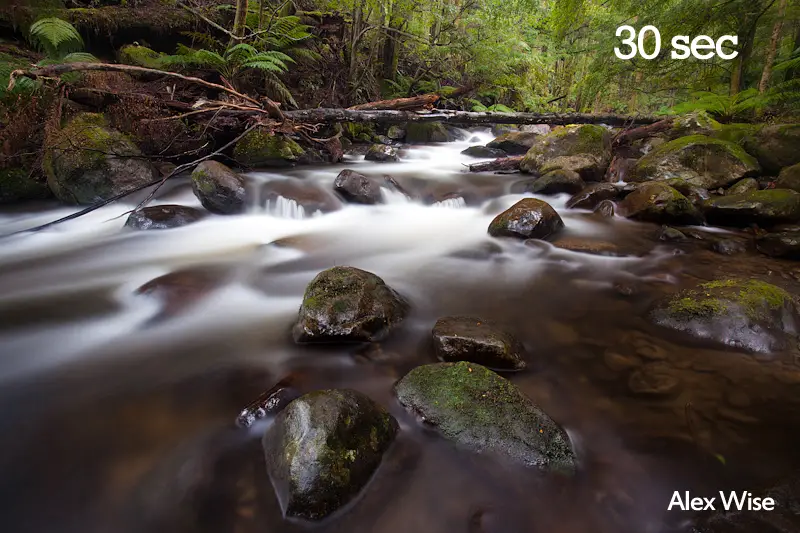
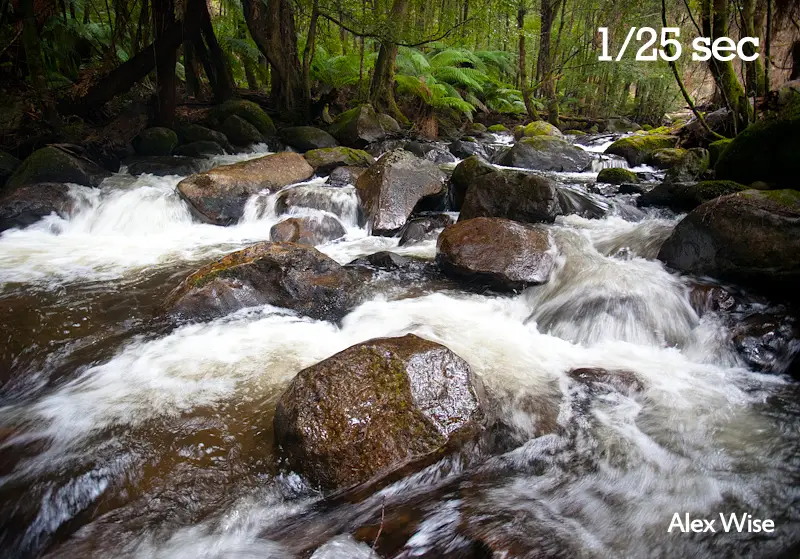
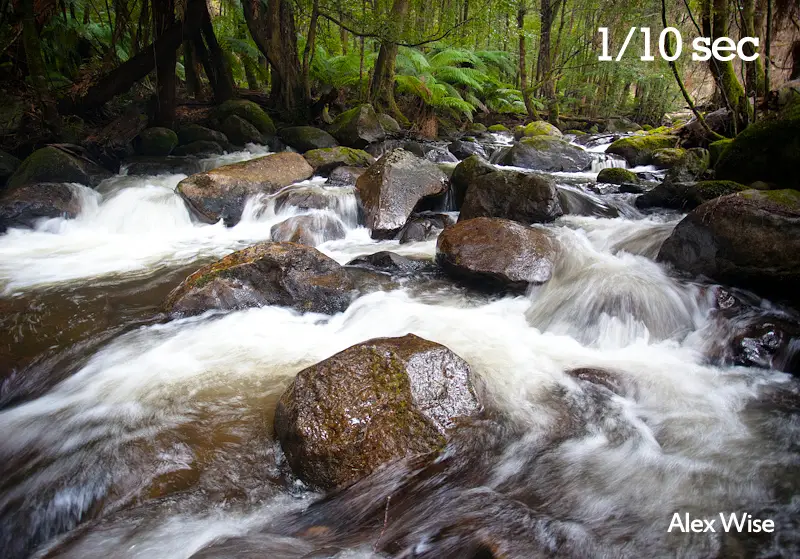
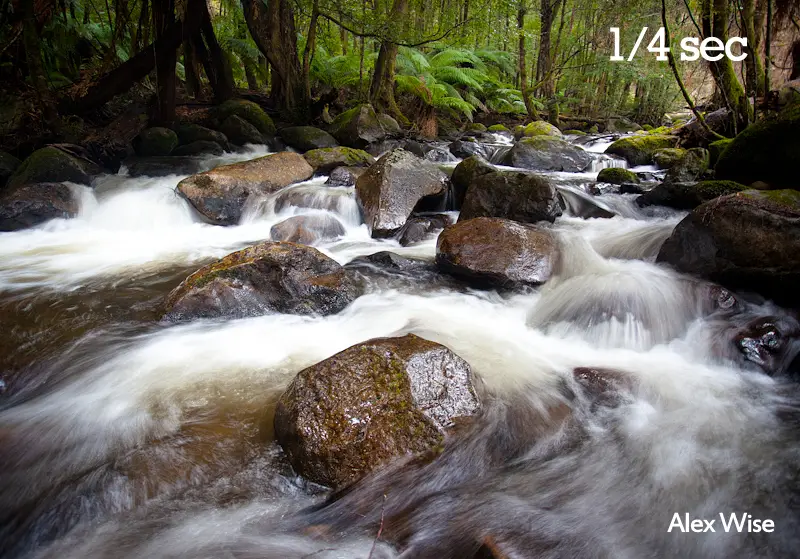
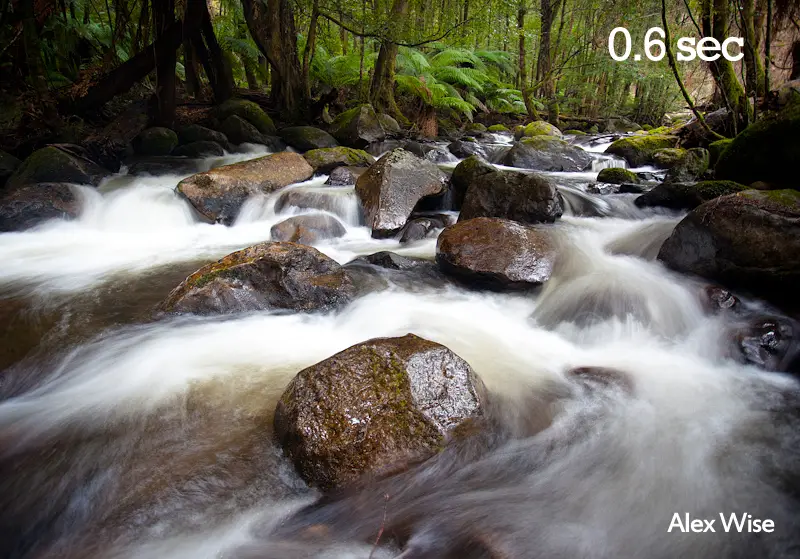
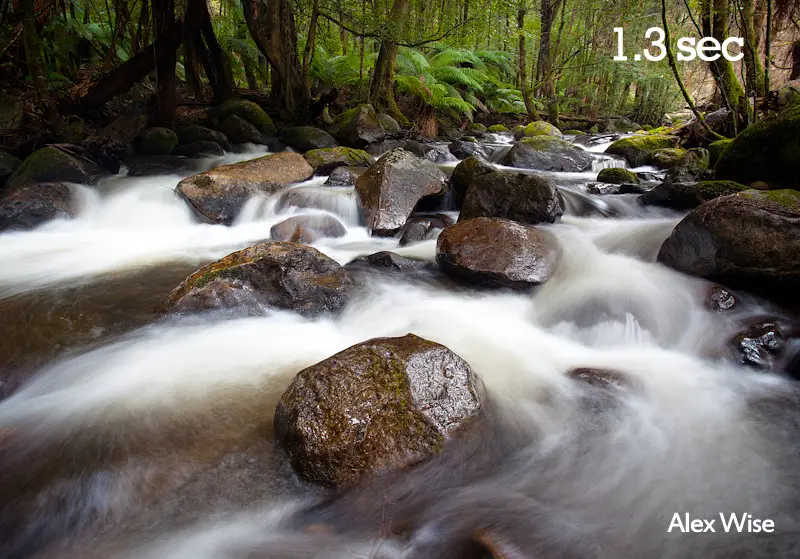
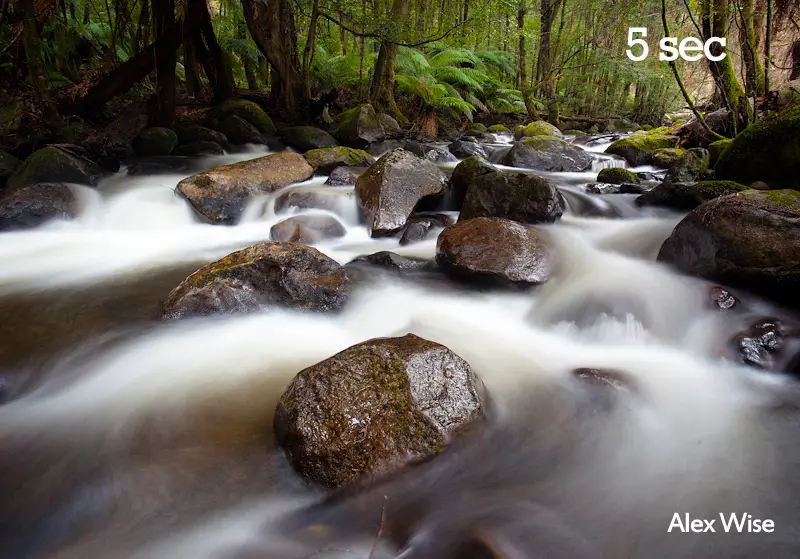
So what impact does shutter speed have when taking photographs of waterfalls? Quite a lot actually. To help you understand how shutter speed is helpful for waterfall photography, I’ve created a gif of three scenes that run through the various shutter speeds. The images all have one thing in common in which the water gradually moves from a rough texture to a nice smooth effect.

1/50 sec– 1/10 sec – 0.3 sec – 2.5 sec – 10 sec – 30 sec


1/25 sec– 1/10 sec – 1/4 sec – 0.6 sec – 2 sec – 10 sec – 30 sec


1/50 sec – 1/25 sec – 1/10 sec – 1/4 sec – 0.6 sec – 1.3 sec – 5 sec – 30 sec

What shutter speed to use?

So what is the ideal shutter speed for shooting waterfalls? It really depends on various factors and how you want your final image to look. I’m quite fond of the shutter speed effect that is evident around the 2-5 second mark of smooth water to provide a calm image.
The shutter speed effect around the 0.3″ mark retains the roughness of the water while avoiding the smooth effect that can be seen around the 5 second and beyond exposure.
Although sometimes retaining a rough texture to the water can work well especially when the river is rough and you wish to capture this mood in your image. Personally I try to hover around the 2-10 second mark.
Why?
Any longer and you begin to introduce blur around the foliage area if there is a slight breeze on the day. For this reason I find 2-10 seconds ideal for capturing a nice smooth texture to the water while retaining sharpness to the surrounding foliage.

Generally my process of taking a waterfall photograph is as follows:
- Set the camera up for the photo, composing with an interesting foreground element at the front of the frame. Normally I look for a mossy rock and focus the camera on that feature while retaining the background in focus also. You can see what I’m referring to by looking at the above shutter speed comparison clips. Each image I frame the photo centering a rock towards the front of the frame. This technique is heavily inspired by the late (and amazing) landscape photographer Peter Dombrovskis. This is how I like to compose my landscape photography but don’t feel constrained to this technique. Explore different ways of composing the frame and capture something that makes you happy.
- Put the camera into Aperture Priority mode (AV)
- Set the camera to a relatively high f-stop (around f11-22)
- Fire a test shot/reading to get a base feel of what exposure times you will be working with. For example, I dial f.13 into the camera and set the ISO to 100. This gives me an exposure time of 0.8 seconds.
- This sounds corny but I like to take in the scene and get a feel for things. Why? If there is a breeze this will affect the sharpness of surrounding foliage.If there is a slight breeze then it’s best to opt for a shutter speed that isn’t too slow (i.e. 30 seconds) but more around the 1-2 second mark.
- At this point I want to increase the shutter speed for a longer exposure. I do this by increasing the f-stop to f.16 and decreasing the ISO from 100 to 50 which now gives me a more ideal exposure time.
Why do I shoot in aperture priority and not manual after taking a base reading? Convenience. Some people almost have an arrogance about shooting in manual mode as if it’s some prerequisite to being a ‘professional’. Aperture priority works for me so why change? It’s only when I’m not happy with the test image (whether it be over or under exposed) that I sometimes change to manual and making slight changes until happy. |
But use whatever works best for you whether it be manual, shutter or aperture priority mode
Ideal Weather Conditions
Miserable weather is a great time to pick up the camera and go take some waterfall photographs.

Overcast skies offer a lovely diffused light and the rain increases the flow of water (especially after a few days of rain). For this reason winter is my favourite season for waterfall photography.
Investing in a camera coat or even taking a plastic bag to protect your camera from rain and spray isn’t such a bad idea if shooting in miserable conditions.
And that’s it!
If you found these photography tips helpful I’d be extremely grateful if you could share the post with your friends via the available tools below or consider linking to it on your blog. Be sure to check out my Photoshop and Lightroom tutorial videos. I’m constantly updating this page with new tutorials as I make them and taking requests.
PS. Don’t be afraid to contact me if you’re confused about any parts of the article. It’s always nice to hear from people and I’m more than happy to explain things in more detail. I’d also love to hear any feedback you might have on how to improve this article. Sometimes it’s easy to skim over things so if you think this could benefit by adding things then I’d love to hear.
Oh and be sure to check your leg for leeches 😉
– Alex

Alex thank you so much for sharing this wonderful tutorial about long exposures, I adore those long exposed shots and I can’t wait to do what u advise here. Again thank you so much. Cheers!!!
Thanks so much for the lovely words Dunia. I’m glad it was useful for you and hope you have fun 🙂
G’Day Alex!
I”m interested in that cheat sheet, however when I clink on the link, it says the “Page could not be found”
Hi Phil,
Sorry about the inconvenience. Try this link for the long exposure cheat sheet.
– Alex
Alex, thanks for the awesome tutorial. I was wondering if you could share with us what tripod you recommend or use yourself. Your work is stunning BTW.
Thanks so much for the kind words and stopping by Joaquin. I’m using the Manfrotto 190D which is one of their more affordable tripods. Having been through 3 tripods, I tend to not overdo spending on tripods as most in the past have succumb to an early death due to salt water.