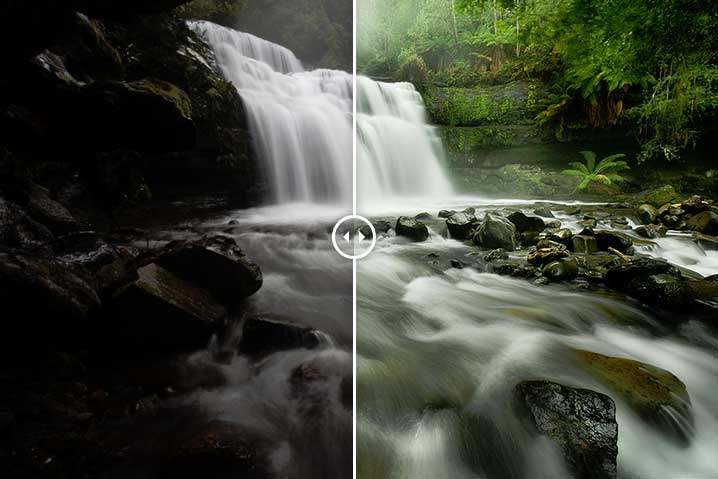
[twentytwenty]
[/twentytwenty]
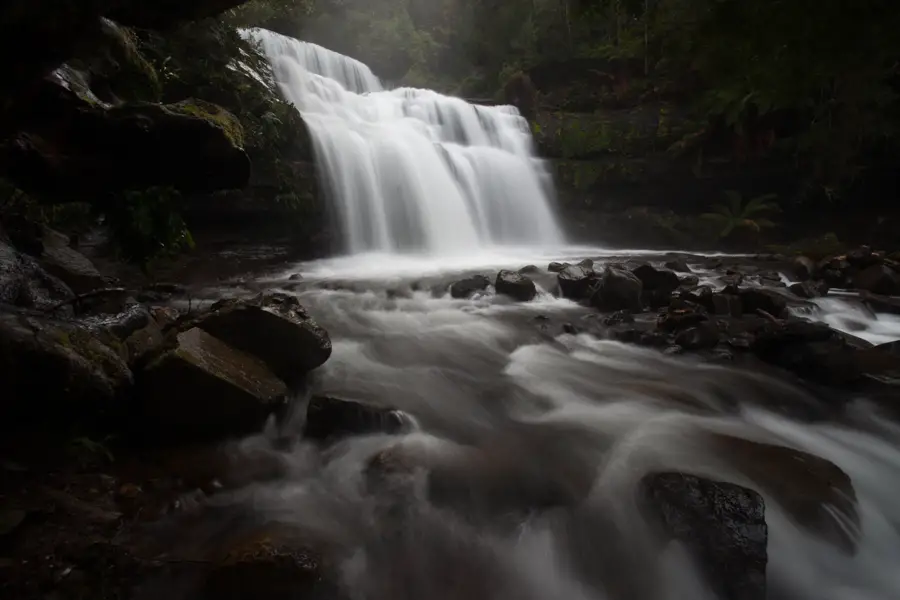
As a photographer, we all have one or two images that are personal favourites. For me, this is mine. It’s a photo captured at Liffey Falls, Tasmania on a wet and wintery day.
Generally personal favourites for me are images that have back stories that make them what they are. Before taking this photograph I had spent 4 days driving around the Tasmanian West Coast in constant torrential rain without much opportunity to get the photos I’d hoped for. Sure it was beautiful walking along those empty beaches in the pouring rain and exploring the quiet towns of the West Coast but at the same time disappointing not to be able to photograph it in all its glory. Feeling a bit tired and over it all, I decided to make a last ditch attempt for some photos at Liffey Falls even if it was pouring with rain.
Taking the Photograph
The rain over the trip seemed relentless and upon arriving it was still constant even through the towering trees. Luckily for this photo I managed to find a nice little spot underneath a large rock slightly covered from the downpour. Being close to the waterfall created its own challenges with water from the waterfall creating a constant spray over my lens. I couldn’t escape the rain! But eventually after taking a photo, wiping the lens and repeating, I eventually got something without water spray all over the image. It was nice walking away from driving around 1200km over 4 days to walk away with one image I was happy with. Regardless thoughI would have probably been happy with nothing. Exploring the Tasmanian West Coast is a joy in itself. Such a beautiful part of the world. In case you’re interested, photos from this trip to the Tasmanian West Coast can be found in a previous post.
The image was captured with a Canon 5D Mark II, Canon 17-40, manfrotto tripod and Hoya Circular Polariser with a 1 second exposure at f/18. Generally I’ll try to shoot a waterfall for a little longer but due to the constant spray from the waterfall I had to settle with a shorter exposure to get a photo without spray all over the lens.
[box]Interested to learn more about photographing waterfalls? Read my how to on photographing waterfalls here[/box]
Post Processing the Photograph
With the amount of spray coming off the waterfall it made the shoot quite the shoot and dash affair. With this in mind, I deliberately shot the image a little under exposed with the intention of pulling back detail in post. Generally shooting slightly under exposed is a good rule of thumb as it offers you a lot of flexibility in post as you are able to recover detail. Shooting over exposed and trying to recover detail is another story and not generally recommended.
Blending two exposures
With the image shot under exposed, I went about loading the image into Lightroom and exporting two images from the RAW. One at the normal exposure that the photo was shot at and another over exposed at +1.52.
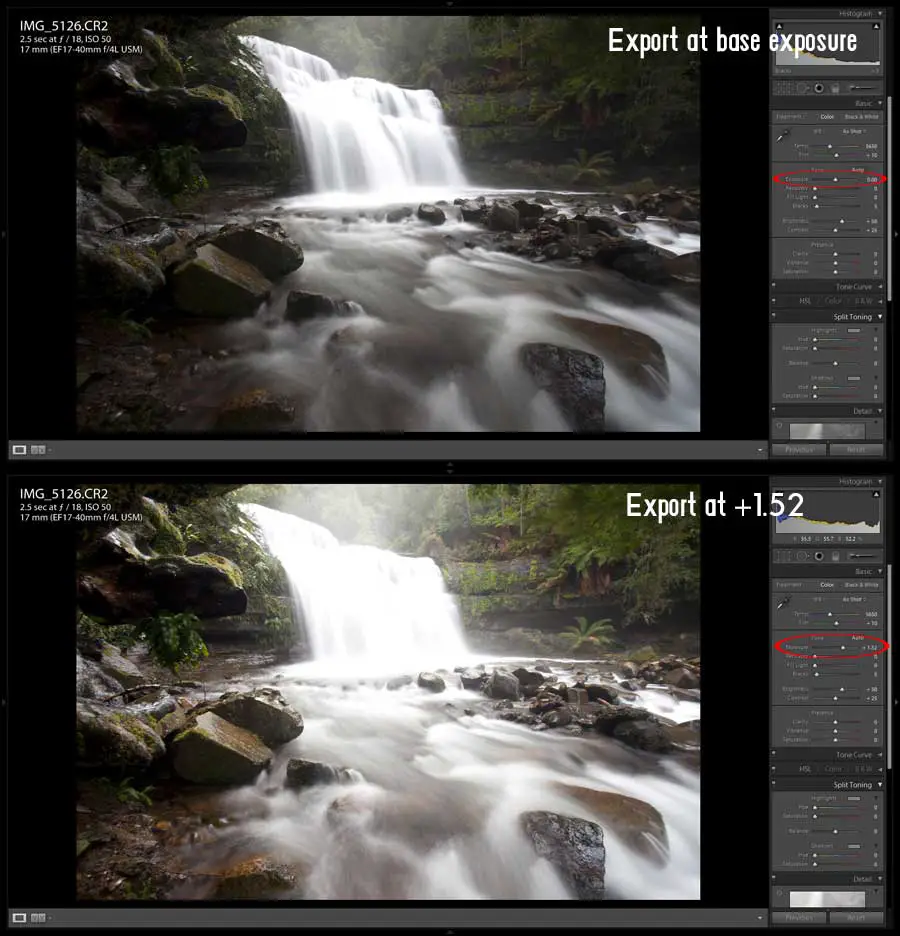
The intention here was to use the over exposed image (+1.52) to bring out detail in areas that were quite dark in the original exposure in particular the foliage areas around the waterfall. Combining parts of the over exposed/second image was through the use of layer masks. I’ve written about the layer mask technique previously and funnily enough, the example image in the post is this photo from Liffey Falls so I’ll let that post do the talking.
Colour Correcting
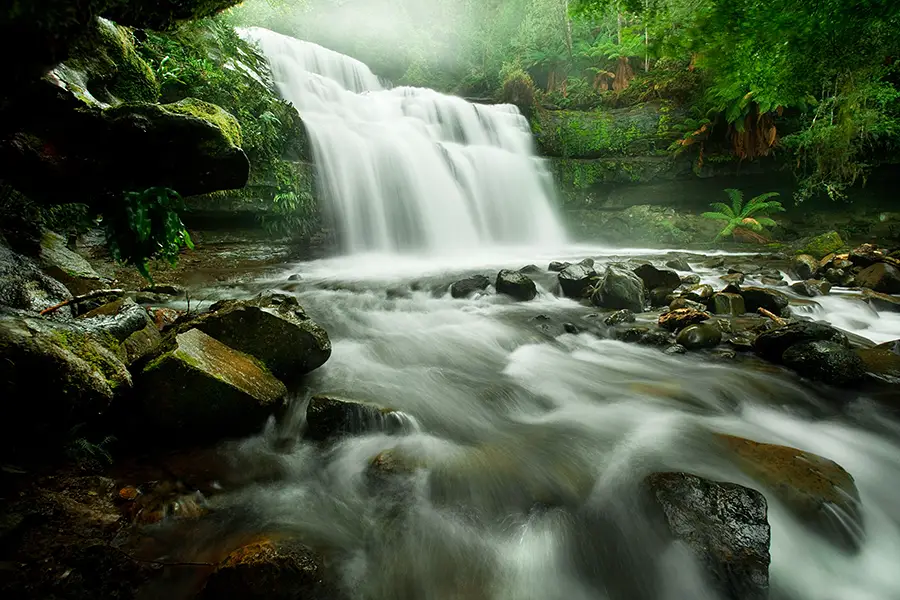
The end result of blending the two images was recovering detail around the waterfall that was otherwise lost in the normal exposure. With the foliage recovered, I then went about making shifts to the red, green and blue colour channels via the curves tool.
In case you’re not familiar with the Curves tool, this gives you the ability to make adjustments to the shadows, midtones and highlights of an image. But for those seeking more control, you can select either the Red, Green or Blue channels and specifically just adjust the shadows of that channel of an image. It’s generally my go to when editing an image in terms of colour correction and changes to the dynamic range of an image. For a quick look into the clip be sure to give this little clip about Photoshop Curves I put together. Not too sure what I was thinking in terms of song choice that day…
I wanted to give the foliage a boost to appear more green and vibrant. Using the curves tool, I made some aggressive changes to the green channel and used layer masks to restrict the changes to the foliage area of the image. This was to avoid introducing a strong green colour cast over the water in the image. With the change to the foliage done, I then went about making some subtle changes to the hue and saturation of the water.
Faking a bit of fog…
So this is where I’m potentially going to lose you… I thought when editing the image “Wow, how great would some fog look at the top of the waterfall? There was a little bit of fog from the rain and low hanging cloud but I must be honest – nothing to the effect as seen in the photograph.Ok so hopefully you’re still with me and I haven’t lost you after coming clean about the fog 😉 But in faking the fog it was actually super easy. Using the dodge brush, I used a mixture of dodging the highlights and midtones around the top of the waterfall gradually introducing it to give this effect.
Final Touches
With the image in a state that I was happy with I went about adding the final touches of selectively sharpening parts of the image using layer masks and some dodge/burning to parts of the image. This was the finished product.
As always, feel free to send an email or leave a comment if you have any questions or feedback.
Don’t forget to give my Facebook Page a like to keep up to date with future posts from my blog or even give this post a like if you’re feeling generous 😉
[fblike style=”standard” showfaces=”false” width=”450″ verb=”like” font=”arial”]
Thanks for reading,
– Alex