After recently moving away from the Canon 5D Mark II to a Sony A7RII, I was itching to get out and make the most of my new purchase by giving the low light performance a play with some astro photography.
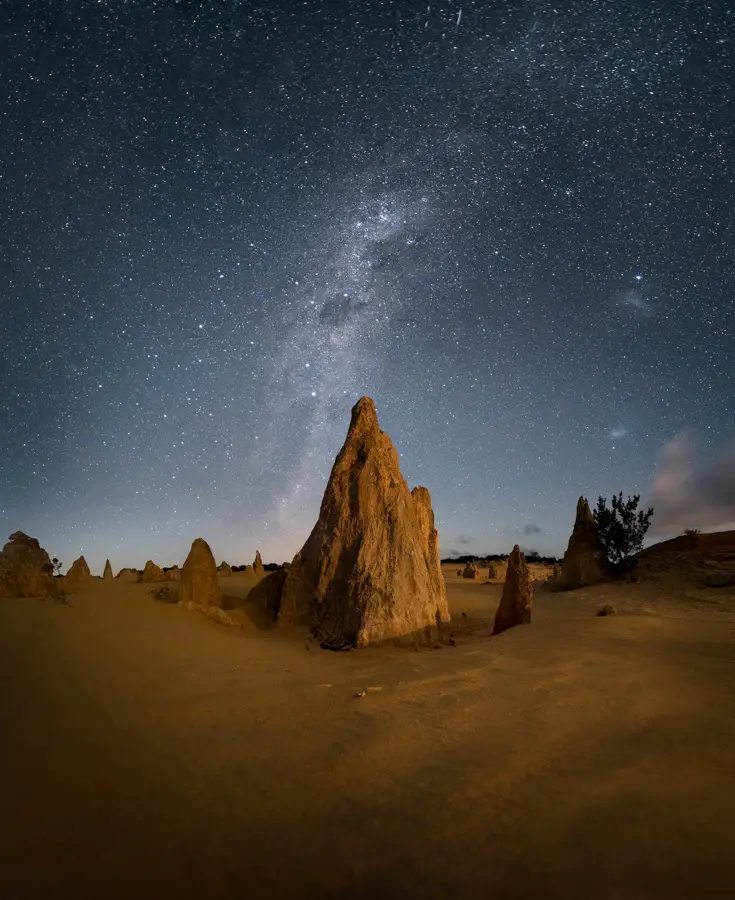
Milky way over The Pinnacles, Western Australia
Milky way photography is something that has evaded me over the years due to the Canon struggling in low light conditions (to put it politely). With the purchase of the A7RII, it was now finally time that I could get out there and shoot in low light conditions without having an image of nasty noise!
But there was one slight problem… I knew nothing about the milky way and spent too much time admiring other people’s photos to take a step back and learn about how to photograph it myself!
Things to consider when planning a milky way shoot
For the purpose of this post, I’m not going to go into great depths on how to use PhotoPills to plan a Milky Way shoot as I think other people have covered this in much better detail than I can. This tutorial by the PhotoPills team is a great starter.
There’s also some other great tools out there for planning a milky way shoot such as Stellarium and Sun Surveyor. Like anything, it comes down to personal preference and finding something that works best for you. For me, photo pills is easy to use which is good for a simpleton like me 😉
Sky tracking mounts are becoming a popular way to reduce the noise in milky way shots. A popular mount is the SkyWatcher mount which rotates to offset the movement of the night sky which in turn allows you to capture longer exposures at a smaller aperture. By doing so this allows you to photograph at a lower ISO which in turn means less noise.
This post will look to cover some of the questions I had as I was learning more about Astro photography. Sometimes it was simple things like
What is the milky way season?
How do I find a dark sky?
When is the best time to photograph the milky way?
Can you photograph the milky way while the moon is up?
How do I check the cloud forecast to ensure clear skies?
What’s the best camera settings for photographing the milky way?
Let’s get started.
When is the best time to photograph the milky way?
Northern or Southern Hemisphere?
Depending on where you are in the world, the milky way is only visible at certain parts of the year. Sure, you might be able to see some parts of the milky way but galactic centre and other parts may be out of view.
The reason that the milky way is only visible at certain parts of the year is largely due to the curvature and movement of the earth. This means for those in the northern hemisphere, your best viewing times of the milky way is between the months of November to February. For those in the southern hemisphere, is between February to October.
This is what people are referring to when they refer to the milky way season starting or finishing.
Is the milky way visible straight after sunset?
Can I just take photos once blue hour ends? Well sort of but not quite.
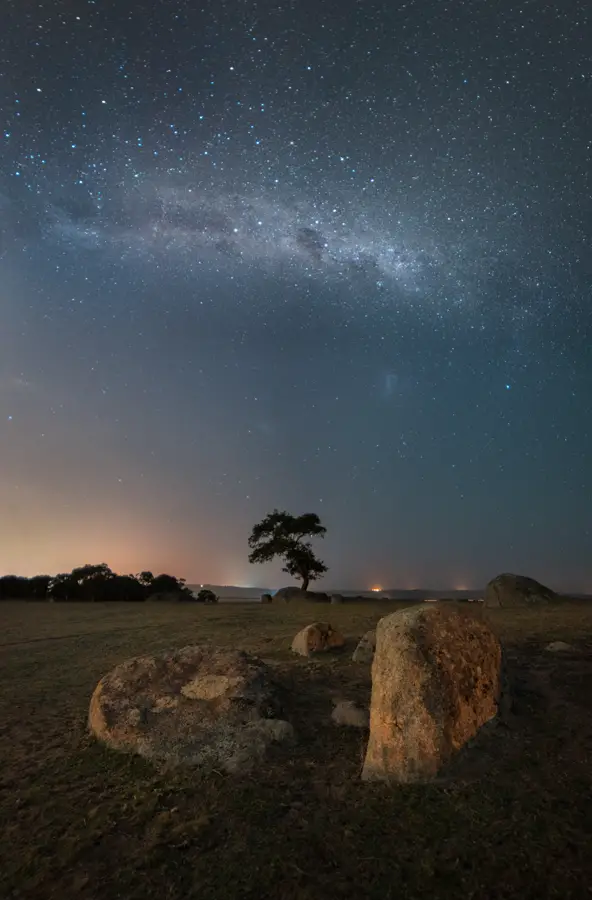
Watching the milky way rise in Lancelin, Western Australia
Like the moon and sun, the milky way begins rising in the late evening and then starts setting in the early morning. The best time to photograph the milky way and all its galactic core glory is once it has fully risen. Depending on the time of the year, this can sometimes be at crazy hours of 3 am in the morning or more comfortable times at 10:30 pm in the evening.
The reason why we wait for the milky raise to fully rise is due to the milky way being huge (100,000 light years in fact! Thanks Google…). If you try photograph the Milky Way while it is still rising, you may find some of the milky way will be cut off and sitting below the horizon. With this in mind, you can still get out there and photograph the Milky Way as its rising but you may find some of it is hidden behind the horizon until it finishes rising.
Why should I care about what phase the moon is in?
Have you ever looked up at the night sky and thought how bright the stars looked compared to other times? This often comes down to two factors… Light pollution and the moon phase.
The first factor that can influence the visibility of the night sky is based on how far you are away from light pollution when looking at the sky. Generally you will find the best skies are found in locations far away from nearby cities. This is due to the amount of light pollution which a city generates which in turn reduces your where you are far away from the light pollution generated.
The second factor which influences how dark the sky will be also comes down to which particular phase the moon is in.
Generally the most optimal time to photograph the milky way is when the moon is in the ‘new moon’ phase. During this time, the moon emits little to no light and increases your chances of seeing the milky way in all its glory. But to go one step further, I’d also recommend planning your shoot when the moon has either risen or set to increase your visibility of the milkyway. Using an app like PhotoPills will give you all this information. Alternatively, websites such as Moon Giant provide a calendar view of the calendar for a particular day of the month.
Finding a location with dark skies
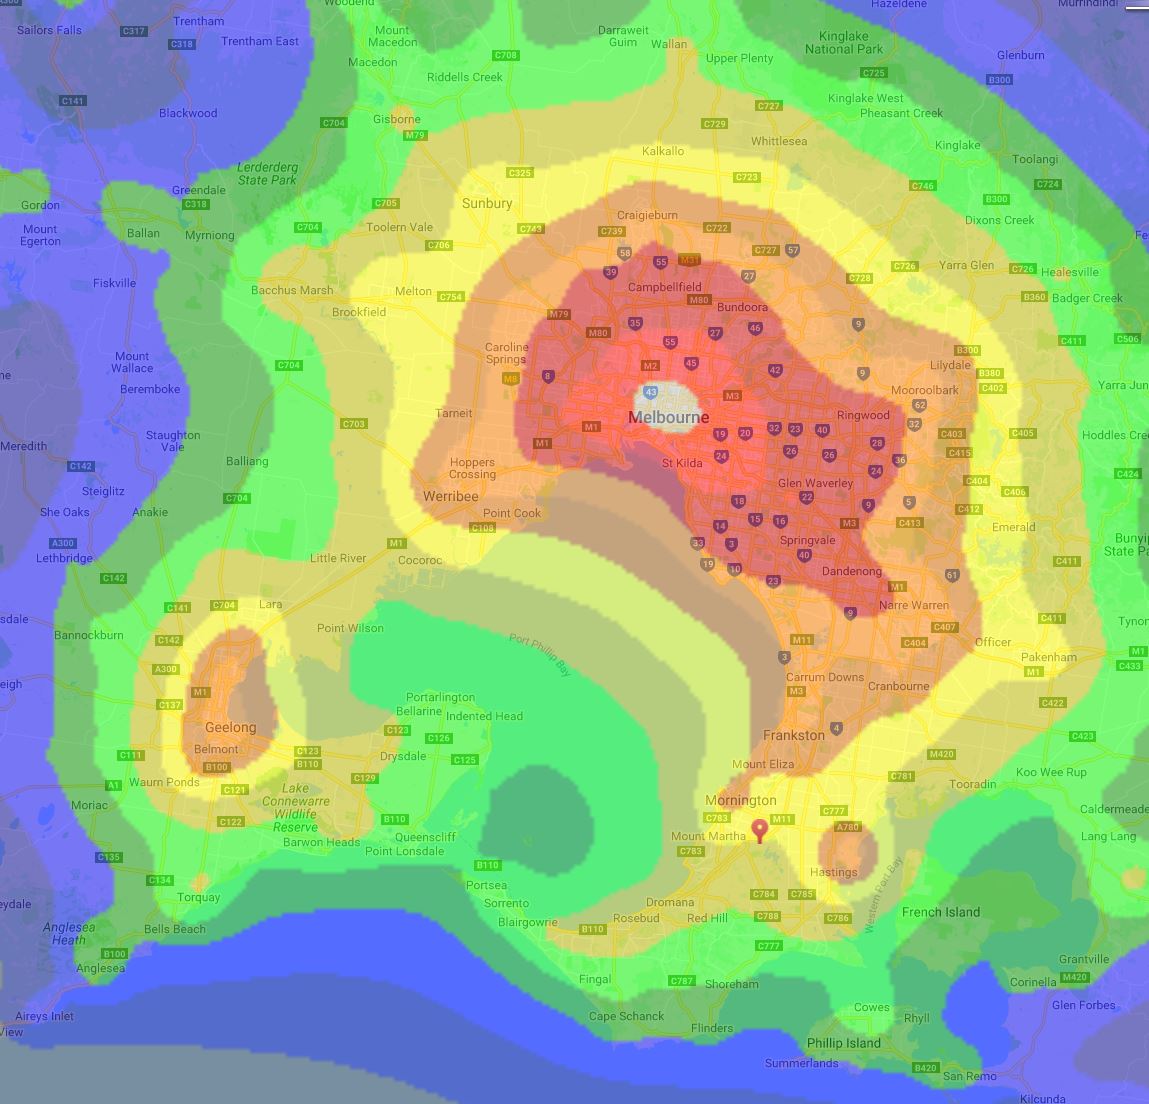
Light pollution over Melbourne, Australia
Depending on where you live, one of the challenges you will have when it comes to photographing the Milky Way is finding a location that isn’t filled with light pollution from a nearby city or town.
Luckily there are tools out there to help with understanding what the level of light pollution is at a specific location. One of my favourites is Dark Site Finder which provides an overlay over Google Maps rating the light pollution in the area from Dark to Bright.
Please note that the data used for Dark Site Finder is 10~ years old so the accuracy for some locations will vary.
But what about photographing a Milky Way under a light polluted sky? One of my favourites is this stunning photo captured of the Sydney Opera House during White Night in 2017 shows that it is more than possible to get a photograph of the Milky Way under a light polluted sky.
How do I check the cloud forecast for the night?
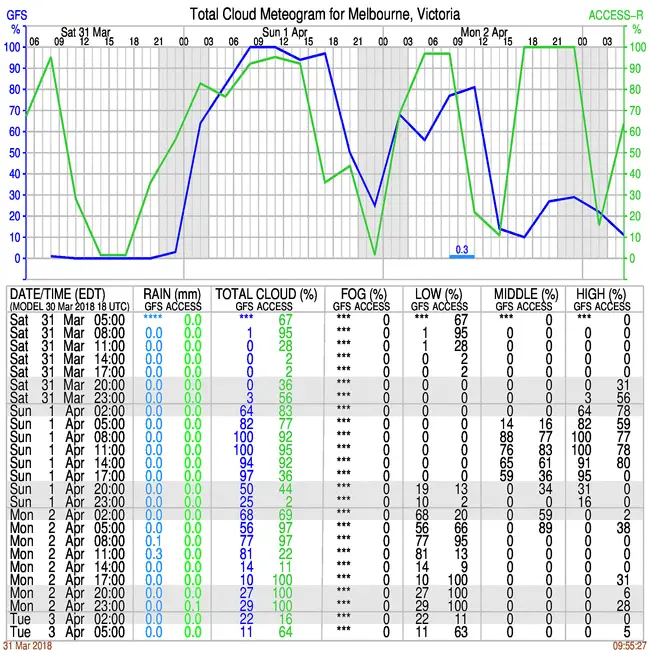
What it looks like when there’s a little bit of cloud. You can only imagine what it’s like when there’s more…
Living in inner-city Melbourne where the urban sprawl of the the city feels like it never ends, I need to venture far if I want to find nice dark skies mentioned in the previous section. As I’m sometimes driving 1-2 hours to get to a location with dark skies, I want to ensure that the location is clear and I’m not wasting my time.
Luckily there’s some great tools out there to assist with knowing what the cloud coverage is like at a specific location. Here in Australia, one of my favourite tools is Cloud Free Night. Using the below screenshot as an example, Cloud Free Night gives me a 3 day cloud forecast for the low, mid and high cloud coverage with also the forecast fog cover. When you only have a limited amount of time to photograph the milky way, cloud forecast tools are a great way to validate that your potentially long road trip and stumbling around in the dark isn’t going to be a waste of time.
Tools like Cloud Free Night are super handy for looking at what the low, mid and high level clouds are doing over 24-48 hours
For those not in Australia there’s also Clear Dark Sky which provides similar cloud forecasts.
Why do I have to wait until the time PhotoPills recommends?
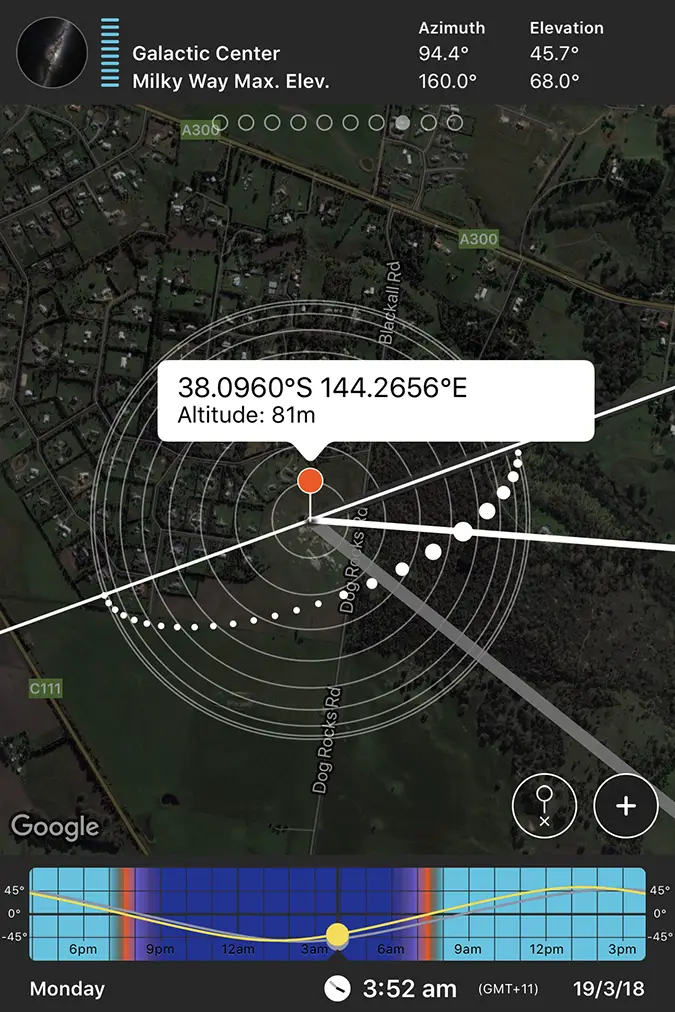
Screenshot from Photo Pills showing me the best time to photograph the milky way at Dog Rocks, Victoria as seen below
PhotoPills (and other tools) recommend a window of time to photographing the galactic core of the Milky Way. As the moon is a light source (and quite a strong one depending on where it’s at in its cycle), this brightens the sky to the point where it makes capturing the galactic core of the milky way difficult. The window of time recommended by PhotoPills is essentially when the moon has finished setting and the sky will be at its darkest. This window of time becomes the optimal time to photographing the galactic core.
Using the screenshot to the right as an example, I’m able to drop a pin to place where I will be taking a photo from which then allows me to see where the milky way will be rising from (the grey line) and where it will setting (the black line). Photo Pills is also recommending the best time of this month to photograph the milky way which is indicated by the full bars at the top of the screenshot.
Being able to see where the milky way will rise and set is super handy especially when you have a composition in mind (like a tree in this case) but are unsure where the milky way will be sitting in the sky. By using an app like Photo Pills, I’m able to cycle through the various times of the year until I find a time when the milky way is sitting in a position that works well for my composition.
I used Photo Pills to plan a recent trip to Dog Rocks, Victoria. The tool allowed me to plan exactly when the milky way would be sitting above the tree (as shown in the previous thumbnail).
Can you photograph the milky way when the moon is still setting?
Definitely!
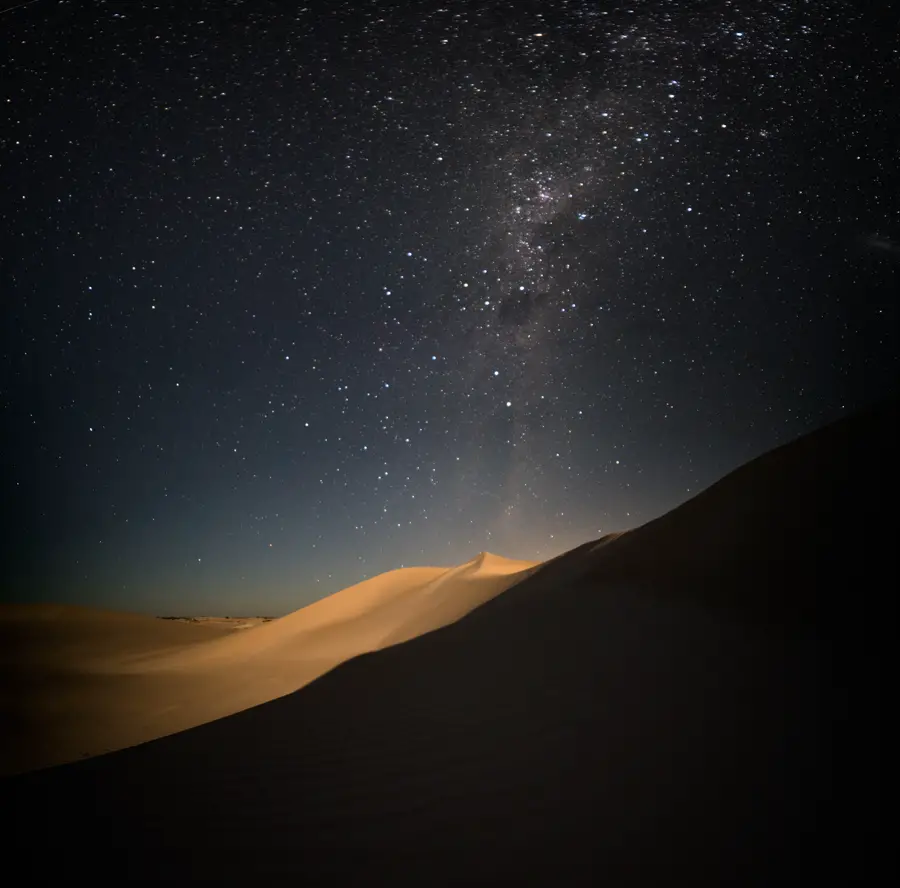
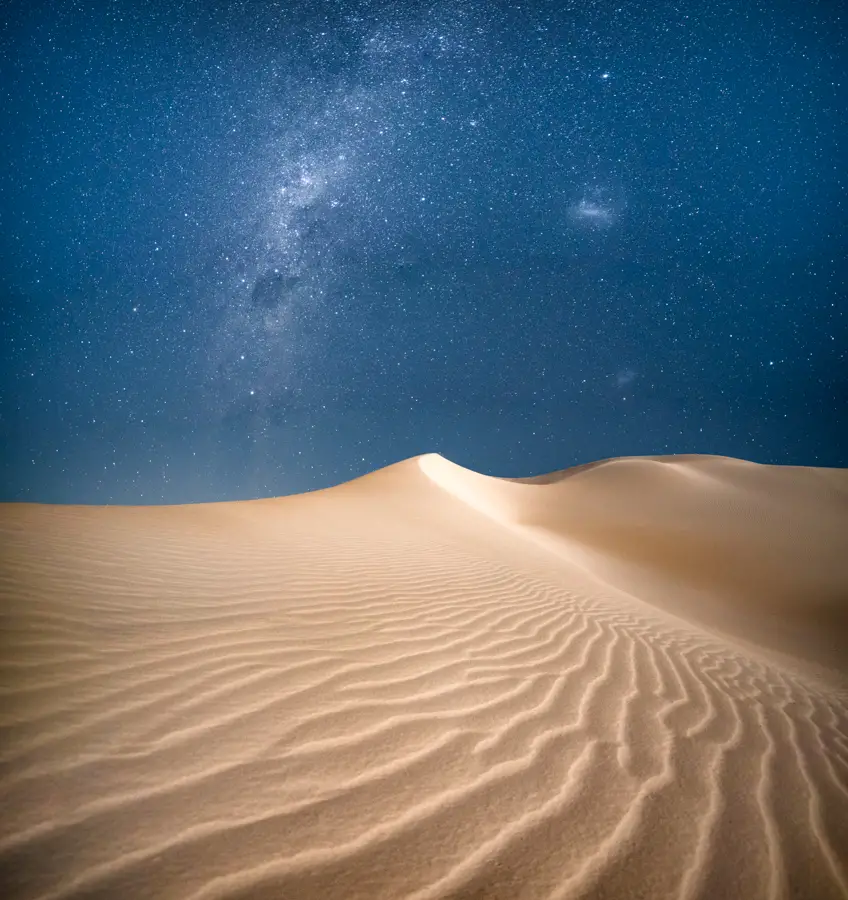
The milky way rising above moonlit dunes in Western Australia
In fact, I actually prefer photographing while the moon is still up as you have the moon acting as a light source helping illuminate your foreground.
If you are planning to shoot while the moon is still setting, I’d recommend getting out while the moon is around 0-50% of its cycle. Any more and it becomes too bright. The milky way purists will call out that you’re not getting the milky way in all its glory but the trade off is worth it if you ask me.
What are the best camera settings for photographing the milky way?
Use a camera with good low light performance – Photographing in dark conditions means you will need to take your photos with a high ISO (generally 3200-4000 but this can vary). With older cameras especially, the noise at this ISO range can be on the higher side compared to new cameras which have much lower noise when photographing at a high ISO.
Use a sturdy tripod – Shooting in low light conditions where your exposure will be around the 20 second mark, it helps to have a sturdy tripod to support your camera.
Use a fast lens – Ideally shoot with a lens around f1.4 to f4 depending on your budget. Anything higher (f4+) may make it difficult to capture the dynamic range of the milky way.
Use a mid-range ISO (3200) – Anything lower and you may have trouble capturing the milky way and anything higher may introduce too much noise depending on your camera body.
Compose with the live view – One of the challenges of photographing the milky way is trying to focus your camera. My favourite trick is to put the camera into live view and focus on to the brightest star. If that fails another option is to focus your lens to infinity.
Find a shutter speed that captures enough light without introducing blur – One trick that’s handy for shooting the milky way is knowing the 500 rule which helps with calculating the longest exposure (in seconds) before the stars begin to turn into star trails. Using this technique, you divide 500 by the focal length of your lens. As an example if you’re shooting with a 20mm lens (500/20), this would result in a shutter speed of 25 seconds.
Questions?
If you have any questions or require any clarification about the points made in this blog post, please don’t hesitate to reach out via the contact page.
 After recently moving away from the Canon 5D Mark II to a Sony A7RII, I was itching to get out and make the most of my new purchase by giving the low light performance a play with some astro photography.