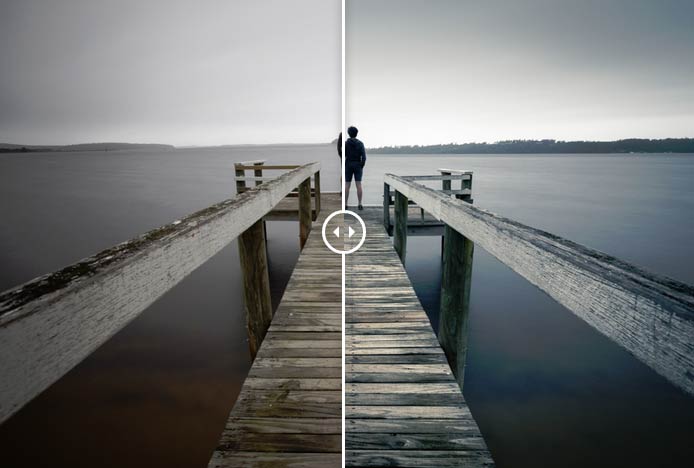
This is quite an old photo taken back in December 2010 at one of my favourite places in Tasmania, St Helens. A place I spent a lot of time as a kid and close to the beautiful Bay of Fires. St Helens is a beautiful part of the state and if you’re ever visiting, I’d put it high up in the list of places to go. It has some beautiful waterfalls, seascapes and is just a great little town.
This photograph was edited using just Adobe Lightroom. Occasionally I’ll edit 70% of my image in Lightroom and then do some remaining changes (curves, colour correction and sharpening) in Photoshop but for this image it was all Lightroom. I really love how far Lightroom has come. Originally when it was first released I was reluctant but it has made so much progress in recent years and reduces Photoshop from my workflow less and less as new releases come about. I’m excited by what is yet to come.
Capturing the Image
The photo was captured during the day with a 50 second exposure at F/8 using a Canon 5d Mark II, Canon 17-40, Cokin Z-Pro graduated neutral density filter, B+W 110 ND, tripod and control. In case you’re not familiar with day time long exposures, I’ve got a small post on my blog about daytime long exposures which goes into detail on how it works and the equipment needed. I love the way long exposures can transform a scene by smoothening the water or clouds of a scene.
For this image, I used a neutral density filter and graduated neutral density filter (for the sky) to smoothen the water and clouds to give a minimalist feel.The clouds were quite patchy and thanks to the wind, I was able to use the long exposure to subtly blur them and give them this look.
Post Processing
Split toning settings used for this image
Post processing this image was heavily geared around playing with the split toning feature of Adobe Lightroom to introduce a cold feel to the image. I went into quite a bit of detail in an earlier post about Lightroom’s Split Toning which may be of interest to those not familiar with it. Through using the split toning feature, you are able to introduce a tone to either your shadows or highlights. It’s really handy and I’ll often use it to add a subtle hint of a colour to either my shadows or highlights. Often I’ll add a very subtle yellow/orange to my highlights to give a warmer feel to the image.
Once the split toning was applied, I made some subtle adjustments to curves, boosting the shadows ever slightly, adjusting the saturation and clarity of the image.
And that is how my self portrait at St Helen’s was captured and post processed. I hope this post was useful 🙂
As always If you have any questions or comments feel free to leave a comment or drop an email. Always happy to help or chat 🙂
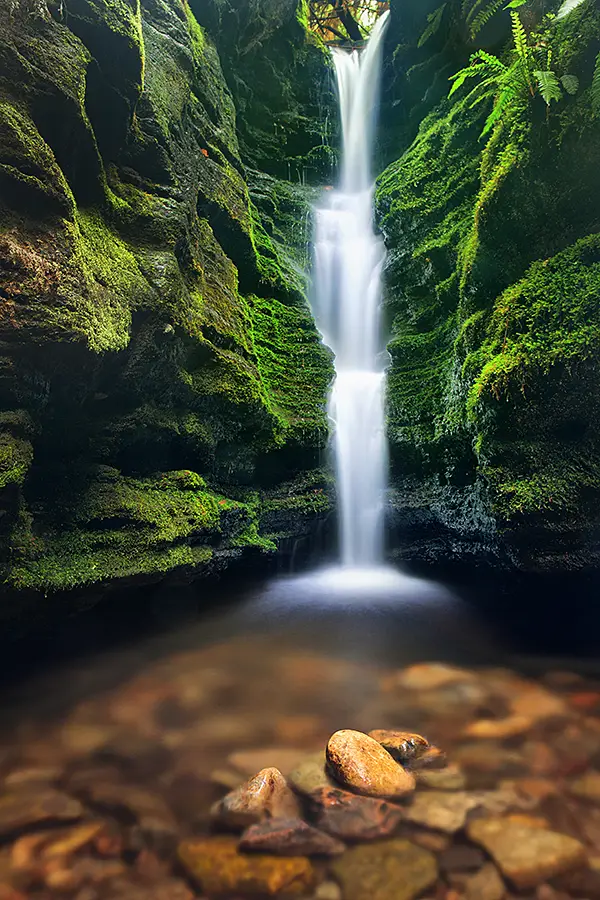
Secret Falls has been on my to photo list for some time after visiting it a few years ago with a friend when bushwalking through the area sans camera. It’s a beautiful little waterfall that does live up to its name even if the location isn’t really quite a secret if the amount of people photographing it is anything to go by…
The location of Secret Falls is a ‘secret’ and probably best not published here but I’m happy to disclose if you drop me an email.
[twentytwenty]
[/twentytwenty]
Taking the photograph
Based on the popularity and small size of the waterfall it made things especially difficult to get a unique take on the waterfall. Something as photographers, we are forever striving for, to get our own unique capture of a scene. With this in mind, I decided to get a bit wet and assemble some rocks in the middle of the foreground with the intention of capturing a long exposure that would blur the water as it passed the rocks. Are moving rocks around in a scene to create a composition cheating and take away the authenticity of a scene? I’d argue no but would be interested to hear if others feel otherwise.
With the scene setup, I set up my gear (Canon 5D Mark II,Canon 24-70, Hoya circular polariser and manfrotto tripod) and began taking some test shots of the scene. It’s interesting, a friend and I were having a discussion recently about focus stacking and the notion of using multiple photographs at varying focus levels to maximize the sharpness of an image. I laughed it off and said it would be rare for me to ever need to do this but what do you know, a week later, I was putting the theory into practice swallowing my naysaying words and using the technique for this shot. The reason I opted to focus stack this image was the difficulty in having both the foreground and background rocks sharp. Generally, shooting wide with an ultra wide angle lens and high depth of field (f/11 onwards) it’s rare to run into this issue but by using the 24-70 which isn’t quite as wide my normal go to lens, the Canon 17-40, it was difficult to get the whole scene in focus.
Focus Stacking
Focus stacking works under the same principal as exposure blending in which your camera is set up on a tripod and you take various exposures or in this case, different focus levels which is then selectively combined into the final image. For this image of Secret Falls, I took a reading in aperture priority mode and got a reading at f/13. This gave me an exposure time of 25 seconds. I changed the camera to manual mode and dialed in f/13 and 25 seconds. The reason for changing to manual mode is to avoid any variation in exposure that aperture priority may have introduced. With the camera set in manual mode, I focused the image on the foreground rocks and then took another image with the focus selected on the background. This left me with two images that I would then need to blend in Photoshop.
Processing the Images
Getting the photo as right as much as you can when taking the photo makes post processing the image far more easier. By using a circular polariser when capturing the photos, this increased the saturation slightly, reduced glare on the water and allowed me to get a longer exposure time. With the two images captured loaded in Photoshop (one with the background in focus and another of the rock in focus) I loaded both images into Photoshop and made the following changes.
Focus stacking – As mentioned above, two images were taken for the purpose of focus stacking, one for the rock in the foreground and another for the foliage in the background. Using layer blending, I used the background (foliage focus) image as my primary image and then introduced the second frame (focus of the rock) into the shot through layer masks
Curves layers – Using a combination of curves and layer masks has become my go to for selective colour grading and brightness/contrast changes to an image. As an example from this image, I selected the green channel and bumped the shadows of the image to really bring out the green around the waterfall. This introduced a strong green colour cast to the whole image, which was mitigated through using layer masks and isolating the strong green to only being present in the foliage area around the waterfall. Similar changes to the image were made to the blue channel to bring out the blues of the waterfall and also to make selective dynamic range increases to the image
Saturation and hue – When making changes to saturation, I rarely make changes to the saturation as a whole and prefer to make changes to individual colours for greater control over the image. For this image, I was particularly keen to play with the greens and reds saturation and hues until I got the desired effect I was after. The idea was to give the water a warmer feel around the rocks and give the greens a stronger hue
Spot removal – Don’t laugh or cringe but I’ve become a sucker for the content aware tool that was introduced a few revisions ago in Photoshop. Selecting the area where a spot had got on my lens from the rain, I filled the area with the content aware tool and it worked a treat
Resize and sharpen for web – Finally I resized the image to 900px/72 dpi at the longest edge and used the unsharpen mask (USM) tool to sharpen the image. Once again, I like to use layer masks when sharpening an image as it allows me to be selective in my sharpness adjustments to a scene. With some minor sharpness adjustments through layer masks the image was complete
Processing this image was fun. It’s always nice to put a new technique like focus stacking into play to see how it works and can benefit an image.
Where is Secret Falls?
Update – I’ve decided to add this section after receiving regular emails asking for the location of Secret Falls. When originally writing this article I was questioning whether to include the location of Secret Falls or not. For me, not disclosing the location had nothing to do with keeping the whereabouts of this small waterfall an enigma but more to do with the environmental impact which disclosing may create. For this reason, when accessing Secret Falls be mindful of the impact you have and follow an existing path rather than creating a new. Potentially this will ruffle feathers with some but this location has been known for years and should be shared for others to enjoy.
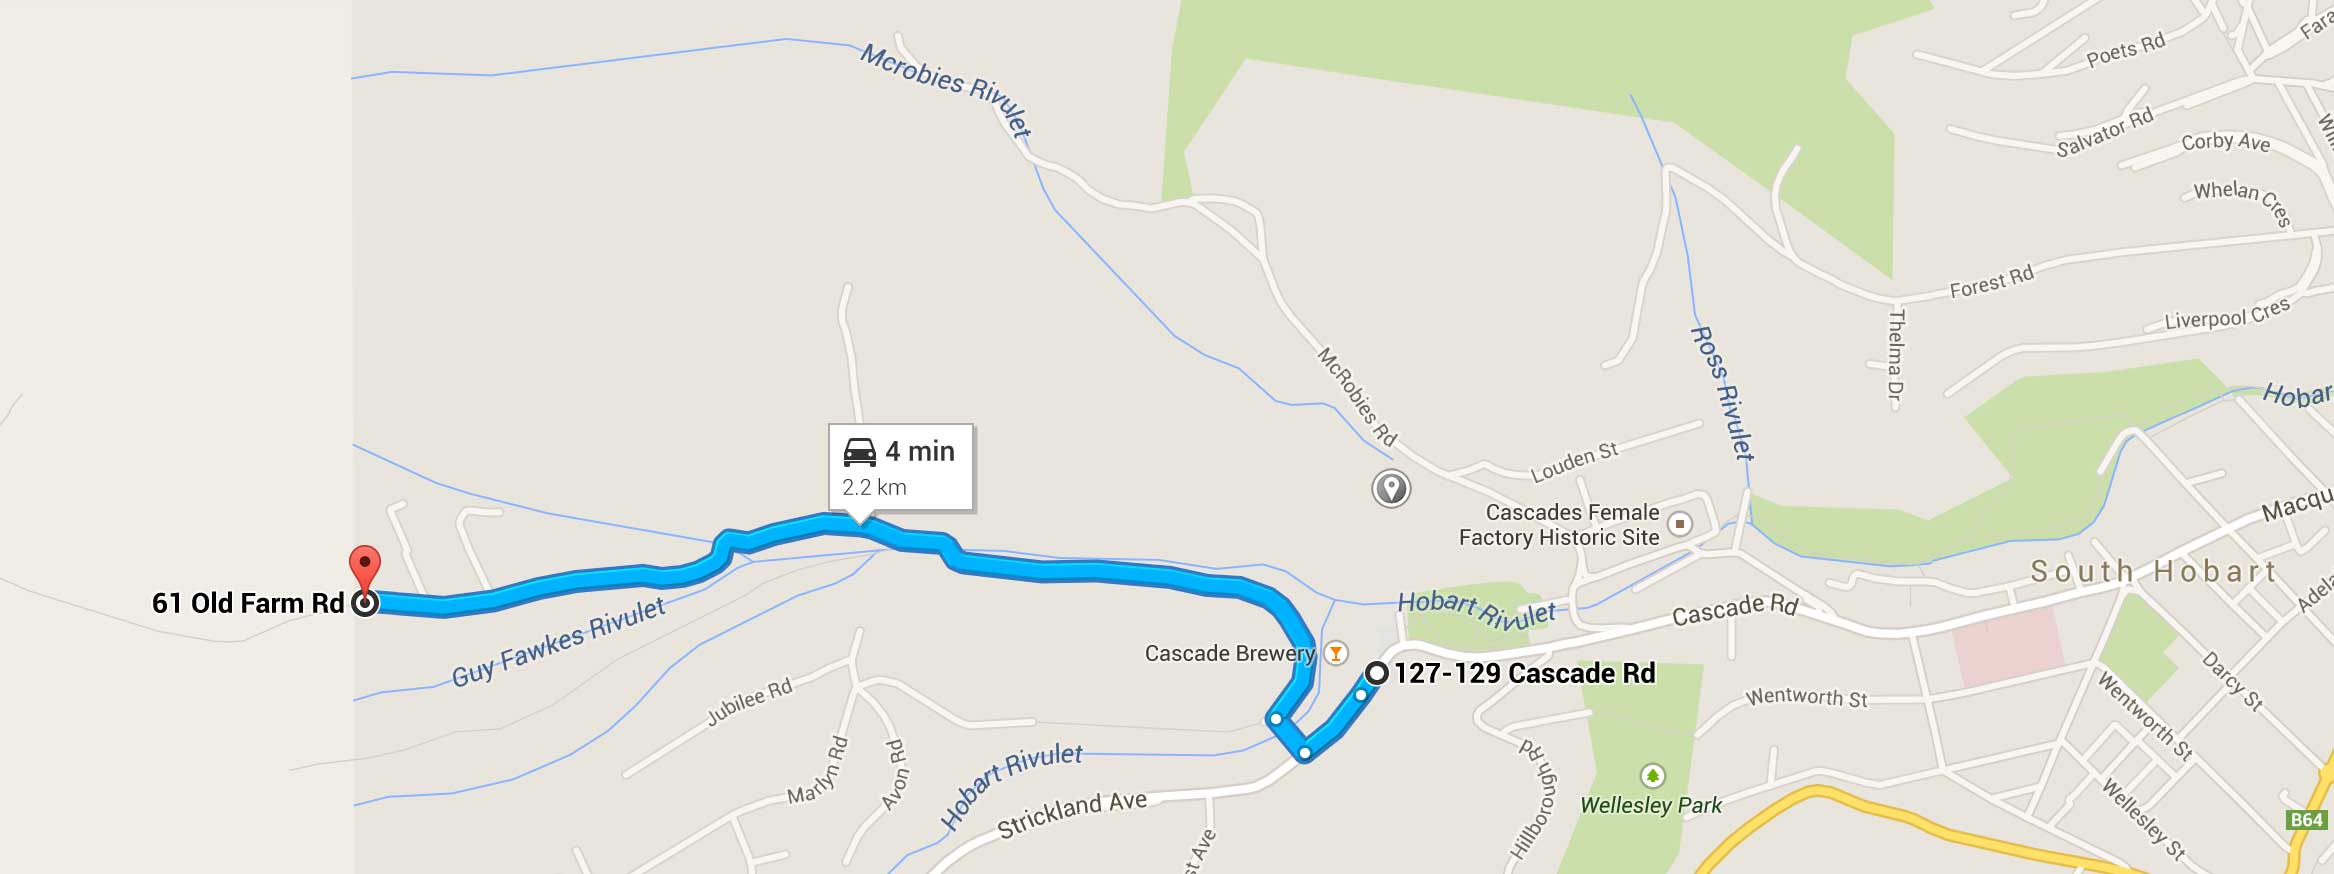
Google Maps screenshot of the route to Secret Falls. Click for larger.
The location of Secret Falls is conveniently located near the CBD of Hobart just up from the Cascade Brewery. The location of Secret Falls is at the end of Old Farm Road which you enter via Cascade Road. The drive from Cascade Road to the end of Old Farm Road takes roughly 5 minutes and will eventually lead you to a carpark which I believe for memory is the Old Farm Fire Junction. Walk towards the Junction and you will have 3-4 bushwalks going in varying directions. When I first visited Secret Falls with a friend, we had no idea which path to take and walked most of them in the search of Secret Falls. It was quite tragic but was a nice afternoon out. So to avoid our mistakes, avoid taking the far left or far right tracks. These will not take you to Secret Falls.
The location of Secret Falls is along the Myrtle Gully Falls track and roughly 100m from the Myrtle Gully waterfall itself. Unfortunately it’s difficult to be specific on the exact location of Secret Falls as it is well hidden by undergrowth and deep gully however the best indication is to keep an eye out for a track that goes down the embankment created by bushwalkers/photographers when accessing the waterfall. If you’ve made it to Myrtle Gully Falls, you have gone too far and need to retrace your steps back a little. As said earlier in the post, please be respectful of the environment as you are making your way to the waterfall and follow the path that others have created rather than creating your own.
Thanks for reading and if you have any questions feel free to drop a comment or email as I’d be happy to help further.
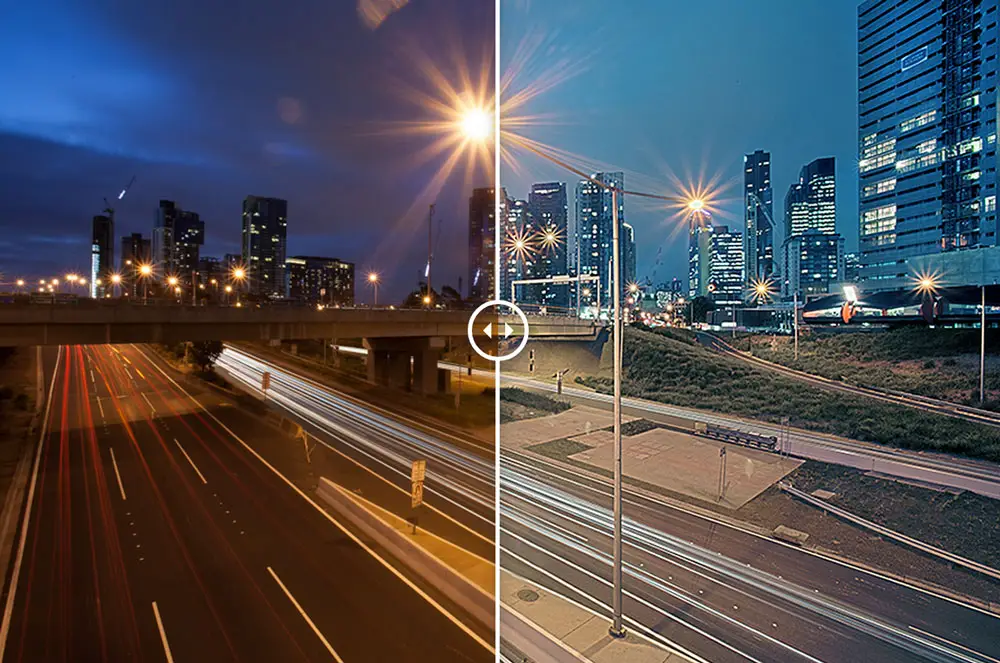
This photograph was captured from a busy overpass in Southbank, Melbourne. Coming from Hobart where traffic is let’s be honest – quiet, I’m forever looking for city overpasses that provide a good vantage point that overlooks the busy and constant flow of traffic entering and exiting Melbourne. I’d like to share the before and after for this image as there’s quite the difference between the two.
[box size=”large” style=”rounded”]This photo forms part of my Before and After Series. Be sure to check out previous posts of this series[/box]
Southbank, Melbourne on Blue Hour
[twentytwenty]
[/twentytwenty]
Capturing the Photograph
Generally when shooting traffic from an overpass that doesn’t have a constant flow of traffic, I will slightly cheat and set my camera to manual mode and fire exposures as each big burst of traffic goes through my scene. The reason for doing this is it allows me to combine the larger flows of traffic into one photo to give a sense that the road was busier than it actually was. It’s probably not ethical but coming from Hobart where the highways aren’t high flowing like huge cities, sometimes we have to use any trick up our sleeves to get the photo we’re striving for.
Luckily though this wasn’t needed on this occasion as I was overlooking one of the busier highways in Melbourne where there is an abundance of trucks and cars constantly flowing under the overpass.
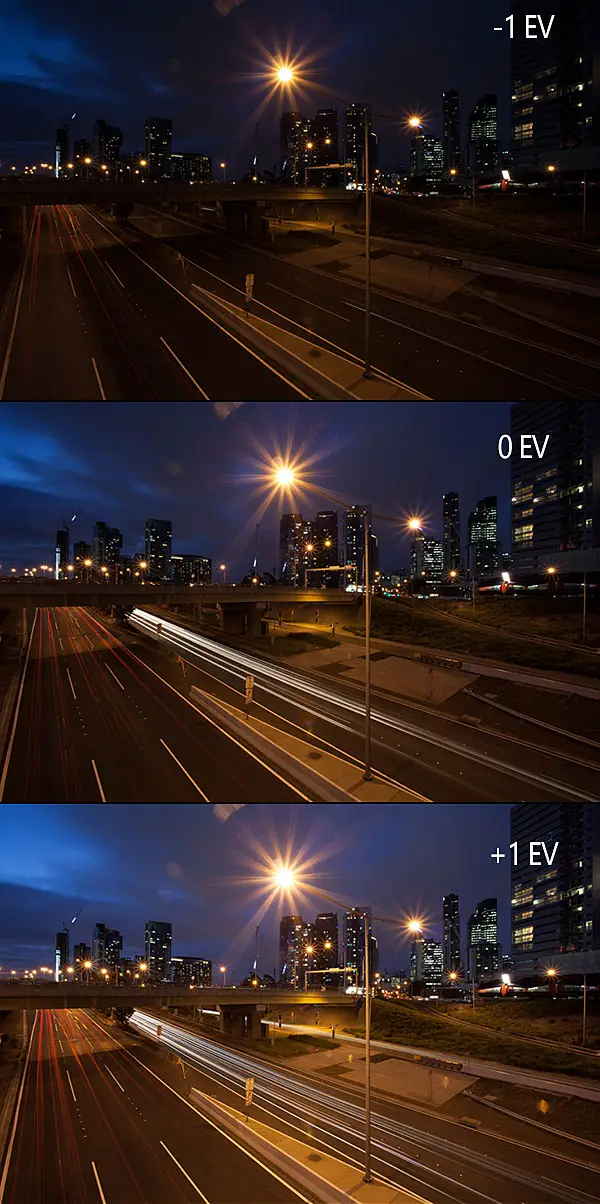
The photograph was taken after sunset on blue hour. I find blue hour is perfect for shooting long exposure cityscape photos as there is still a lot of natural light which the camera picks up through long exposures that may not be visible to the naked eye. Although there was a lot of light still about, I wanted to ease on the side of caution and capture multiple exposures at different exposure values. By this I mean, I wanted to capture an under exposed, neutral exposed and over exposed image. No no, before you ask, not to create a HDR image but to err on the side of caution. Although shooting at this hour provides a lot of available light that may not be visible to the natural eye, it still doesn’t overcome the issue that there was some dynamic range drop off around the buildings and dark points of the overpass where the over exposed image would be useful.
Using Automatic Exposure Bracketing
For this reason I set the camera into automatic exposure bracketing mode (AEB) and set the camera to fire at various exposures. This is quite a useful tool for when you are shooting and don’t want to risk missing the right dynamic range.
[box size=”large” style=”rounded”]Further information about Automatic Exposure Bracketing (AEB) can be found on a previous post of my blog which explains how to use it on your camera and when it can be useful[/box]
With the images captured at varying levels of exposure, I was quite content that I had the image I was after and set off home to process the images.
Editing the Images
Opening the images in Lightroom, I was glad to have taken multiple exposures and decided to use the +1 over exposed image as my neutrally exposed image was slightly too dark. Instead, the over exposed image provided a good level of dynamic range without blowing out any highlights while bringing out detail in the shadows.
Upon editing the image, it was quickly apparent that the surrounding lights had warmed the RAW temperature of the image to a level that didn’t accurately reflect the scene. Normally I would drop the colour temperature within Lightroom but opted to go straight to Photoshop for colour grading.
I’m quite fond of using Photoshop for colour grading of my images through using Curves to make this change. Curves is super powerful as it allows you to isolate your changes to the shadows, midtones and highlights of the red, green and blue channels of the image. Through using this tool, it provides you with the ability to have great control over the tones and contrast of an image. For example, in this image I used Curves, selected the red channel and made changes to the shadows to correct the colour temperature. For more example about Curves, Adobe’s website has some [ilink url=”http://helpx.adobe.com/photoshop/using/curves-adjustment.html”]great information[/ilink] about using the tool.
For the most part, the final image involved a lot of back and forth edits in curves with layer masks to subtly introduce different parts of the curves to parts of the image. This generally meant bumping the shadows then layer masking it to a particular part of the image (i.e. boosting the shadows for the under pass of the image).
If you enjoyed this post be sure to check out my other posts in this [ilink url=”https://www.alexwisephotography.net/blog/category/technique/before-and-after-technique/”]Before and After Series[/ilink] or if you’re feeling brave, give me a follow on Twitter or Facebook 😉
Recently I posted this image on [ilink url=”http://www.reddit.com/r/EarthPorn/comments/2epv5r/lone_tree_on_sunset_in_mansfield_victoria_by_alex/”]Reddit[/ilink] and received some great exposure. Amidst the exposure, some people were calling that the sub-reddit had degenerated into nothing more than heavily Photoshopped images that didn’t depict how the scene accurately looked. As part of my [ilink url=”https://www.alexwisephotography.net/blog/category/technique/before-and-after-technique/”]Before and After Series[/ilink] I’d like to look at how this image from [ilink url=”https://www.alexwisephotography.net/blog/2014/06/24/exploring-country-victoria-mansfield-and-abroad/”]Mansfield, Victoria[/ilink] was captured and processed.
The Evolution of the Dark Room
When reading comments comments about photographs that don’t resemble a scene whether it’s directed at me or others, I question whether there is a level of ignorance surrounding post processing. Let’s not forget that Ansel Adams was a pioneer in the use of dodge and burning and other darkroom techniques as discussed in interesting detail with comparative pictures by [ilink url=”http://whitherthebook.wordpress.com/2013/02/27/ansel-adams-and-photography-before-photoshop/”]Jack Dziamba[/ilink]. I would argue that if Ansel Adams was alive today, he would be using Photoshop as his digital dark room and pushing the envelope by using its features to process his images. Not only was Adams a pioneer in developing darkroom techniques but his involvement in the now famous, f/64 group, were also pioneers in exploring darkroom techniques which are now imitated in the digital equivalent – Photoshop. Regardless of time, photographers will always be looking to explore and push the envelope with photography and to me, that is the joy in Photography. We’re always constantly learning and developing. It’s definitely what keeps me hooked.
My Shooting Process
Before I even press the trigger on a my camera shutter, I am not only correcting the camera as much as I can (i.e. setting it to the settings that I desire, straightening the horizon, etc) but also considering how I will process the image whether this be adding a duo tone or using the dodge/burn tool to highlight particular parts of the image. I don’t simply take a photo, look at my LCD and think “ah well, I’ll fix it up in Photoshop”. Instead I capture an image on the camera that forms part of ‘my vision’ for the whole photograph. For this reason, you may find notice my before photographs in this [ilink url=”https://www.alexwisephotography.net/blog/category/technique/before-and-after-technique/”]Before and After Series[/ilink] are often captured quite flat. Shooting in RAW mode, your images will appear somewhat flat regardless however often I will aim to shoot my image without any harsh highlights which often means shooting slightly under exposed. Modern digital camera’s have come a long way however pulling detail from highlights is a lot more difficult than pulling detail from blown highlights. For this reason, I will often expose just before I start to lose my highlights. For example, if the highlights are starting to blow at 5″ seconds, I will reduce to a shorter exposure of 2.5″ seconds. But enough ramble… Let’s look at how this photo from Mansfield was captured and post processed.
Capturing the Photo
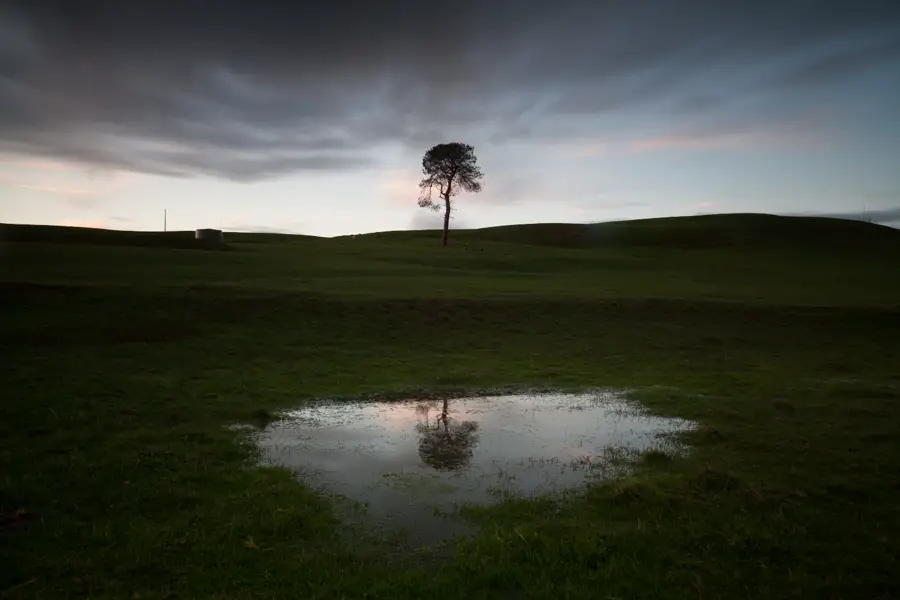
Images captured at varying exposure times for the final image
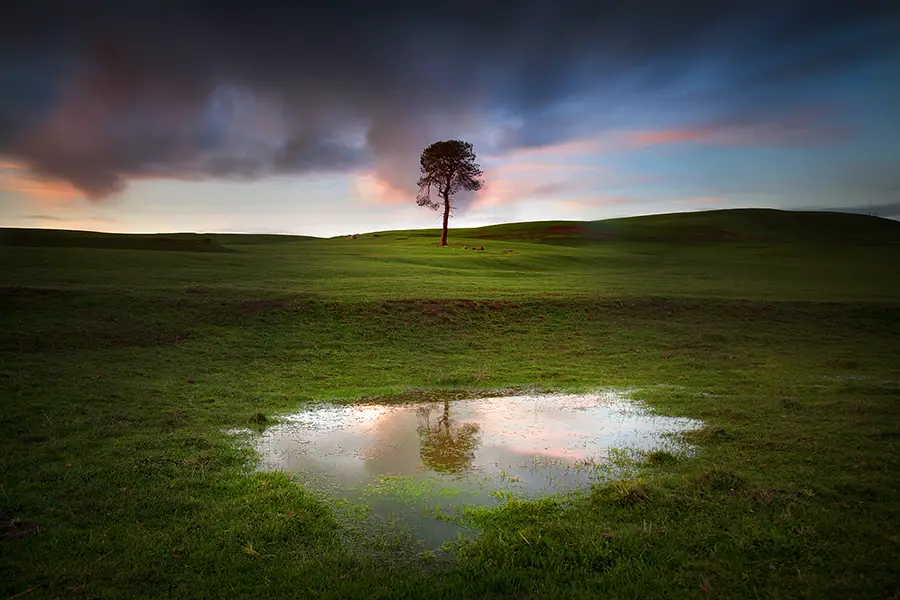
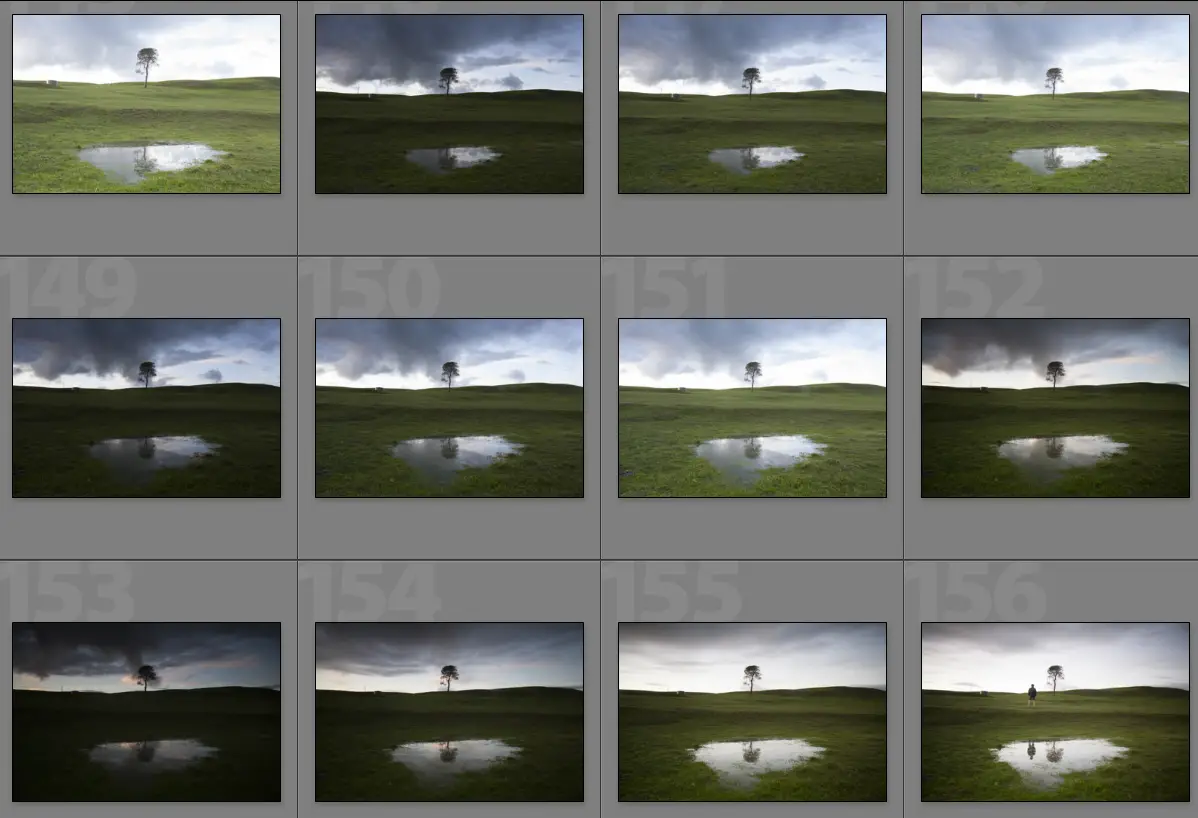
This photograph was taken while staying on a remote rural property in June 2014. We stayed in a farm house on an actual farm filled with livestock. It was an amazing experience and something I’ll never forget. Upon arriving home from photographing the [ilink url=”https://www.alexwisephotography.net/blog/2014/06/24/exploring-country-victoria-mansfield-and-abroad/”]Howqua Valley[/ilink] the sun was just starting to set and without much time to drive far, I decided to take a walk around the farm in the hope of finding a composition to capture the sunset. Luckily I came across this tree and decided to setup my tripod and camera gear while having a walk around to try find a good angle. As I was setting up cows were walking across the crest of the hill, I worried for a second that they may take a seat and call it home for the night but fortunately they kept moving. On this evening, there was quite a bit of breeze about which in turn was bringing through clouds at a rapid pace which I wanted to capture through a long exposure. The clouds weren’t moving as quite as much as I would have liked so I captured multiple long exposures with the intention of layer blending them in Photoshop. However through taking a long exposure, this ran the risk of also blurring the grass and puddle reflections. For this reason I also took some shorter length exposures in case the long exposures left the scene unsharp.
Processing the Images
The location was lacking for stand out compositions so I decided to take a chance and just take this one composition of the sunset of the tree reflecting in the background. Once I setup my camera, I took a few photos over the sunset which included:
Long exposures – The idea was to capture the moving clouds but unfortunately they weren’t moving as fast as I would have liked so to capture them properly before the sun went down, I captured multiple exposures with the intention of combinging them through using layer masks in Photoshop;
Short exposure – Shooting 3-5 minute long exposures with a slight breeze ran the risk of blurring the grass and puddles. I captured a shorter exposure in case I got home and these elements were blurry from the long exposure. By having this image I could easily layer mask the short exposure into the image and retain the sharpness of the image and;
Self portrait – Can I just say, putting the camera into a one minute self timer and sprinting (and perhaps awkwardly tripping) makes you look like a complete fool to anyone nearby watching? Fortunately no one was around nor do I really care but I’m sure if someone saw they would have been slightly bemused. This image never eventuated but was just an idea for something different in case the tree didn’t work on its own.
[box type=”info” size=”large” style=”rounded”]Layer what? Check out a previous blog post that discusses how to use layer masks[/box]
Generally I’ll tend to make most of my adjustments in Lightroom but obviously when you are doing some layer masking Photoshop is required. Once I identified what images I would be using (a mix of long exposures and a short exposure), I exported the images from Lightroom without much change and began editing them with the following process:
Opened my short exposure in Photoshop to use as the base layer
Imported the longer exposures and added them as layers to this image
Slowly introduced the clouds one shot at a time by using layer masks
Once the clouds were introduced to the shot and I was happy, I wanted to go a bit experimental with the vignette and colour grading for the image. This resulted in a lot of selective curves and saturation masks making minor changes to the different channels of the image. For the most part, this was just playing around until I was happy with the end result but the intention was to focus on the tree and reflections and slowly fade off to a vignette using dodge and burning
Added a ProContrast layer from the [ilink url=”https://www.google.com/nikcollection/”]Nik Collection[/ilink] and juggled the opacity until it was at an acceptable level
Save image (this will form my master copy for printing)
Resize image for web (900px at the longest edge)
Added a unsharp (USM) layer to sharpen only the tree and grass of the shot. The idea here was to keep the sky looking as soft as possible while trying to boost the sharpness of the rest of the image. I do this quite often for my images however be mindful not to do over do this as having one part of your image with strong sharpness and the rest looking unsharp can look quite odd if you’re not careful
Save web image
Apologies if the process sounds a bit vague but for the most part, dropping and the different clouds exposures was the easy part. It was experimenting with different colour styles and dodge/burning where I dabbled and experimented with different looks until I ended up with something I was happy with.
Thanks for reading. If you have any questions about the processing of this image be sure to leave a comment or drop me an email as I’d be happy to help!
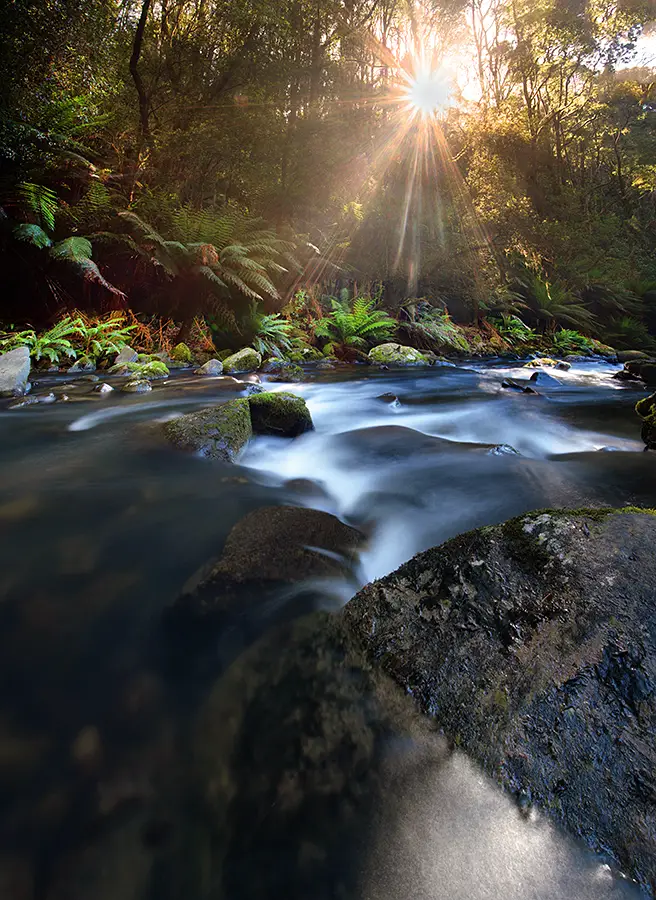
This is an entry for my [ilink url=”https://www.alexwisephotography.net/blog/category/technique/before-and-after-technique/” style=”note”]Before and After series of photographs[/ilink] where I share how I captured and post processed an image. This particular image is from Hopetoun Falls looking back down river of the water that runs off from the main fall. Hopetoun Falls forms part of the Otways Ranges and is a beautiful part of the world. If you’d like to see more photos from this trip be sure to check out my [ilink url=”https://www.alexwisephotography.net/blog/2013/12/08/weekend-trip-down-the-great-ocean-road/” style=”note”]post from the Great Ocean Road[/ilink] which includes this among many.
[twentytwenty] [/twentytwenty]
Capturing and Editing Sunlight at Hopetoun Falls
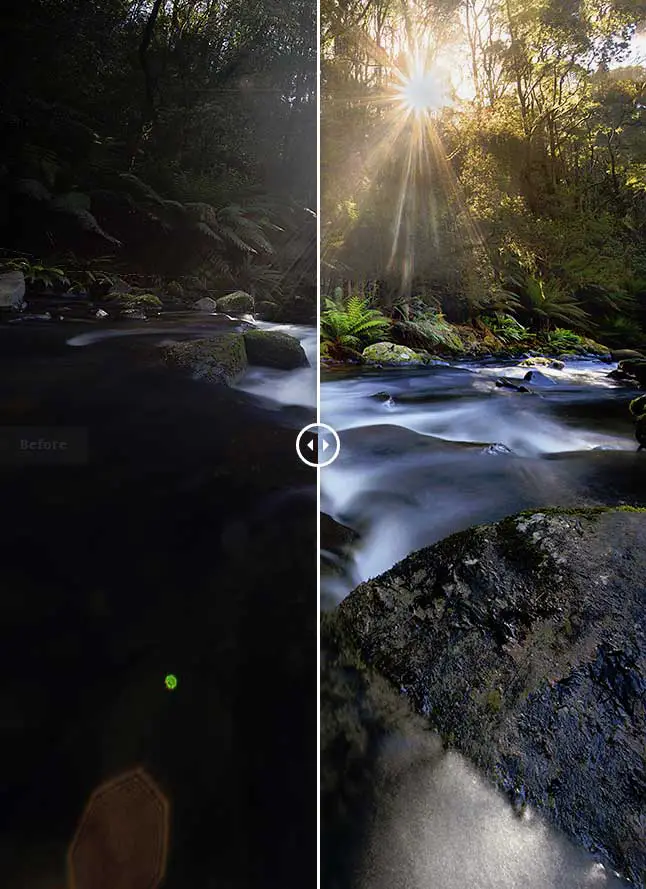
This is one of those photographs that as a photographer, we view it through our eyes and then when we try to capture it in camera it’s incredibly difficult to replicate what our eye is seeing. On this particular day we had shot the waterfall most of the day under overcast conditions (perfect for photographing waterfalls). Later during our time at Hopetoun Falls, the cloud started to clear and the sun began to shine stunningly through the trees. Rather than pack up my gear like I normally would when the sun starts shining harshly at a waterfall I wanted to try pull off a shot of the sun bursting through the trees.
Taking the Photo
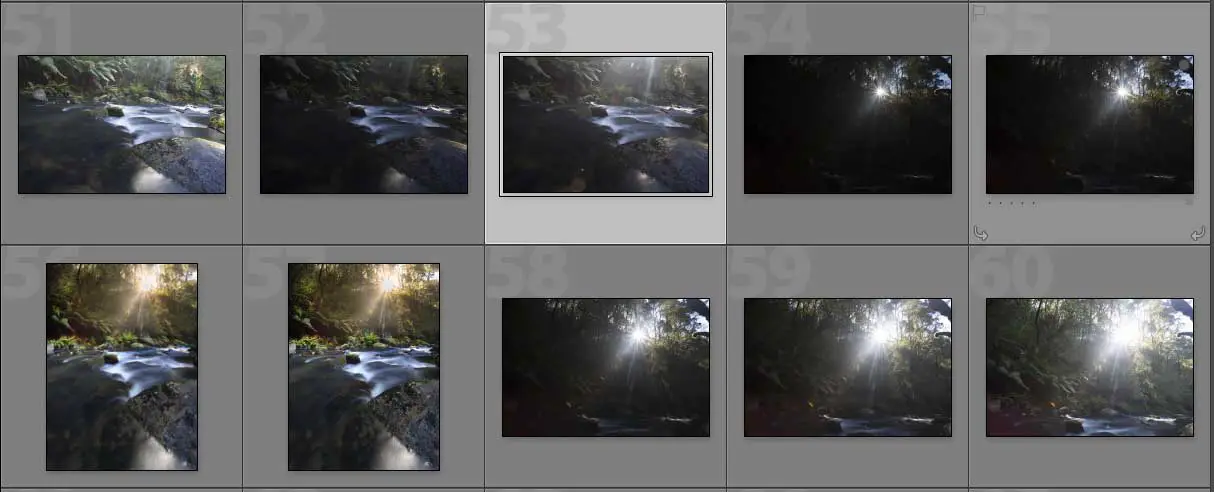
Bracketed images that would be later stitched and combined in Photoshop
Framing the photo straight away I knew if I wanted to get both the stream and sun bursting through the trees in shot I would have to take two photos and stitch them together. Even though I was shooting with a Canon 17-40 it still wasn’t wide enough to fit in the one shot so a two image stitch would be the go. Shooting the images I’m using my Canon 5D Mark II, Canon 17-40, Hoya Circular Polariser and Manfrotto tripod.
I also knew that trying to capture the dynamic range properly in one shot for each stitch was going to be very difficult. Not one to normally use the auto bracketing exposure (AEB) feature on my camera, I opted to take 3 exposures of the top half of the stitch and another 3 for the bottom part of the stitch which resulted in a slight mess of images in my Lightroom catalogue.
In case you’re not familiar with the AEB feature I wrote [ilink url=”https://www.alexwisephotography.net/blog/2013/01/12/automatic-exposure-bracketing-aeb-explained/”]article about Auto Exposure Bracketing[/ilink] a while ago now which explains the feature a little more. I took the multiple exposures as it provided me with some insurance that if I didn’t get it right with the neutral exposure I would also have the under and over exposed images to play with.
Combining and Editing the Photos
When it comes to exposure blending my level of competency is around average so the idea of combining this with a two image stitch was a recipe for disaster. I processed the images from the trip and let the images for this one sit for a while. Normally when I shoot, I like to process my images within 24 hours of taking them. I hate the feeling of sitting on unedited images and like to get them processed, not necessarily to post online but just to have them processed according to how I remembered the scene. For this one, I was actually too intimidated by the prospect ahead and knew I was in for some fun in Photoshop.
It wasn’t until a weekend a few weeks later that I finally decided to give combining and editing the images a crack.
Combining The Photos
Having used auto exposure bracketing to capture an under, neutral and over exposed image for both the top and bottom parts of the frame, I went about creating two image stitches for each bracket.
By this I mean, I created a two image stitch of the two over exposed images, again for the neutrally exposed images and another for the under exposed images. This resulted in 3 separate stitched images consisting of 1 over exposed stitch, 1 neutral exposed stitch and 1 under exposed stitch.
When stitching images, most people tend to recommend various different pieces of software like PTGui but I’ve had quite good luck with the Photoshop stitch tool. This can be found under File > Automate > Photomerge.
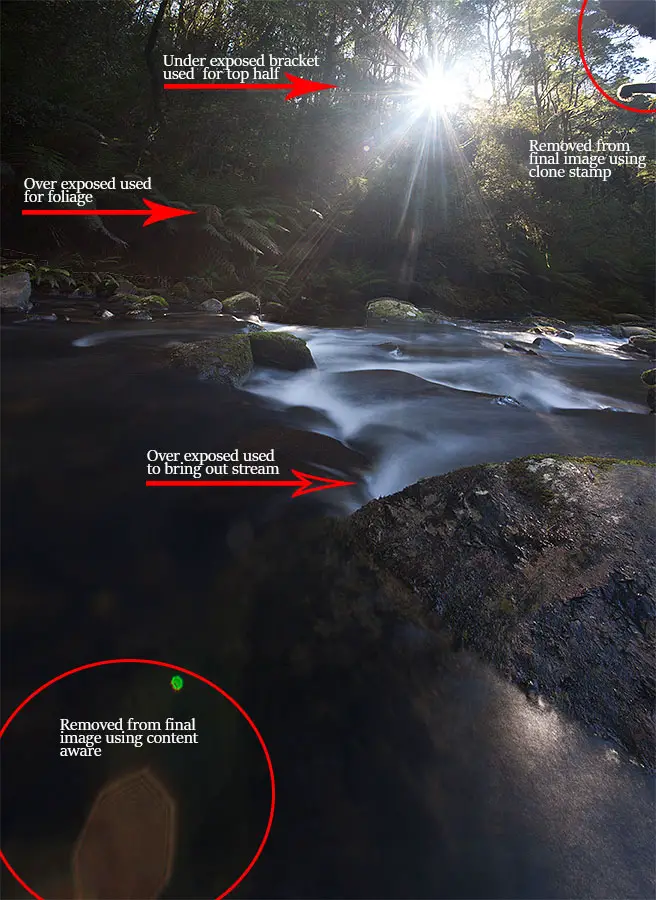
Now that I had these 3 separate image stitches of each exposure, I went about opening the neutral image in Photoshop and layering the over and under exposed images as layers on top. The over exposed image would be used to bring out the dynamic range in the foliage surrounding the waterfall and the waterfall itself while the under exposed layer would be used to capture the sun bursting through the trees. Luckily, it wasn’t as hard as I originally thought but just required a lot of low opacity layer masking to subtly bring out areas of a layer. The hardest part was blending the sun into the shot which required me to use a combination of the brush tool and gradient masks to ever subtly drop it back in without it looking uneven to the rest of the scene.
I’ve attached a screenshot to the right which highlights the different parts of the image where layer masks from the 3 images were used. Call me lazy but I’ve become a fan of the [ilink url=”http://tv.adobe.com/watch/learn-photoshop-cc/using-contentaware-fill-to-remove-distractions/”]Adobe Photoshop Content Aware Tool[/ilink] which for the most part works perfectly. Generally if this doesn’t work I’ll revert back to the [ilink url=”https://www.youtube.com/watch?v=MY023ZQJy0M”]Adobe Clone Stamp Tool[/ilink] to remove unwanted distractions like the branch in the corner and lens flare at the bottom of the stream.
Once all the images were blended in, I then went about making selective adjustments to the saturation and individual colour channels to colour grade parts of the image. I’m fond of using layer masks for saturation changes as it allows you to increase or decrease the saturation or change the hue of a particular area in the image without affecting the overall photo. For this image, I used selective saturation and hue adjustments to both the water and foliage areas.
Finally some cropping was applied to the image and a warming filter was applied to add some warmth to the sunburst coming through the trees. With this I used a layer mask to ensure changes with the warming filter were only limited to the sunburst and not the rest of the image.
And that’s that. Something I learnt from this photo was that sometimes it’s okay to sit on an image and procrastinate about it rather than process it immediately. Sometimes I should probably do a bit more often.


