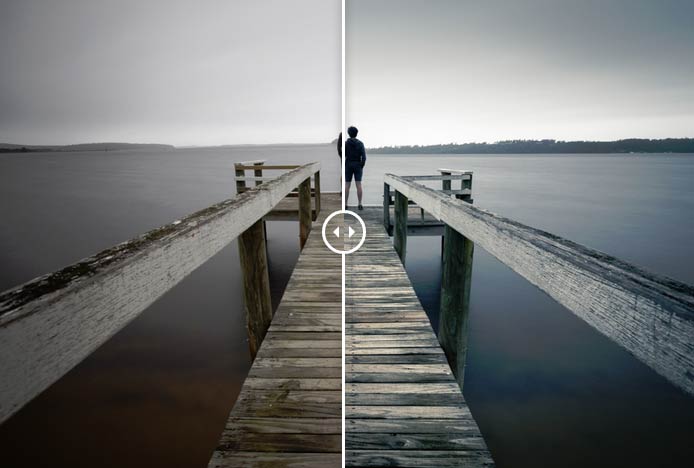
This is quite an old photo taken back in December 2010 at one of my favourite places in Tasmania, St Helens. A place I spent a lot of time as a kid and close to the beautiful Bay of Fires. St Helens is a beautiful part of the state and if you’re ever visiting, I’d put it high up in the list of places to go. It has some beautiful waterfalls, seascapes and is just a great little town.
This photograph was edited using just Adobe Lightroom. Occasionally I’ll edit 70% of my image in Lightroom and then do some remaining changes (curves, colour correction and sharpening) in Photoshop but for this image it was all Lightroom. I really love how far Lightroom has come. Originally when it was first released I was reluctant but it has made so much progress in recent years and reduces Photoshop from my workflow less and less as new releases come about. I’m excited by what is yet to come.
Capturing the Image
The photo was captured during the day with a 50 second exposure at F/8 using a Canon 5d Mark II, Canon 17-40, Cokin Z-Pro graduated neutral density filter, B+W 110 ND, tripod and control. In case you’re not familiar with day time long exposures, I’ve got a small post on my blog about daytime long exposures which goes into detail on how it works and the equipment needed. I love the way long exposures can transform a scene by smoothening the water or clouds of a scene.
For this image, I used a neutral density filter and graduated neutral density filter (for the sky) to smoothen the water and clouds to give a minimalist feel.The clouds were quite patchy and thanks to the wind, I was able to use the long exposure to subtly blur them and give them this look.
Post Processing
Split toning settings used for this image
Post processing this image was heavily geared around playing with the split toning feature of Adobe Lightroom to introduce a cold feel to the image. I went into quite a bit of detail in an earlier post about Lightroom’s Split Toning which may be of interest to those not familiar with it. Through using the split toning feature, you are able to introduce a tone to either your shadows or highlights. It’s really handy and I’ll often use it to add a subtle hint of a colour to either my shadows or highlights. Often I’ll add a very subtle yellow/orange to my highlights to give a warmer feel to the image.
Once the split toning was applied, I made some subtle adjustments to curves, boosting the shadows ever slightly, adjusting the saturation and clarity of the image.
And that is how my self portrait at St Helen’s was captured and post processed. I hope this post was useful 🙂
As always If you have any questions or comments feel free to leave a comment or drop an email. Always happy to help or chat 🙂
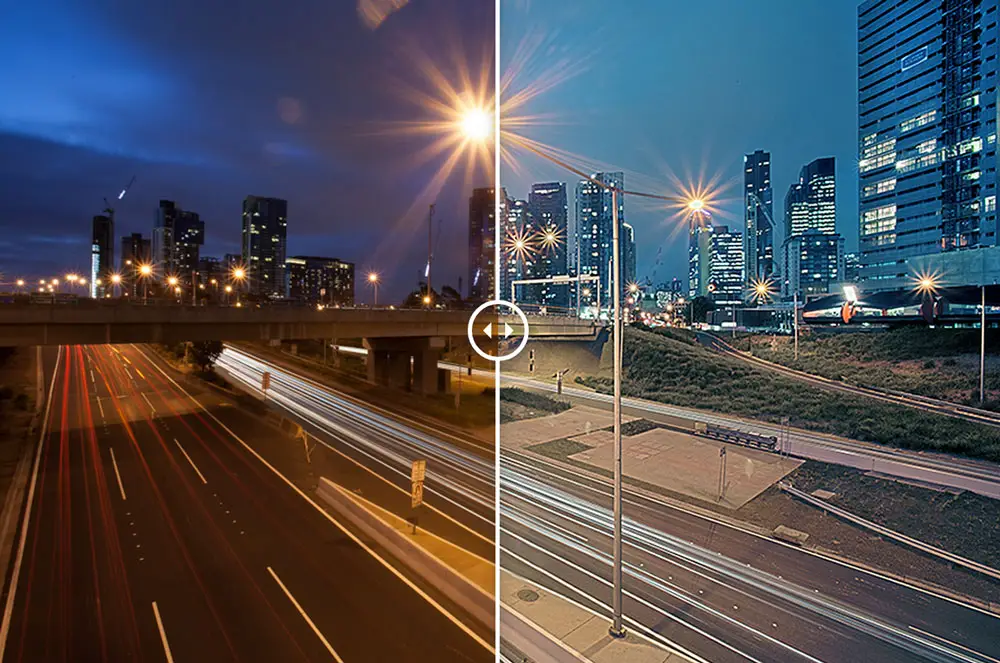
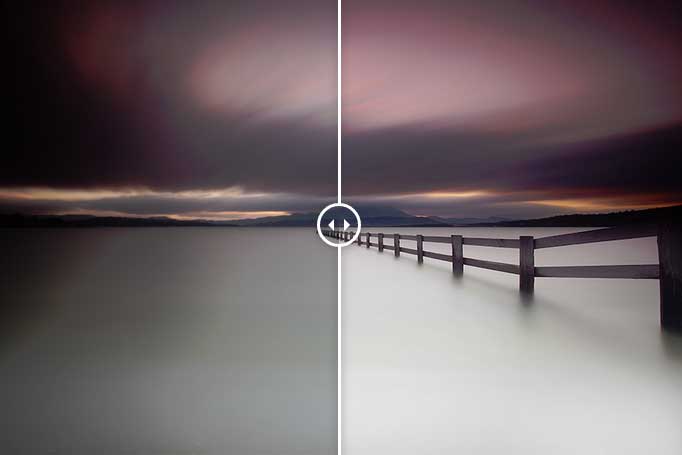
This photograph was captured from a busy overpass in Southbank, Melbourne. Coming from Hobart where traffic is let’s be honest – quiet, I’m forever looking for city overpasses that provide a good vantage point that overlooks the busy and constant flow of traffic entering and exiting Melbourne. I’d like to share the before and after for this image as there’s quite the difference between the two.
[box size=”large” style=”rounded”]This photo forms part of my Before and After Series. Be sure to check out previous posts of this series[/box]
Southbank, Melbourne on Blue Hour
[twentytwenty]
[/twentytwenty]
Capturing the Photograph
Generally when shooting traffic from an overpass that doesn’t have a constant flow of traffic, I will slightly cheat and set my camera to manual mode and fire exposures as each big burst of traffic goes through my scene. The reason for doing this is it allows me to combine the larger flows of traffic into one photo to give a sense that the road was busier than it actually was. It’s probably not ethical but coming from Hobart where the highways aren’t high flowing like huge cities, sometimes we have to use any trick up our sleeves to get the photo we’re striving for.
Luckily though this wasn’t needed on this occasion as I was overlooking one of the busier highways in Melbourne where there is an abundance of trucks and cars constantly flowing under the overpass.
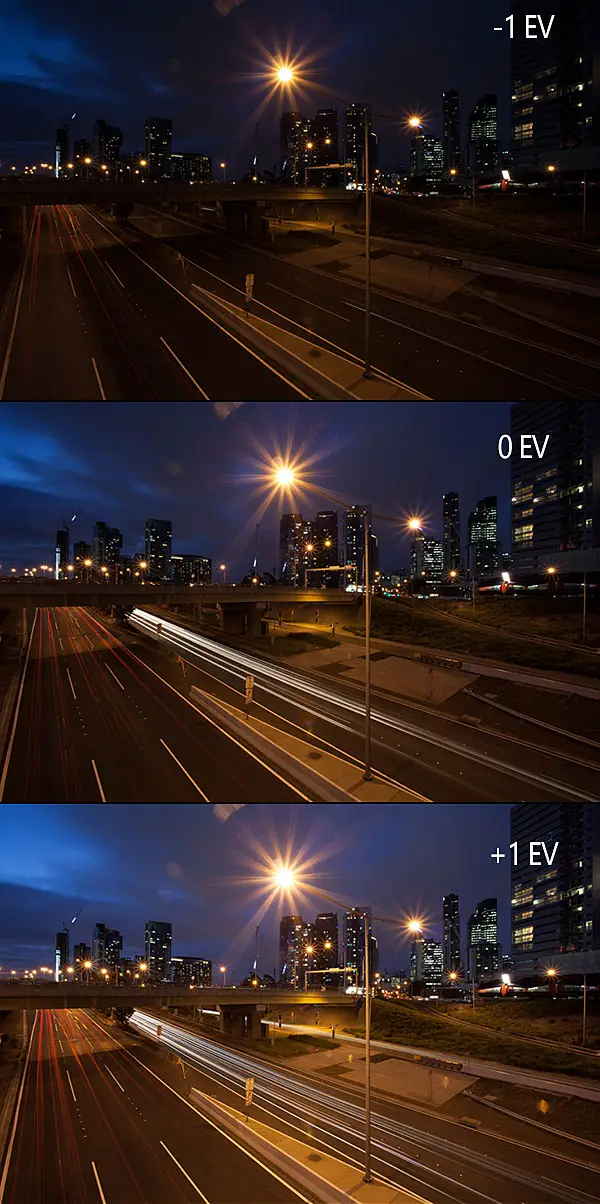
The photograph was taken after sunset on blue hour. I find blue hour is perfect for shooting long exposure cityscape photos as there is still a lot of natural light which the camera picks up through long exposures that may not be visible to the naked eye. Although there was a lot of light still about, I wanted to ease on the side of caution and capture multiple exposures at different exposure values. By this I mean, I wanted to capture an under exposed, neutral exposed and over exposed image. No no, before you ask, not to create a HDR image but to err on the side of caution. Although shooting at this hour provides a lot of available light that may not be visible to the natural eye, it still doesn’t overcome the issue that there was some dynamic range drop off around the buildings and dark points of the overpass where the over exposed image would be useful.
Using Automatic Exposure Bracketing
For this reason I set the camera into automatic exposure bracketing mode (AEB) and set the camera to fire at various exposures. This is quite a useful tool for when you are shooting and don’t want to risk missing the right dynamic range.
[box size=”large” style=”rounded”]Further information about Automatic Exposure Bracketing (AEB) can be found on a previous post of my blog which explains how to use it on your camera and when it can be useful[/box]
With the images captured at varying levels of exposure, I was quite content that I had the image I was after and set off home to process the images.
Editing the Images
Opening the images in Lightroom, I was glad to have taken multiple exposures and decided to use the +1 over exposed image as my neutrally exposed image was slightly too dark. Instead, the over exposed image provided a good level of dynamic range without blowing out any highlights while bringing out detail in the shadows.
Upon editing the image, it was quickly apparent that the surrounding lights had warmed the RAW temperature of the image to a level that didn’t accurately reflect the scene. Normally I would drop the colour temperature within Lightroom but opted to go straight to Photoshop for colour grading.
I’m quite fond of using Photoshop for colour grading of my images through using Curves to make this change. Curves is super powerful as it allows you to isolate your changes to the shadows, midtones and highlights of the red, green and blue channels of the image. Through using this tool, it provides you with the ability to have great control over the tones and contrast of an image. For example, in this image I used Curves, selected the red channel and made changes to the shadows to correct the colour temperature. For more example about Curves, Adobe’s website has some [ilink url=”http://helpx.adobe.com/photoshop/using/curves-adjustment.html”]great information[/ilink] about using the tool.
For the most part, the final image involved a lot of back and forth edits in curves with layer masks to subtly introduce different parts of the curves to parts of the image. This generally meant bumping the shadows then layer masking it to a particular part of the image (i.e. boosting the shadows for the under pass of the image).
If you enjoyed this post be sure to check out my other posts in this [ilink url=”https://www.alexwisephotography.net/blog/category/technique/before-and-after-technique/”]Before and After Series[/ilink] or if you’re feeling brave, give me a follow on Twitter or Facebook 😉
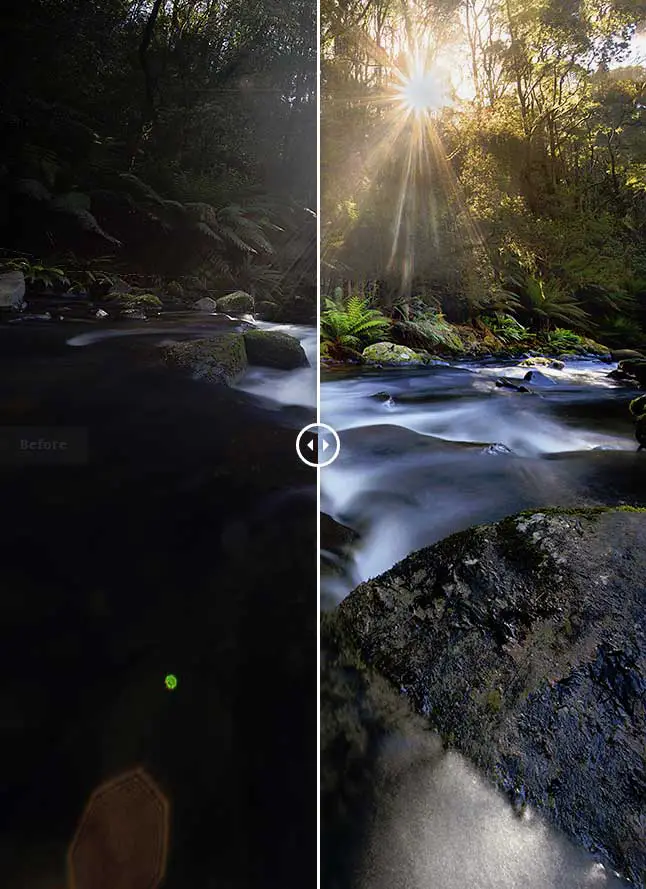
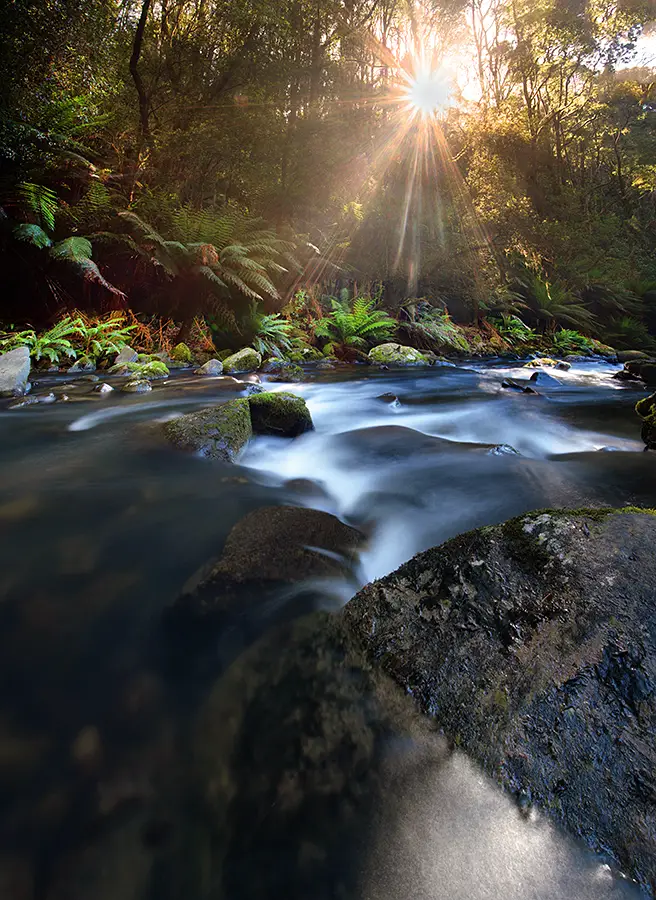
This is an entry for my [ilink url=”https://www.alexwisephotography.net/blog/category/technique/before-and-after-technique/” style=”note”]Before and After series of photographs[/ilink] where I share how I captured and post processed an image. This particular image is from Hopetoun Falls looking back down river of the water that runs off from the main fall. Hopetoun Falls forms part of the Otways Ranges and is a beautiful part of the world. If you’d like to see more photos from this trip be sure to check out my [ilink url=”https://www.alexwisephotography.net/blog/2013/12/08/weekend-trip-down-the-great-ocean-road/” style=”note”]post from the Great Ocean Road[/ilink] which includes this among many.
[twentytwenty] [/twentytwenty]
Capturing and Editing Sunlight at Hopetoun Falls
This is one of those photographs that as a photographer, we view it through our eyes and then when we try to capture it in camera it’s incredibly difficult to replicate what our eye is seeing. On this particular day we had shot the waterfall most of the day under overcast conditions (perfect for photographing waterfalls). Later during our time at Hopetoun Falls, the cloud started to clear and the sun began to shine stunningly through the trees. Rather than pack up my gear like I normally would when the sun starts shining harshly at a waterfall I wanted to try pull off a shot of the sun bursting through the trees.
Taking the Photo
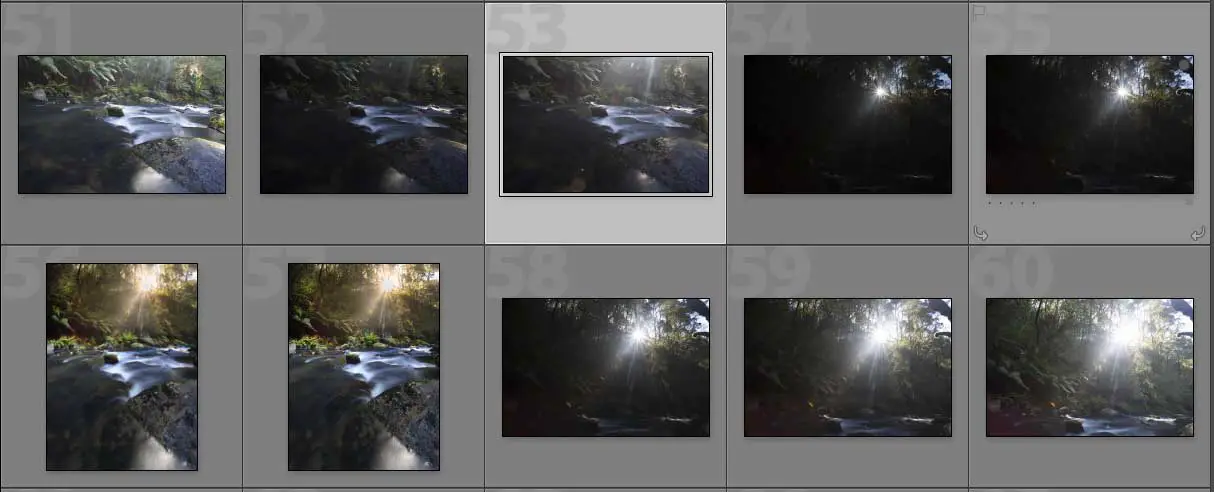
Bracketed images that would be later stitched and combined in Photoshop
Framing the photo straight away I knew if I wanted to get both the stream and sun bursting through the trees in shot I would have to take two photos and stitch them together. Even though I was shooting with a Canon 17-40 it still wasn’t wide enough to fit in the one shot so a two image stitch would be the go. Shooting the images I’m using my Canon 5D Mark II, Canon 17-40, Hoya Circular Polariser and Manfrotto tripod.
I also knew that trying to capture the dynamic range properly in one shot for each stitch was going to be very difficult. Not one to normally use the auto bracketing exposure (AEB) feature on my camera, I opted to take 3 exposures of the top half of the stitch and another 3 for the bottom part of the stitch which resulted in a slight mess of images in my Lightroom catalogue.
In case you’re not familiar with the AEB feature I wrote [ilink url=”https://www.alexwisephotography.net/blog/2013/01/12/automatic-exposure-bracketing-aeb-explained/”]article about Auto Exposure Bracketing[/ilink] a while ago now which explains the feature a little more. I took the multiple exposures as it provided me with some insurance that if I didn’t get it right with the neutral exposure I would also have the under and over exposed images to play with.
Combining and Editing the Photos
When it comes to exposure blending my level of competency is around average so the idea of combining this with a two image stitch was a recipe for disaster. I processed the images from the trip and let the images for this one sit for a while. Normally when I shoot, I like to process my images within 24 hours of taking them. I hate the feeling of sitting on unedited images and like to get them processed, not necessarily to post online but just to have them processed according to how I remembered the scene. For this one, I was actually too intimidated by the prospect ahead and knew I was in for some fun in Photoshop.
It wasn’t until a weekend a few weeks later that I finally decided to give combining and editing the images a crack.
Combining The Photos
Having used auto exposure bracketing to capture an under, neutral and over exposed image for both the top and bottom parts of the frame, I went about creating two image stitches for each bracket.
By this I mean, I created a two image stitch of the two over exposed images, again for the neutrally exposed images and another for the under exposed images. This resulted in 3 separate stitched images consisting of 1 over exposed stitch, 1 neutral exposed stitch and 1 under exposed stitch.
When stitching images, most people tend to recommend various different pieces of software like PTGui but I’ve had quite good luck with the Photoshop stitch tool. This can be found under File > Automate > Photomerge.
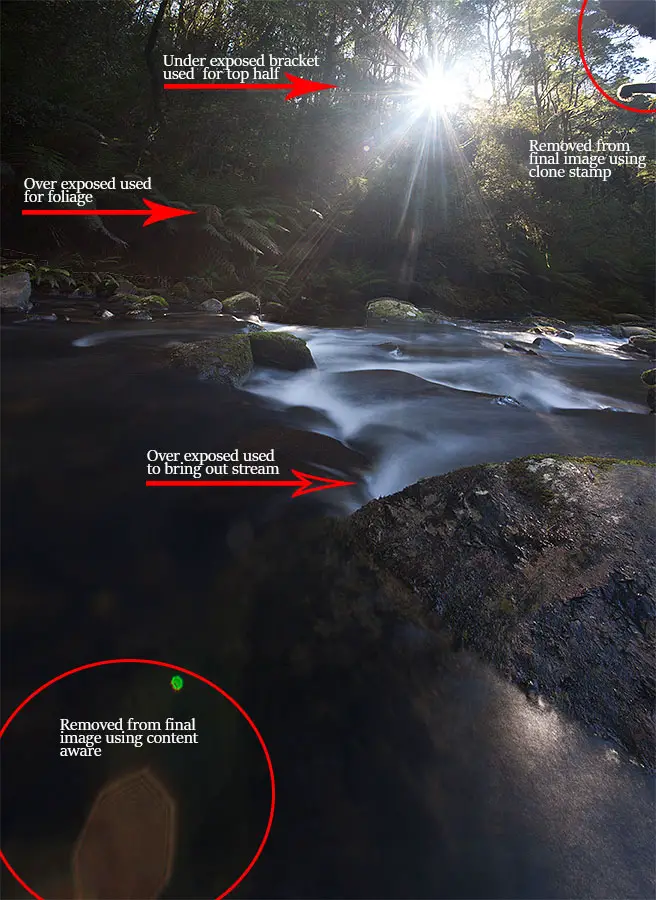
Now that I had these 3 separate image stitches of each exposure, I went about opening the neutral image in Photoshop and layering the over and under exposed images as layers on top. The over exposed image would be used to bring out the dynamic range in the foliage surrounding the waterfall and the waterfall itself while the under exposed layer would be used to capture the sun bursting through the trees. Luckily, it wasn’t as hard as I originally thought but just required a lot of low opacity layer masking to subtly bring out areas of a layer. The hardest part was blending the sun into the shot which required me to use a combination of the brush tool and gradient masks to ever subtly drop it back in without it looking uneven to the rest of the scene.
I’ve attached a screenshot to the right which highlights the different parts of the image where layer masks from the 3 images were used. Call me lazy but I’ve become a fan of the [ilink url=”http://tv.adobe.com/watch/learn-photoshop-cc/using-contentaware-fill-to-remove-distractions/”]Adobe Photoshop Content Aware Tool[/ilink] which for the most part works perfectly. Generally if this doesn’t work I’ll revert back to the [ilink url=”https://www.youtube.com/watch?v=MY023ZQJy0M”]Adobe Clone Stamp Tool[/ilink] to remove unwanted distractions like the branch in the corner and lens flare at the bottom of the stream.
Once all the images were blended in, I then went about making selective adjustments to the saturation and individual colour channels to colour grade parts of the image. I’m fond of using layer masks for saturation changes as it allows you to increase or decrease the saturation or change the hue of a particular area in the image without affecting the overall photo. For this image, I used selective saturation and hue adjustments to both the water and foliage areas.
Finally some cropping was applied to the image and a warming filter was applied to add some warmth to the sunburst coming through the trees. With this I used a layer mask to ensure changes with the warming filter were only limited to the sunburst and not the rest of the image.
And that’s that. Something I learnt from this photo was that sometimes it’s okay to sit on an image and procrastinate about it rather than process it immediately. Sometimes I should probably do a bit more often.
Over the coming months I’d like to share with you some before and after images of shots I’ve taken over the years. I’m a firm believer that there needs to be transparency in photography and the days of photographers hiding away secrets is done. Sorry to the old guard and old rules (oh yeah I just quoted Jay-Z in a post). Sure, there’s some aspects of photography that can’t be taught but I for one enjoy a behind the scenes look of how other photographers work. It’s both beneficial to people starting out and people who have been shooting for sometime. I shoot quite a bit with various people and find even though we’re shooting the same thing and processing quite similarly, there’s always subtle differences and it’s that what I hope to capture in my posts.
Through these before and after images, you will sometimes find that there is a dramatic change between the straight out of camera image and the final image you see on my website. While in others there may be minimal difference. For me, this is highlighting that we aren’t always fortunate to get great light while in other cases we are fortunate for the get great light and walk away with great photos in camera.
I’d like to use this as an opportunity to demonstrate how the image looked prior to my processing and briefly explain the processing techniques I used to achieve the final image. In some cases, the final image won’t be to everyone’s tastes and I fully accept and welcome that so feel free to chime in if you have any criticism of how you may have gone about things differently.
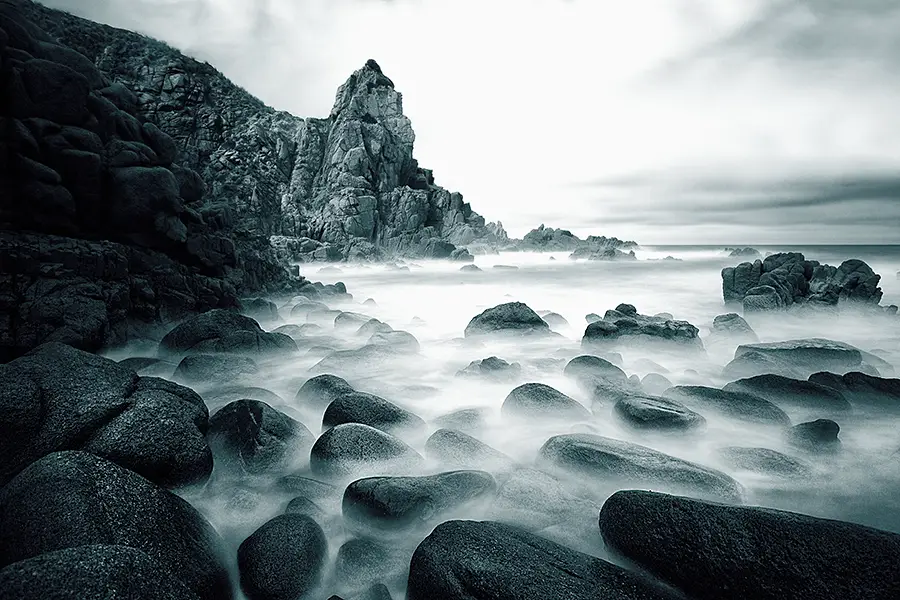
Using welding glass to create a daytime long exposure at Cape Woolamai
Look I won’t lie, I’m a light snob and when Ricardo Da Cunha told me at 7am that we weren’t heading down to the Yarra Valley to capture some nice fog lit forrests but instead down to Phillip Island I did raise my eye brows slightly. One of the things I’ve learnt over time is that for certain scenes, there’s not much point pulling your camera out unless it’s at certain times of the day. For waterfalls I generally find they’re best when the weather is overcast and miserable while for seascapes I prefer to shoot around sunset/sunrise to capture the golden hour light and colours that unfold. So with this in mind I smiled and thought I could at least resurrect the situation with some day time long exposure shots but that didn’t quite turn out to be. More on that later.
On our way down the idea was to catch up with Andrew Sharpe who has only just recently purchased a Phase One setup. I’d not seen one in the flesh and while not tempted myself, it’s a beautiful camera and I’m envious. Personally speaking, I’m a too rough with my camera’s and also like to get a little too close to the action like the time I lost my camera to a waterfall… So the idea of walking around with a camera worth upwards of $20,000+ alone would scare me. Hell, sitting on the train with a bag of camera gear can be nerve wracking enough. But either way, it was a beautiful camera and the results it puts out are stunning.
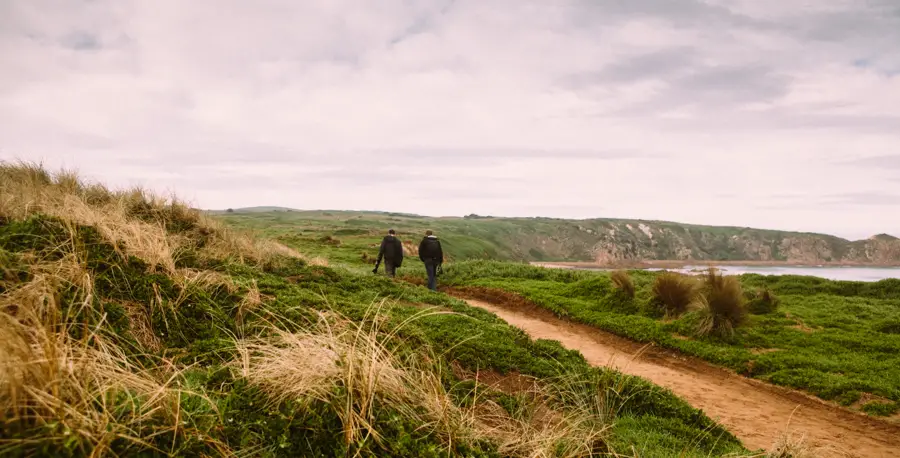
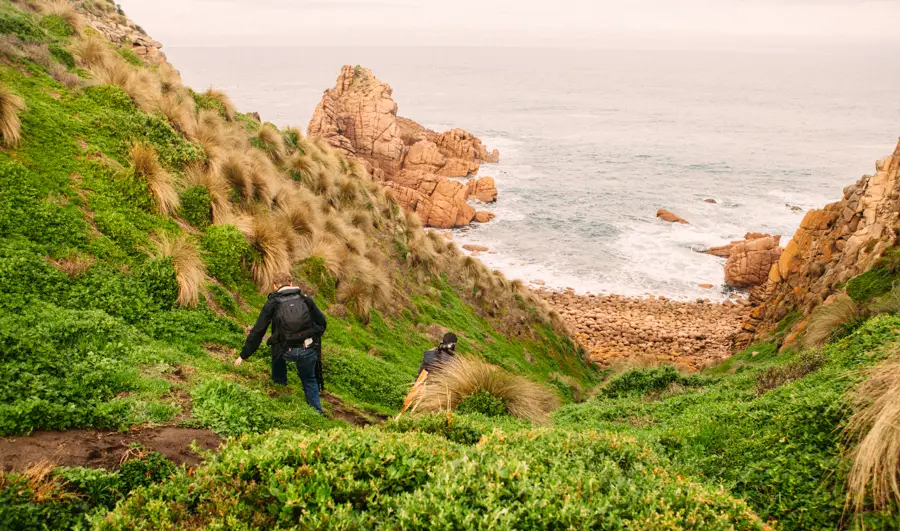
The walk into the Pinnacles is stunning and a must visit if you’re ever down Phillip Island wayAh… The lovely muddy descent down to the Pinnacles. Always a pleasure.
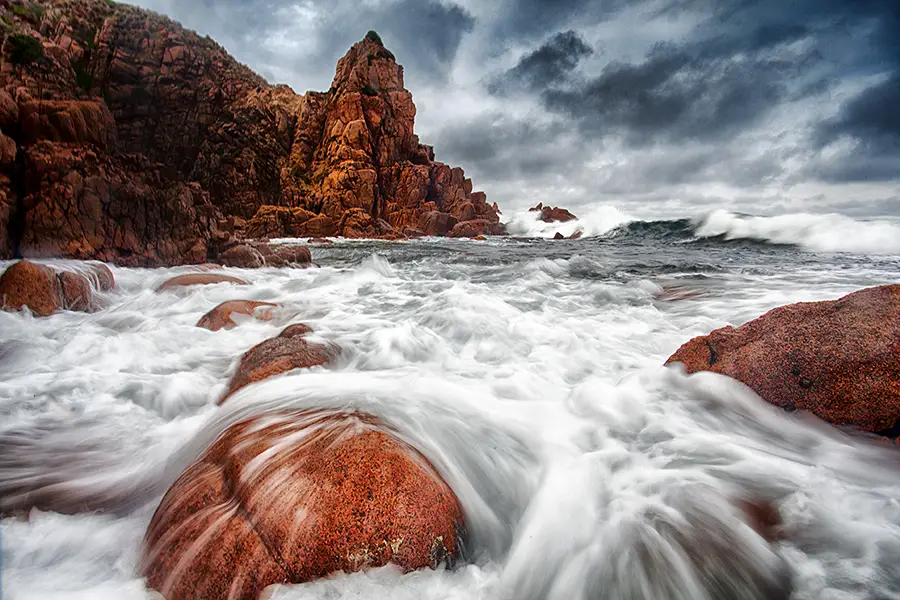
I’ve been down to the Pinnacles at Cape Woolamai only the once and it’s one of my favourite places for seascape photography in the state. There’s something about walking down the beach for a km or two and finally making your way to a set of stairs then walking further before you begin to descend down into the Pinnacles. A private little bay where the waves are endless and wild. It’s one of those places that never disappoints and would be hard to take a bad photograph. A must visit for any travelling photographer who is interested in seascape photography.
We made our way down to Cape Woolamai and the sky was overcast with not much going on. I quickly learnt that I had left my B+W 110 10 stop filter at home. The filter that I thought would allow me to at least capture a couple of frames using day time long exposure effects and resurrect the trip. Bit of a dampener but I quickly remembered that I had a Hoya R72 (infrared filter also great for long exposures) and some welding glass in my camera bag. I’ve blogged about using welding glass in the past with this post about using welding glass as a DIY neutral density filter which explains what welding glass to purchase and how to remove the colour cast from your shots.
With lighting conditions quite diffused from the overhead cloud this allowed me to capture the movement of water through some short long exposures using my Cokin Z-Pro filters like the shot below which involved the use of a .9 Cokin graduated neutral density filter. Some more information on the different types of filters out there and how to use them can be read on a recently posted blog post in case you are interested in further information.
Cape Woolamai
We didn’t hang around too long and ended up making our way back to Melbourne by lunch time. Would I shoot seascapes again during the day? Probably not but it’s a good slap in the face for me to be less of a light snob and get out there in conditions that are less ideal and make the most of what you are given. As opposed to only shooting locations when the conditions align.
Although that being said I find this seems to be one of the biggest mistakes I see for beginner photographers – not shooting according to the conditions and expecting to go out in the middle of the day and walk out with nice photos. If you are starting out I’d recommend learning what conditions work best for certain conditions and shooting around this time. So if you’re keen on shooting a favourite beach, find out if it is sunset or sunrise facing and get down there at that time as opposed to the middle of the day where you will be battling strong light or dull skies. Just don’t become a light snob like me 😉

